
Chapter 7 Git
In the previous chapters, we learned to organize all our files and data in a well structured and documented repository. Moreover we learned how to write readable and maintainable code.
However, as the number of files and lines of code increase, it is more and more difficult to maintain full control of our project. We need some tools to help us managing this process. In this chapter, we introduce Git, a software for tracking changes in any file during the development of our project. In Chapter 8, instead, we introduce GitHub, a dedicated Git hosting services that allow us to collaborate with other colleagues using shared remote repositories.
7.1 Version Control
As our projects get more complex, we quickly end up writing thousands of lines of code. During the development, we create several scripts and define many functions; we continuously revise the code, adding new parts, removing others, and making any sort of changes. In particular, when collaborating with other colleagues, this whole process can quickly became very chaotic. We will likely end up with a messy project with multiple copies of the same files (e.g, my-script-2, my-script-5-rev, my-script-10b-rev-adjust and other crazy names). In this scenario, any file conflict or error in the code would results in endless hours trying to figure out the problem and restoring the project to the previous working state could become a real adventure. We need something that helps us managing and tracking our projects during their development.
Fortunately, we do not need to invent anything. Programmers have already faced these issues for years and their answer is “version control”. Version control software allow us to track the files in our project saving all changes and managing collaboration with other colleagues. In particular, version control have the following advantages:
- Tracking Files. All changes to the project files (creation, deletion or modification) are recorded keeping track of which were the specific changes, who made them, when, and why. In this way, we obtain a detailed history and complete traceability of the project development. Moreover, we can easily check earlier version of the project and if something goes wrong we can restore the project to any previous status (see Section 7.2.1).
- Managing Collaboration. By sharing an online repository, multiple colleagues can contribute to the development of the same project concurrently. They can work independently on their local machine and then add their own contributions to the shared repository. Version control software manage this whole process in a smooth and efficient way, ensuring no conflicts between the different contributions. A conflict occurs when two colleagues modify the same line in a file (see Section 7.2.2).
- Branching. During the development, we can create different branches (like the branches of a tree) that diverge from the main line of development. Each branch is independent allowing us to make changes without affecting the other branches or the main line of development. When ready, we can integrate all changes into the main line by merging the desired branch. Branches are commonly used to develop new features, solve issues, or make experiments safely without worrying about braking the code. Only when a only when a stable solution is obtained, we integrate branches into the main line of development (see Section 7.2.3).
Version control software are the solution for managing projects development in an efficient and secure way and Git (https://git-scm.com/) is the most popular version control software. Therefore, let’s learn how to use Git.
7.2 Git Overview
First, we describe the main idea behind the git workflow introducing all the elements, concepts, and technical terms.
7.2.1 Tracking Files
Using Git, we can track the files in our project saving all changes. In Git terms, we define this process as creating a commit (or committing). Note that creating a commit is much more than simply saving in the traditional terms (i.e., overwriting existing files or creating new files). Creating a commit, we keep record of the exact changes (creation, deletion or modification) to each file. We can think of a commit as a snapshot of all the files in our project at that exact point in time.
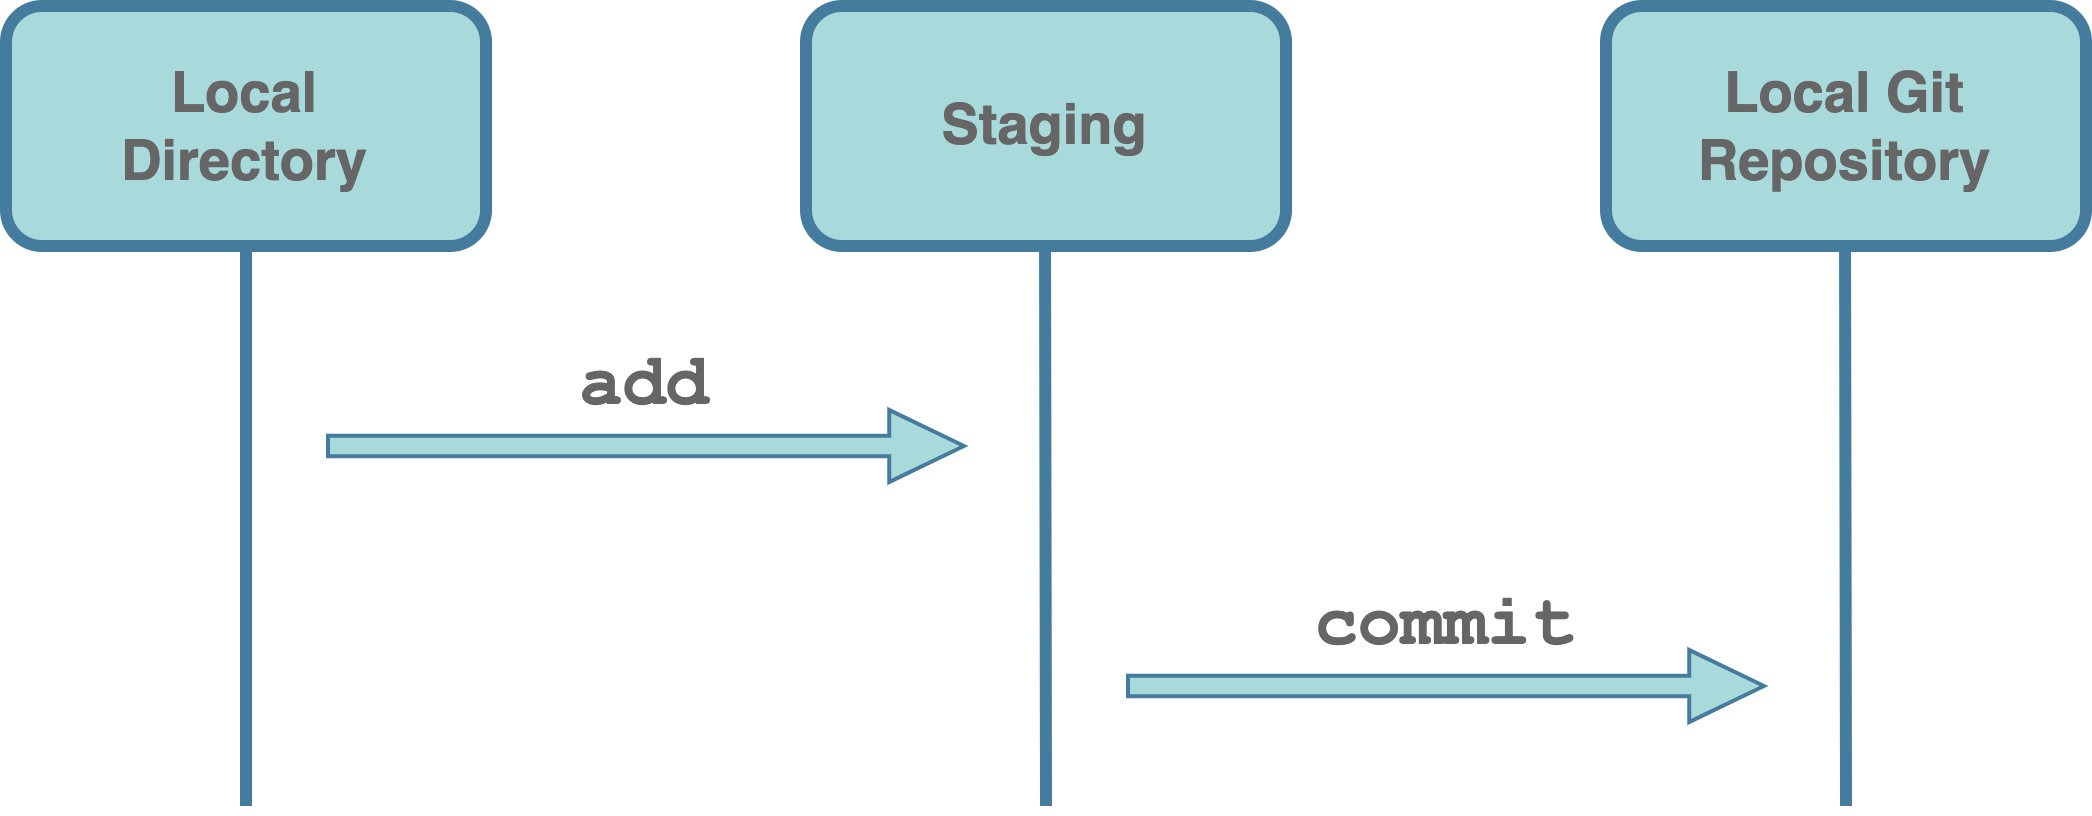
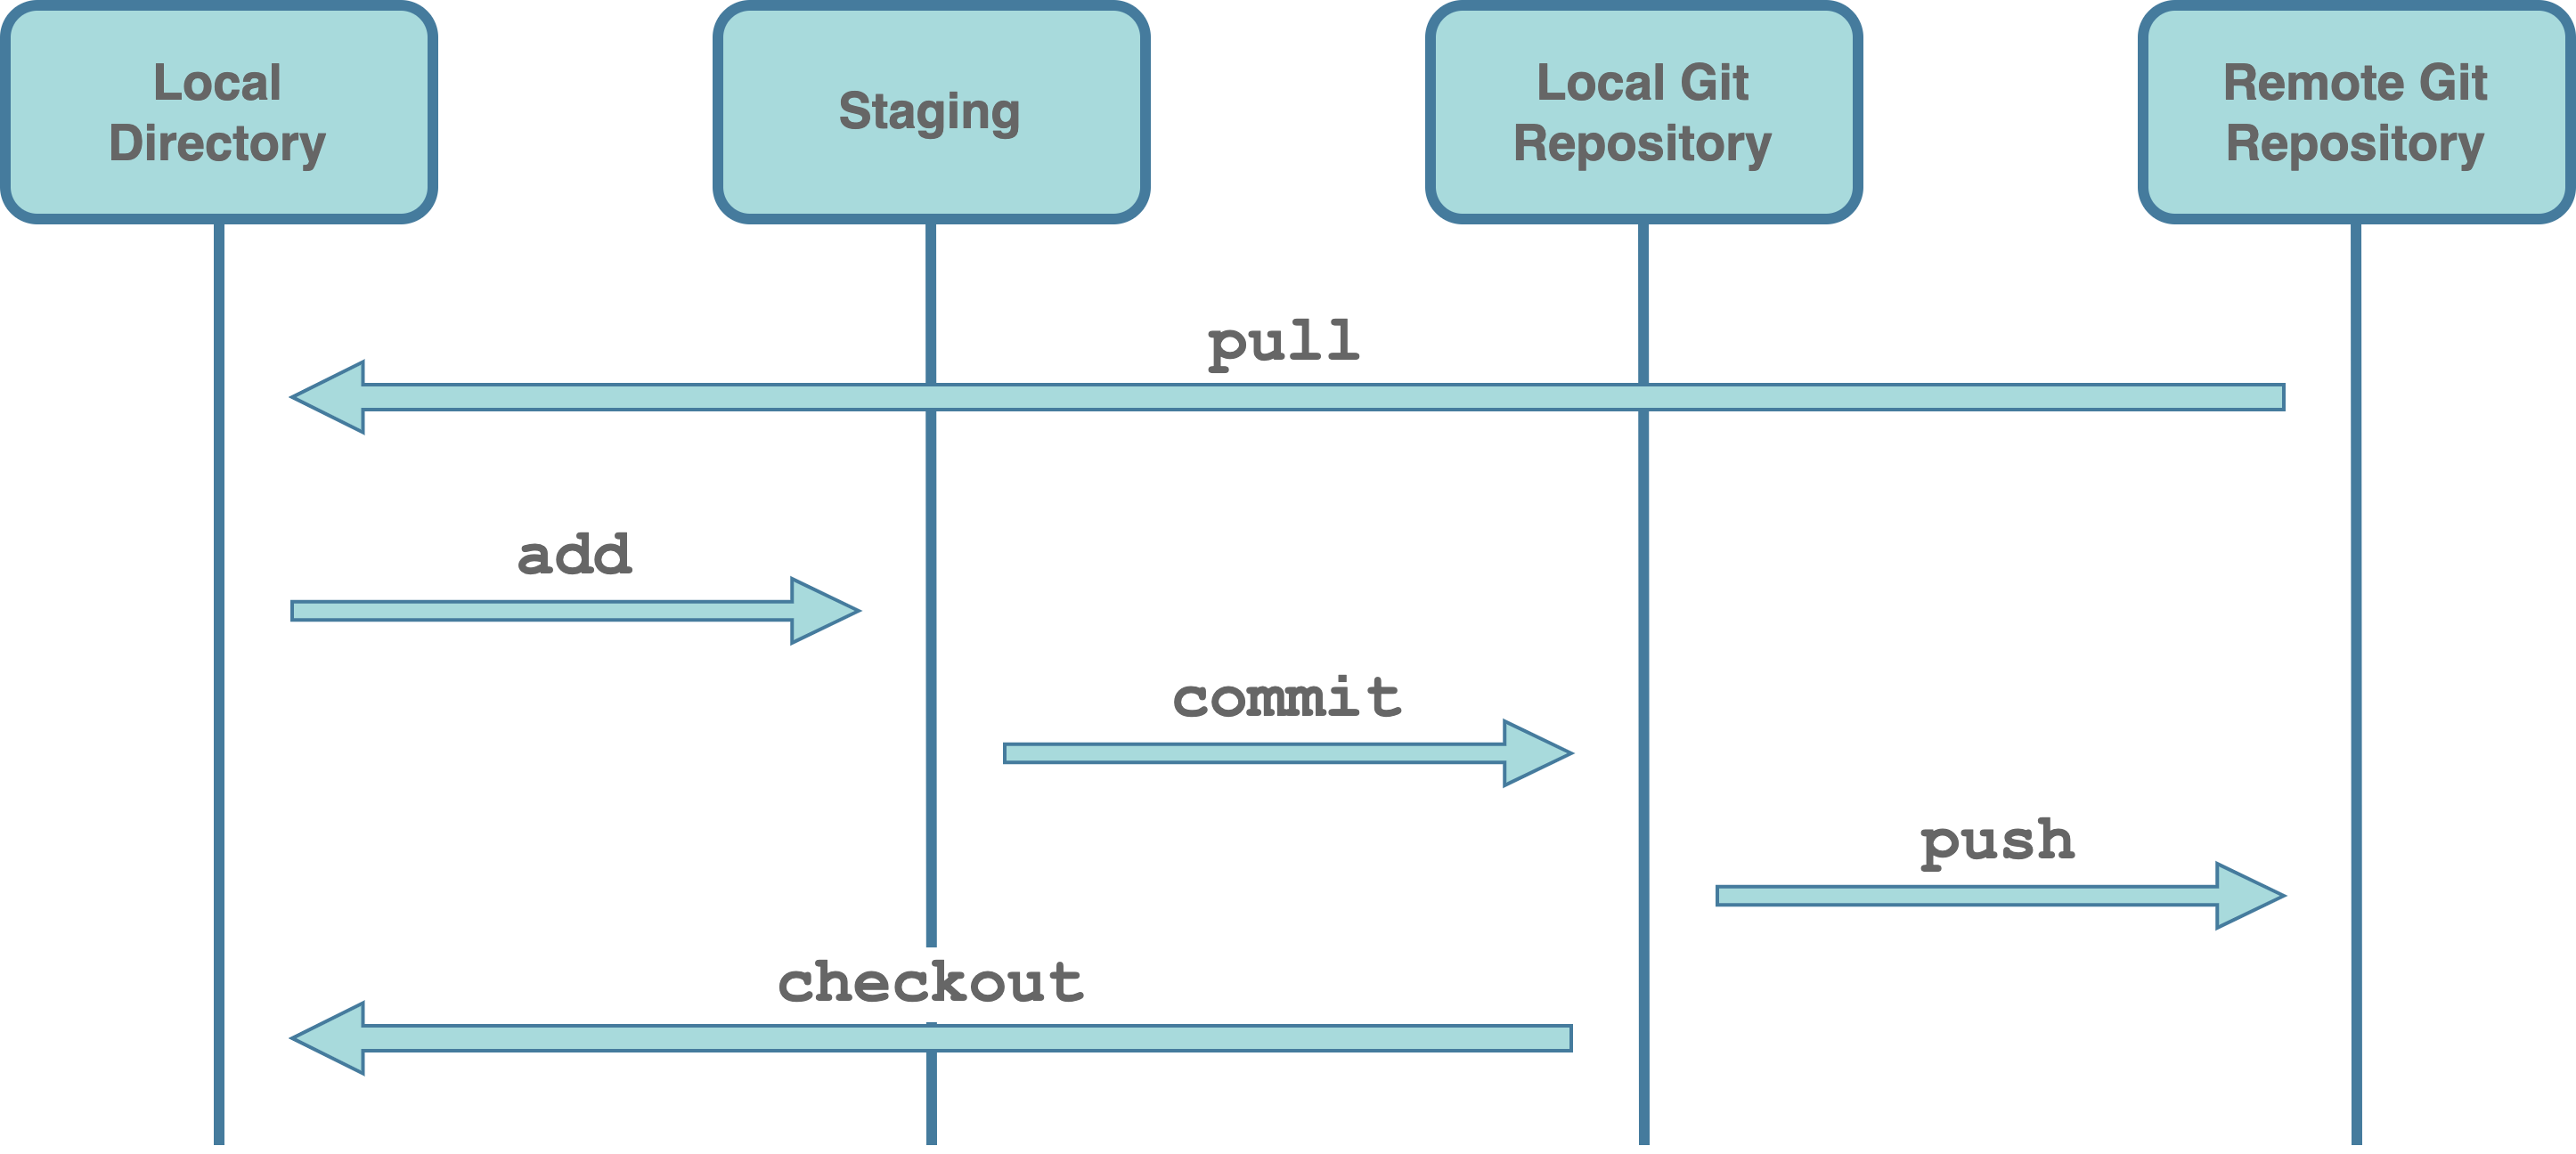
Creating a commit requires a two step process:
add. First, we need to add the desired files to the staging area. We can think of the staging area as a waiting room for the files ready to be committed. This is used to indicate to Git which files from our local directory we want to include in the next commit. In this way, we can group together in the same commit only related files, logically splitting changes into different commits.commit. Next, we proceed creating the actual commit. Git captures a snapshot of the currently staged files and adds the commit to the timeline in our local Git repository. The local Git repository is simply an hidden directory (i.e.,.git/) within our project used by Git to store all information and files required for version control.
Commit by commit, we create a timeline with the whole history of our project. We can visualize this process as in the following figure, where each circle represents a commit and we called the principal timeline master (more on this in Section 7.2.3).
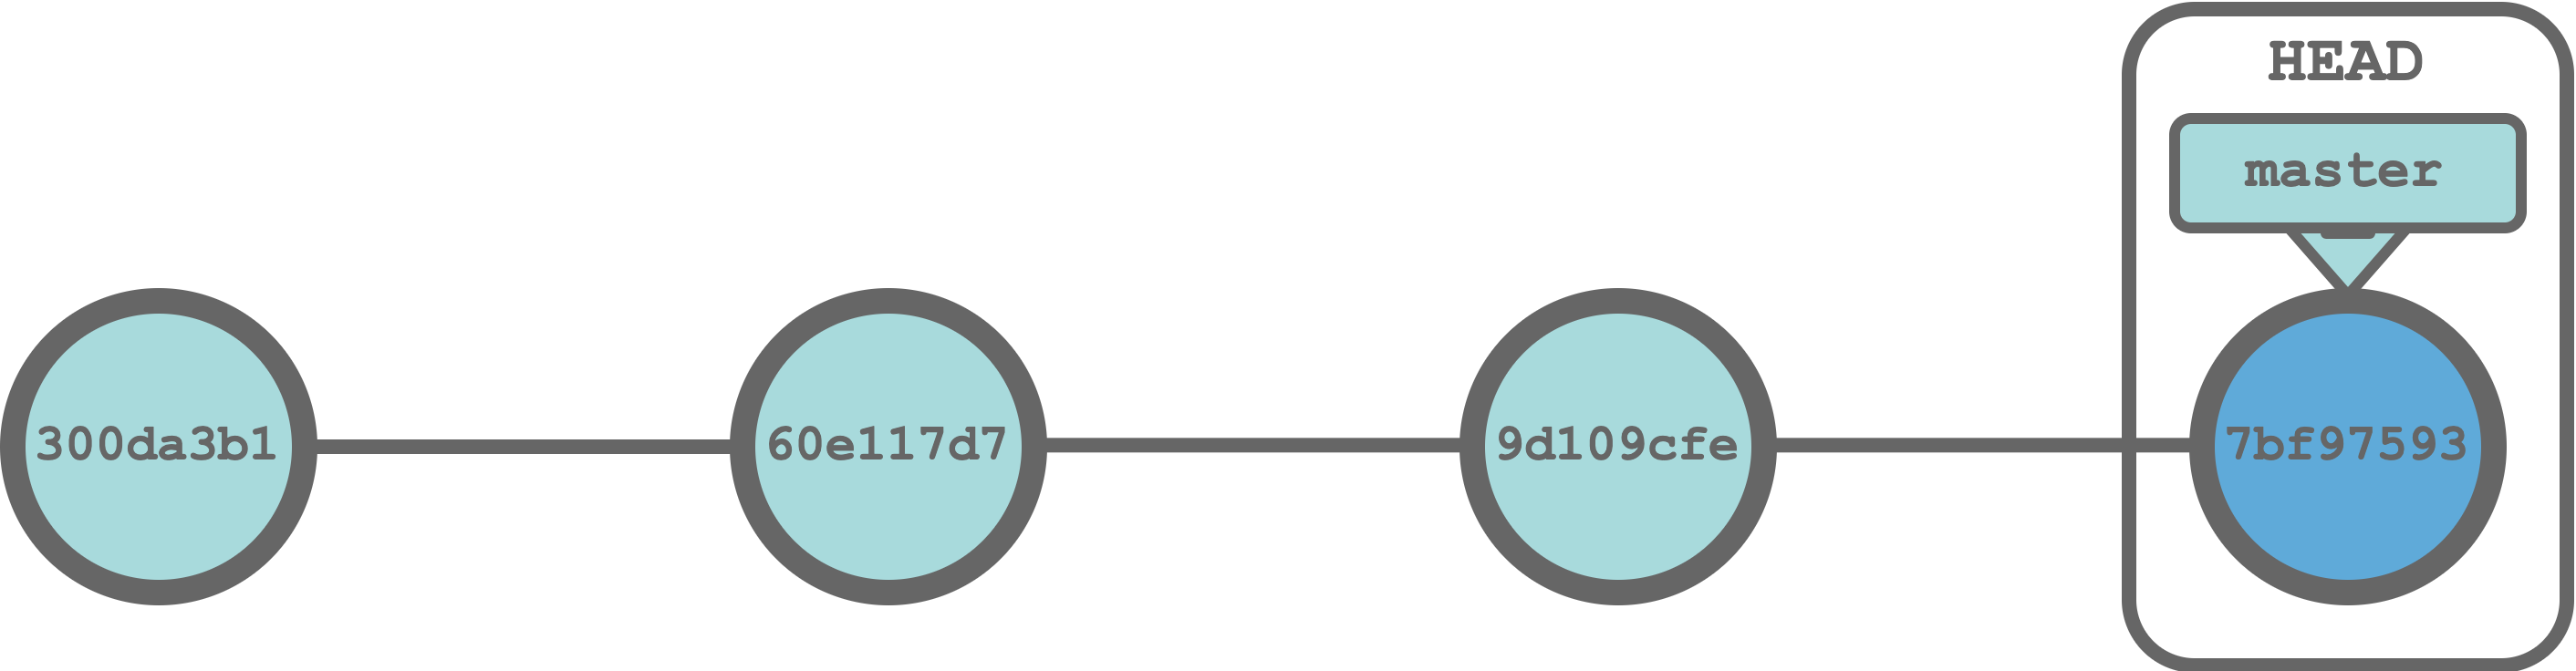
HEAD indicates the current commit we are viewing, in our case, the last commit in the timeline. Moreover, each commit is identified by a unique SHA-1 hash ID (i.e., an alpha-numeric sequence). We can use these IDs to move along the project timeline as if we had a time machine.
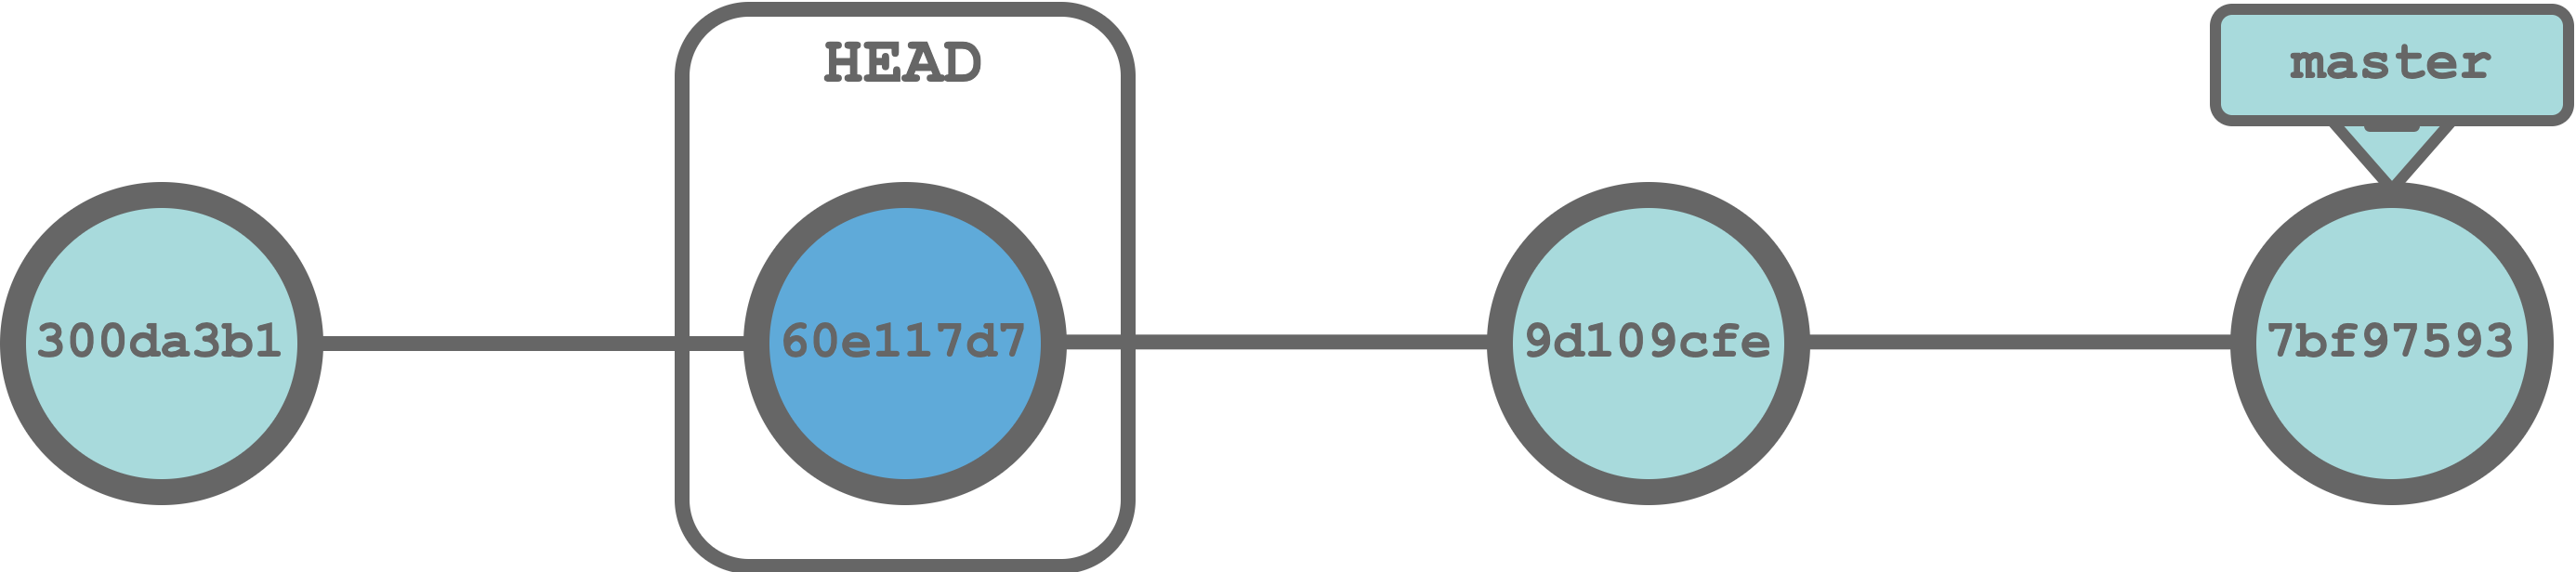
Imagine we have found some unexpected issues in our code and we want to move back to a previous commit to check if at that point in time everything was fine. We can move our HEAD to the desired commit and, as if by magic, all files in our project will be restored to their previous versions at that exact point in time. Of course, we can subsequently move again the HEAD to the last commit restoring the files to their present version.
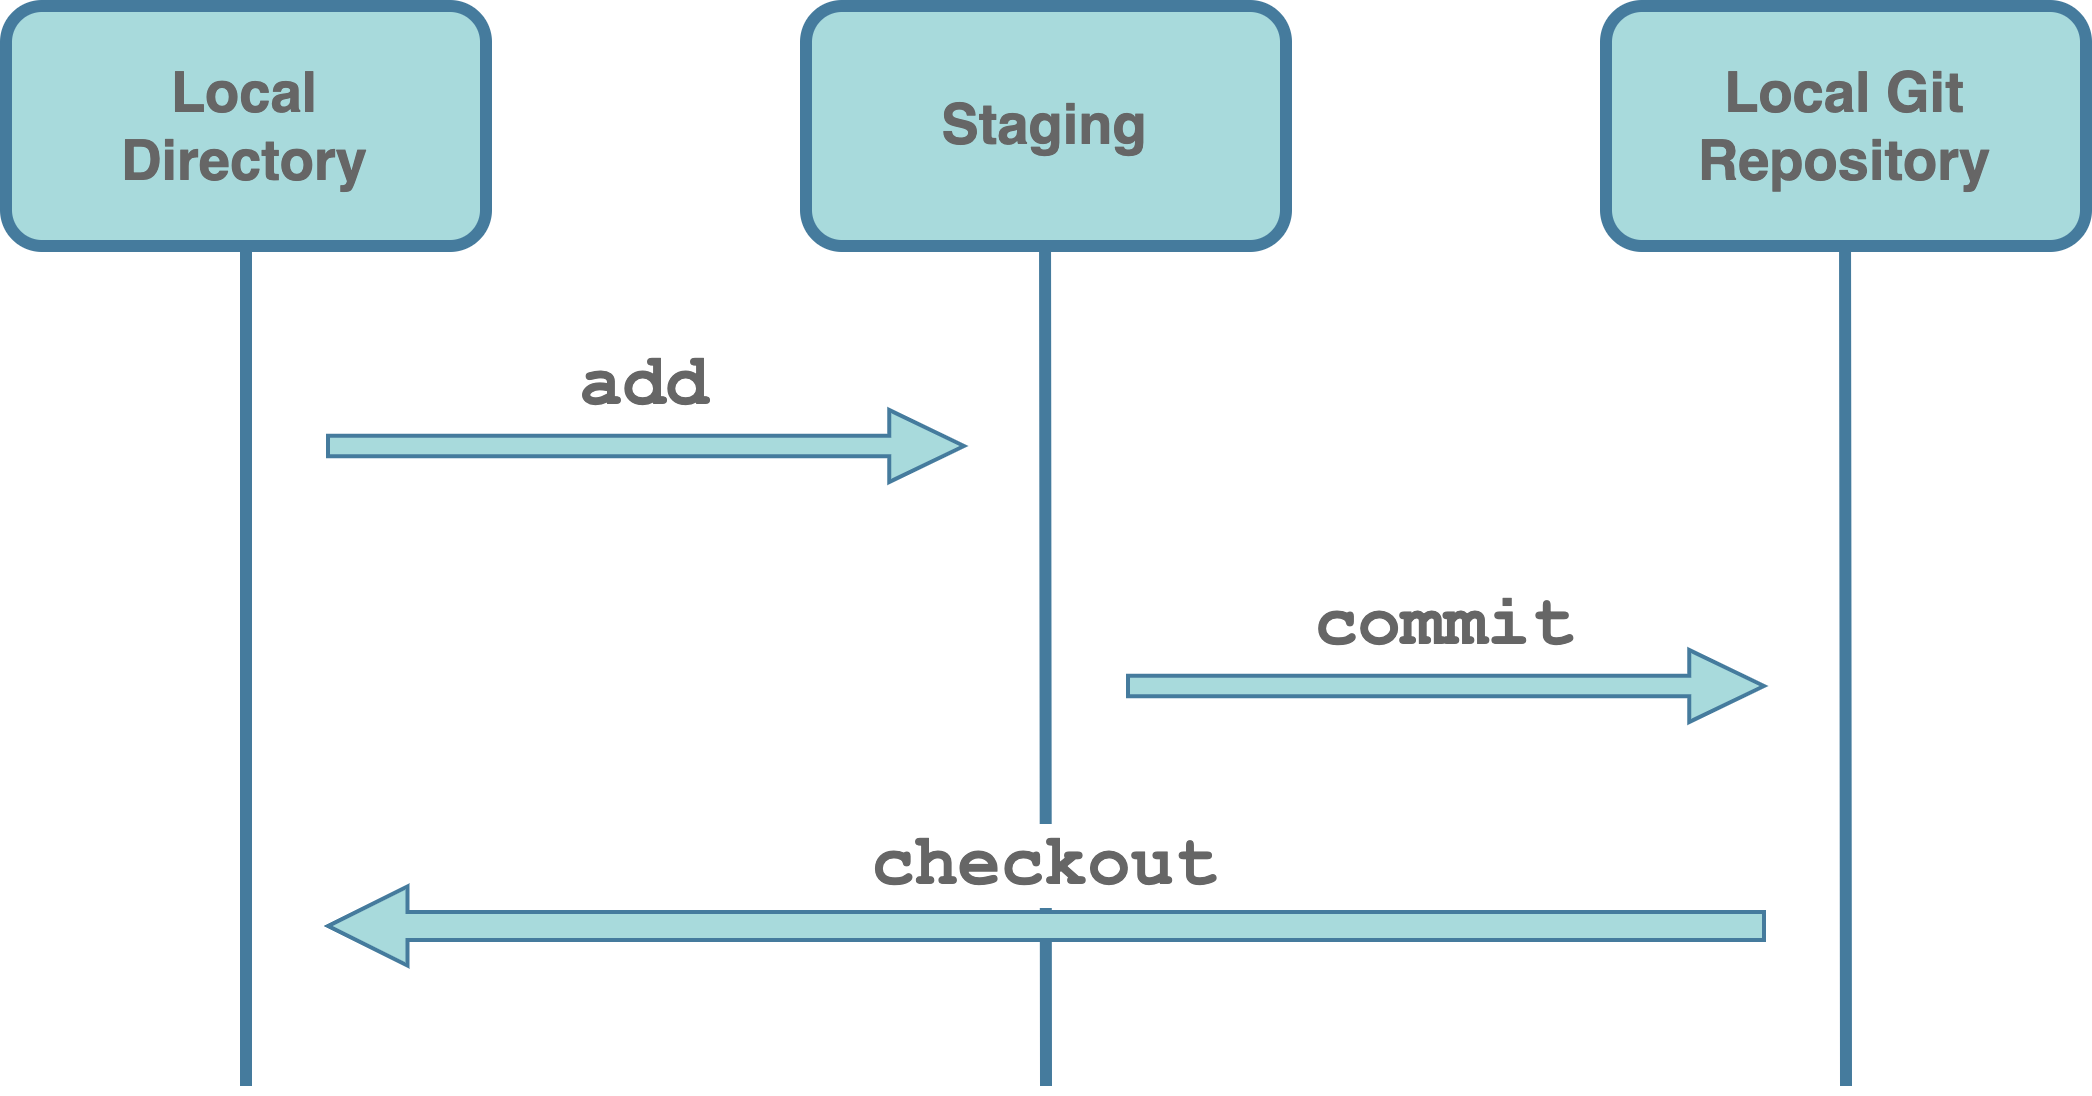
In Git terms, we define the process of moving the HEAD to restore a specific commit status as:
checkout. We can restore any commit status in our timeline. Git uses the information in the local repository to restore all files in our local directory to their versions at that exact point in time.
7.2.2 Managing Collaboration
So far we described the workflow of a single user working only on his/her local machine. Even if we work on our own only on our local machine, using Git is always highly recommended as allows us to keep track of our project development. However, when we collaborate with other colleagues, Git show all of its power.
To collaborate with other colleagues, we need to share the Git repository. Therefore, we will have:
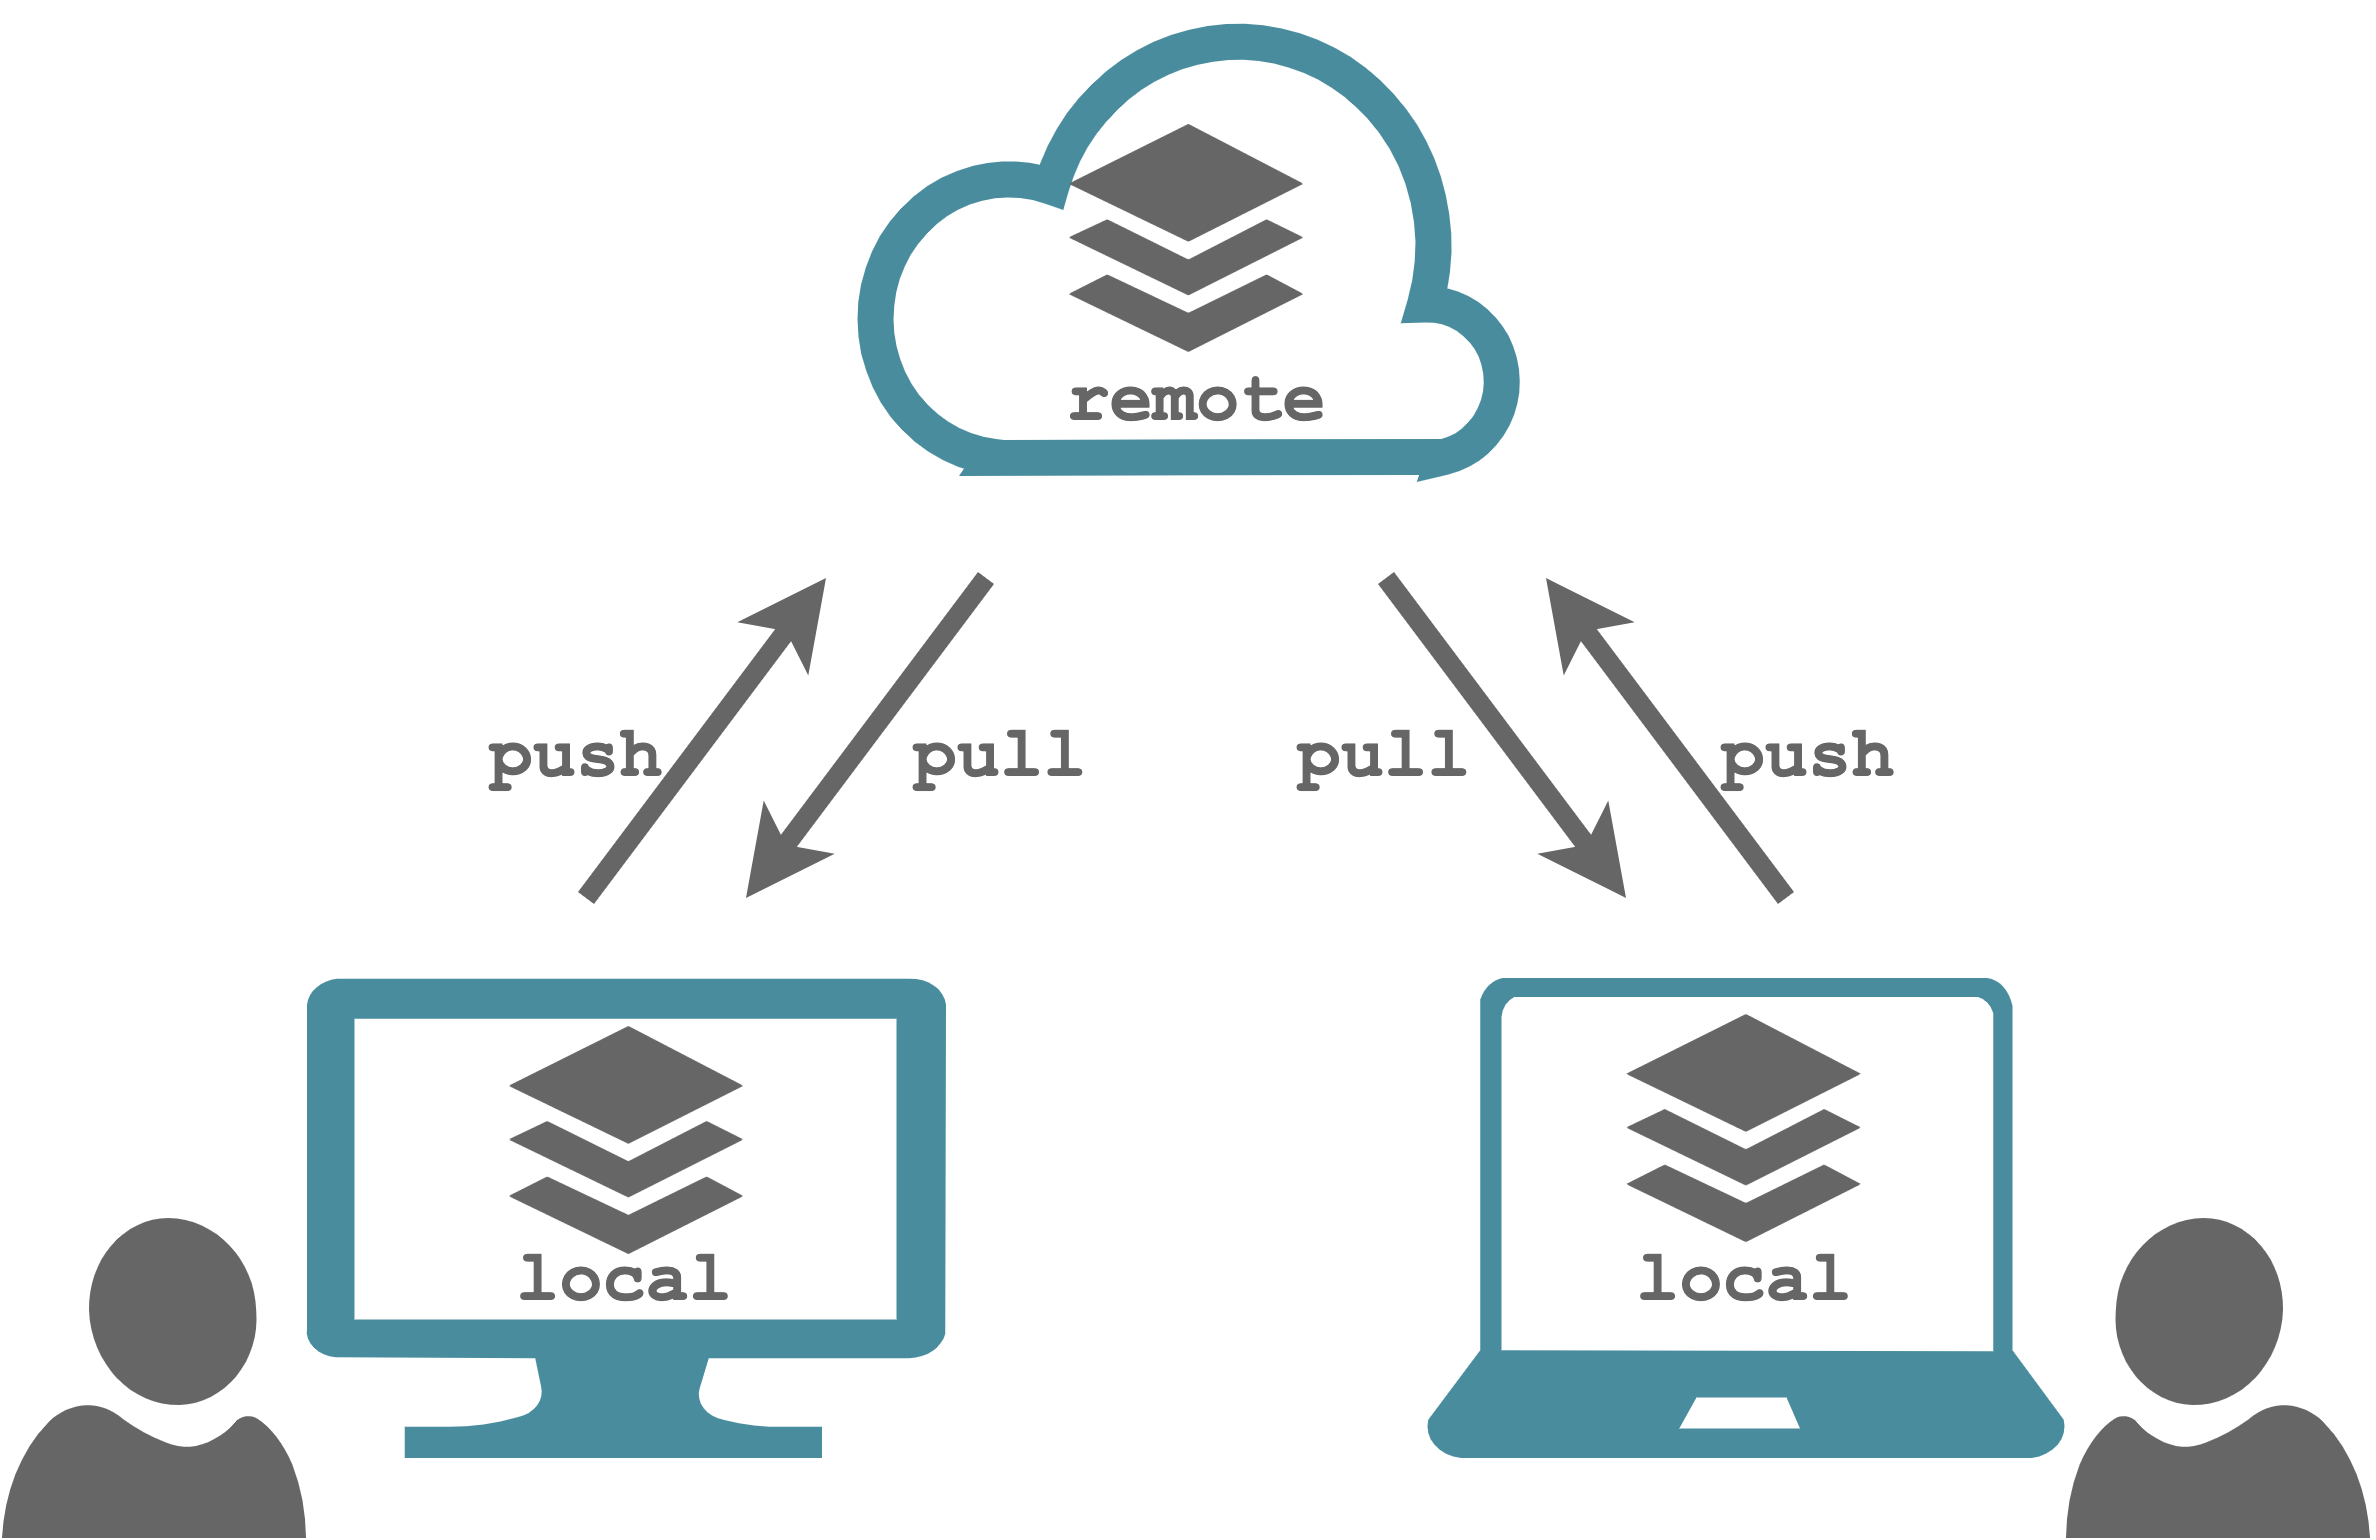
- Remote Git Repository. The Git repository shared between all colleagues that is used as reference. This is usually available on a online service (e.g., GitHub, GitLab, or Bitbucket; see Chapter 8) or a private server. Note that, for Git to work, we need to share the repositories on dedicated Git hosting services. We can not use common cloud storage services (e.g., Google Drive or Drop Box) as they do not have Git running behind.
- Local Git Repository. Each colleagues has his/her own copy of the remote Git repository on his/her own local machine.
Colleagues can work independently on their own local repository as usual, making all sort of changes and create multiple new commits. Once finished, they can share their work with other colleagues by uploading their new commits to the remote repository. Next, other colleagues can updated their local repository by downloading the new changes from the remote repository. In particular, we have two actions:
pull. Download the new commits in the local repository from the remote repository.push. Upload the new commits from the local repository to the remote repository.
Git automatically manages this whole process in a smooth and efficient way. In particular, Git checks for:
- Pull First. Git do not allows us to push our commits if detects in the remote repository new commits that are not available in our local repository. This is usually due to other colleagues pushing their commits. Git force us to integrate these commits by pulling from the remote repository and next push our commits. In this way, Git ensure that there are no conflicts between our commits and the new commits from other colleagues.
- Solve Conflicts. A conflict con occur when we integrate changes from other colleagues (or merging branches; see Section 7.2.3) and two different commits modify the same line in a file (or one commit deletes the file and the other edit the same file). In this case, Git is not able to automatically integrate the changes. Therefore, before pushing our commits, Git ask us to explicitly solve any conflict by choosing which of the two versions to keep.
Summarizing, when collaborating with other colleagues on a shared repository, the workflow proceed as follow. First, we pull latest commits from the remote repository to our local repository. Next, we keep working as usual developing the project and creating new commits in the local repository. Finally, when we reach some stable point in the development, we push our new commits to the remote repository.
Remember,
Always pull first!
This must be the first thing we do at each session as it is important to always work with the latest project version. If we forget about it, we may end up relying on old code versions introducing several issues.
7.2.3 Branching and Merging
Imagine we are working with other colleagues on the development of different features. Ideally, we would be able to develop each feature independently of each other and integrate everything together when ready. In this way, we could avoid continuously running into conflicts or other issues. Alternatively, suppose we got a wonderful idea to improve our project but this would require some drastic changes and we are not sure if this idea would be successful. Ideally, we would like to work on a separate copy of our project allowing us to shift back to the original project if something goes irremediably wrong.
Git has two incredibly useful features designed to facilitate the workflow in both scenarios described above:
branch. We can create independent streams of development. In Git terms, these are called branches (like the branches of a tree). Branches allows us to work concurrently on different features (or projects ideas) without letting changes in one branch to affect the other branches. We need to assign a name to each branch and a standard convention is to name the principal branchmaster( ormain; these are just names without any special meaning per se). We can subsequently move ourHEADto shift from one branch to another. Files in our local directory will be restored according to the specific branch stream of changes. In the figure below, we can see an example of a Git history with three branches where theHEADis currently pointing tobranch1.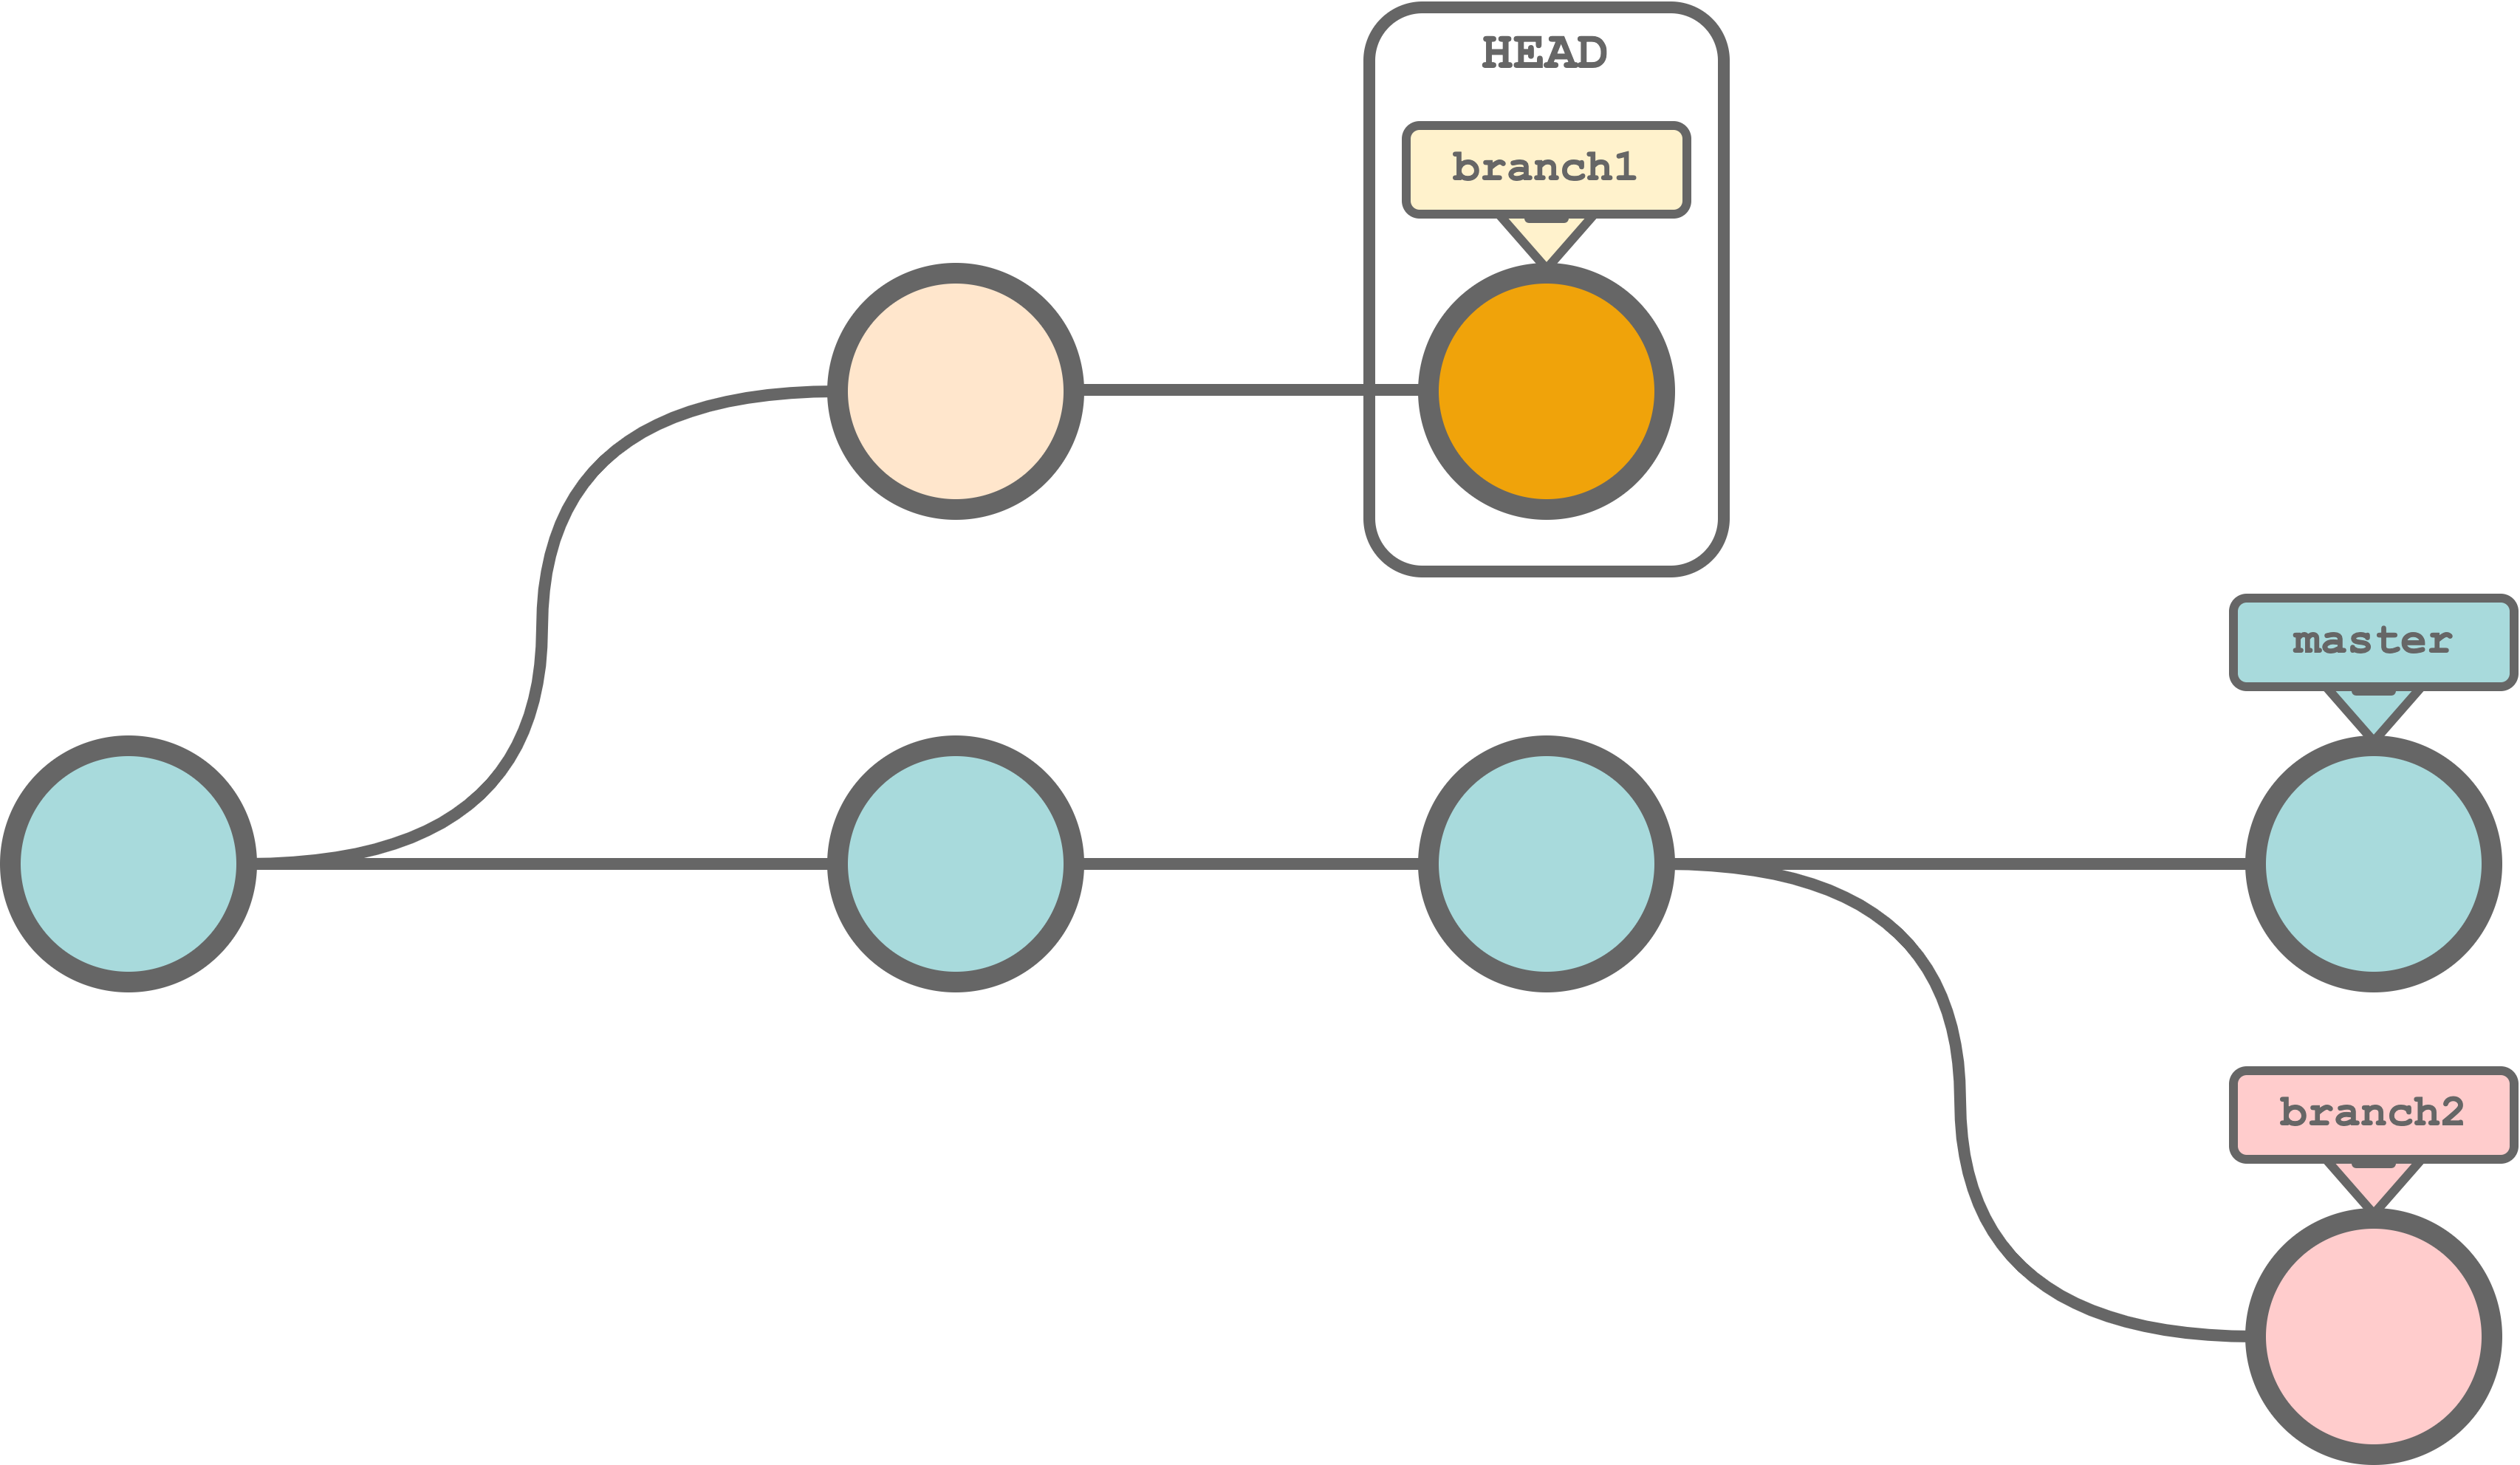
merge. At some point, we may want to integrate changes from different branches. In Git terms, we merge one branch into another. In this way, we can develop different features (or projects ideas) independently and merge them when ready. Before merging, Git will check for conflicts between the different branch commits. In case of conflicts, Git will require us to explicitly solve them by choosing which of the two versions to keep. In the figure below, we can see an example of a Git history where thebranch1is merged back intomaster.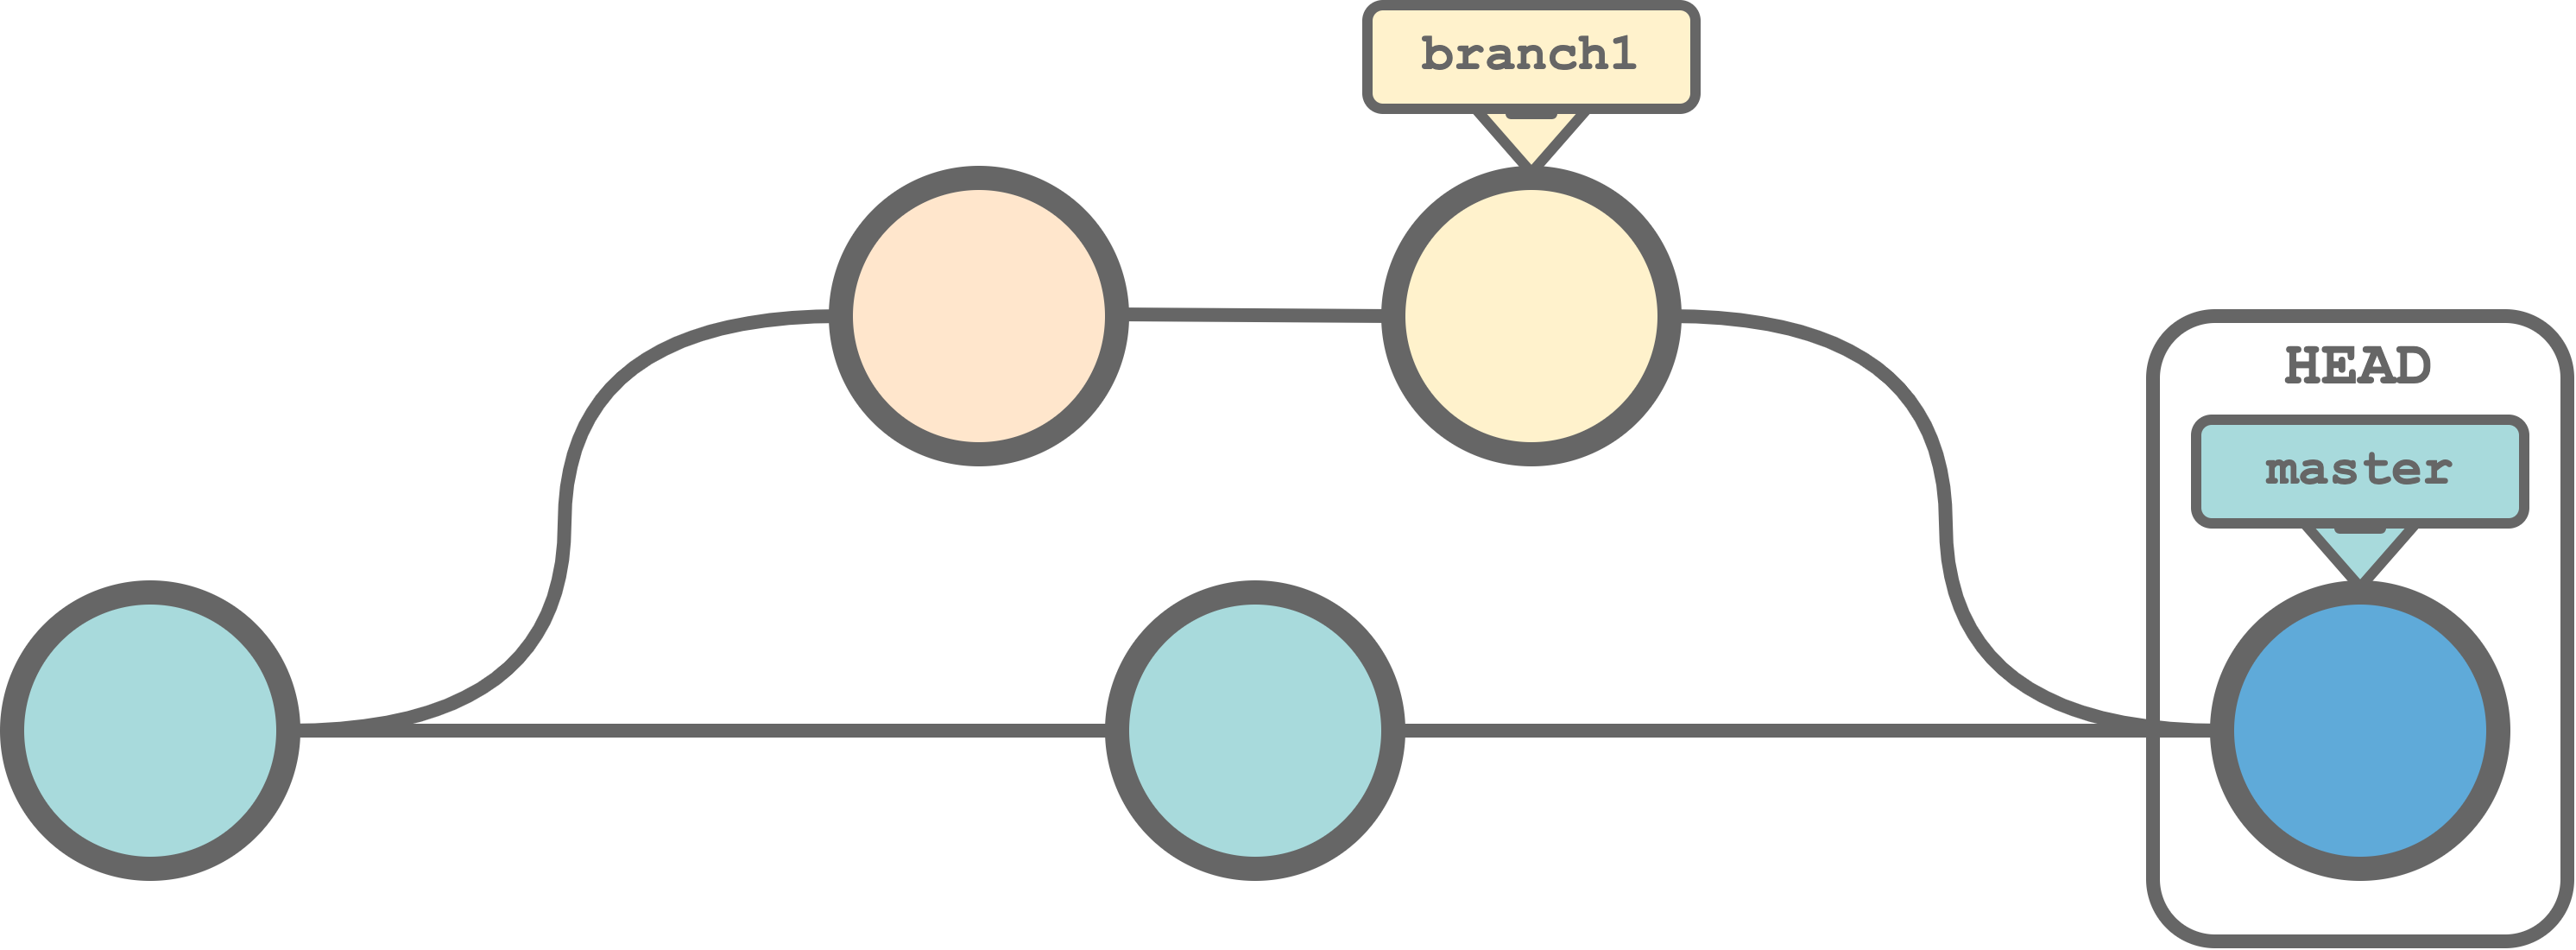
Note that the directionality is important. Branches are not mixed together creating a single branch, but commits in the timeline of one branch are integrated in the timeline of the other branch. Therefore, considering the previous example, we would obtain the following timelines for the two branches.
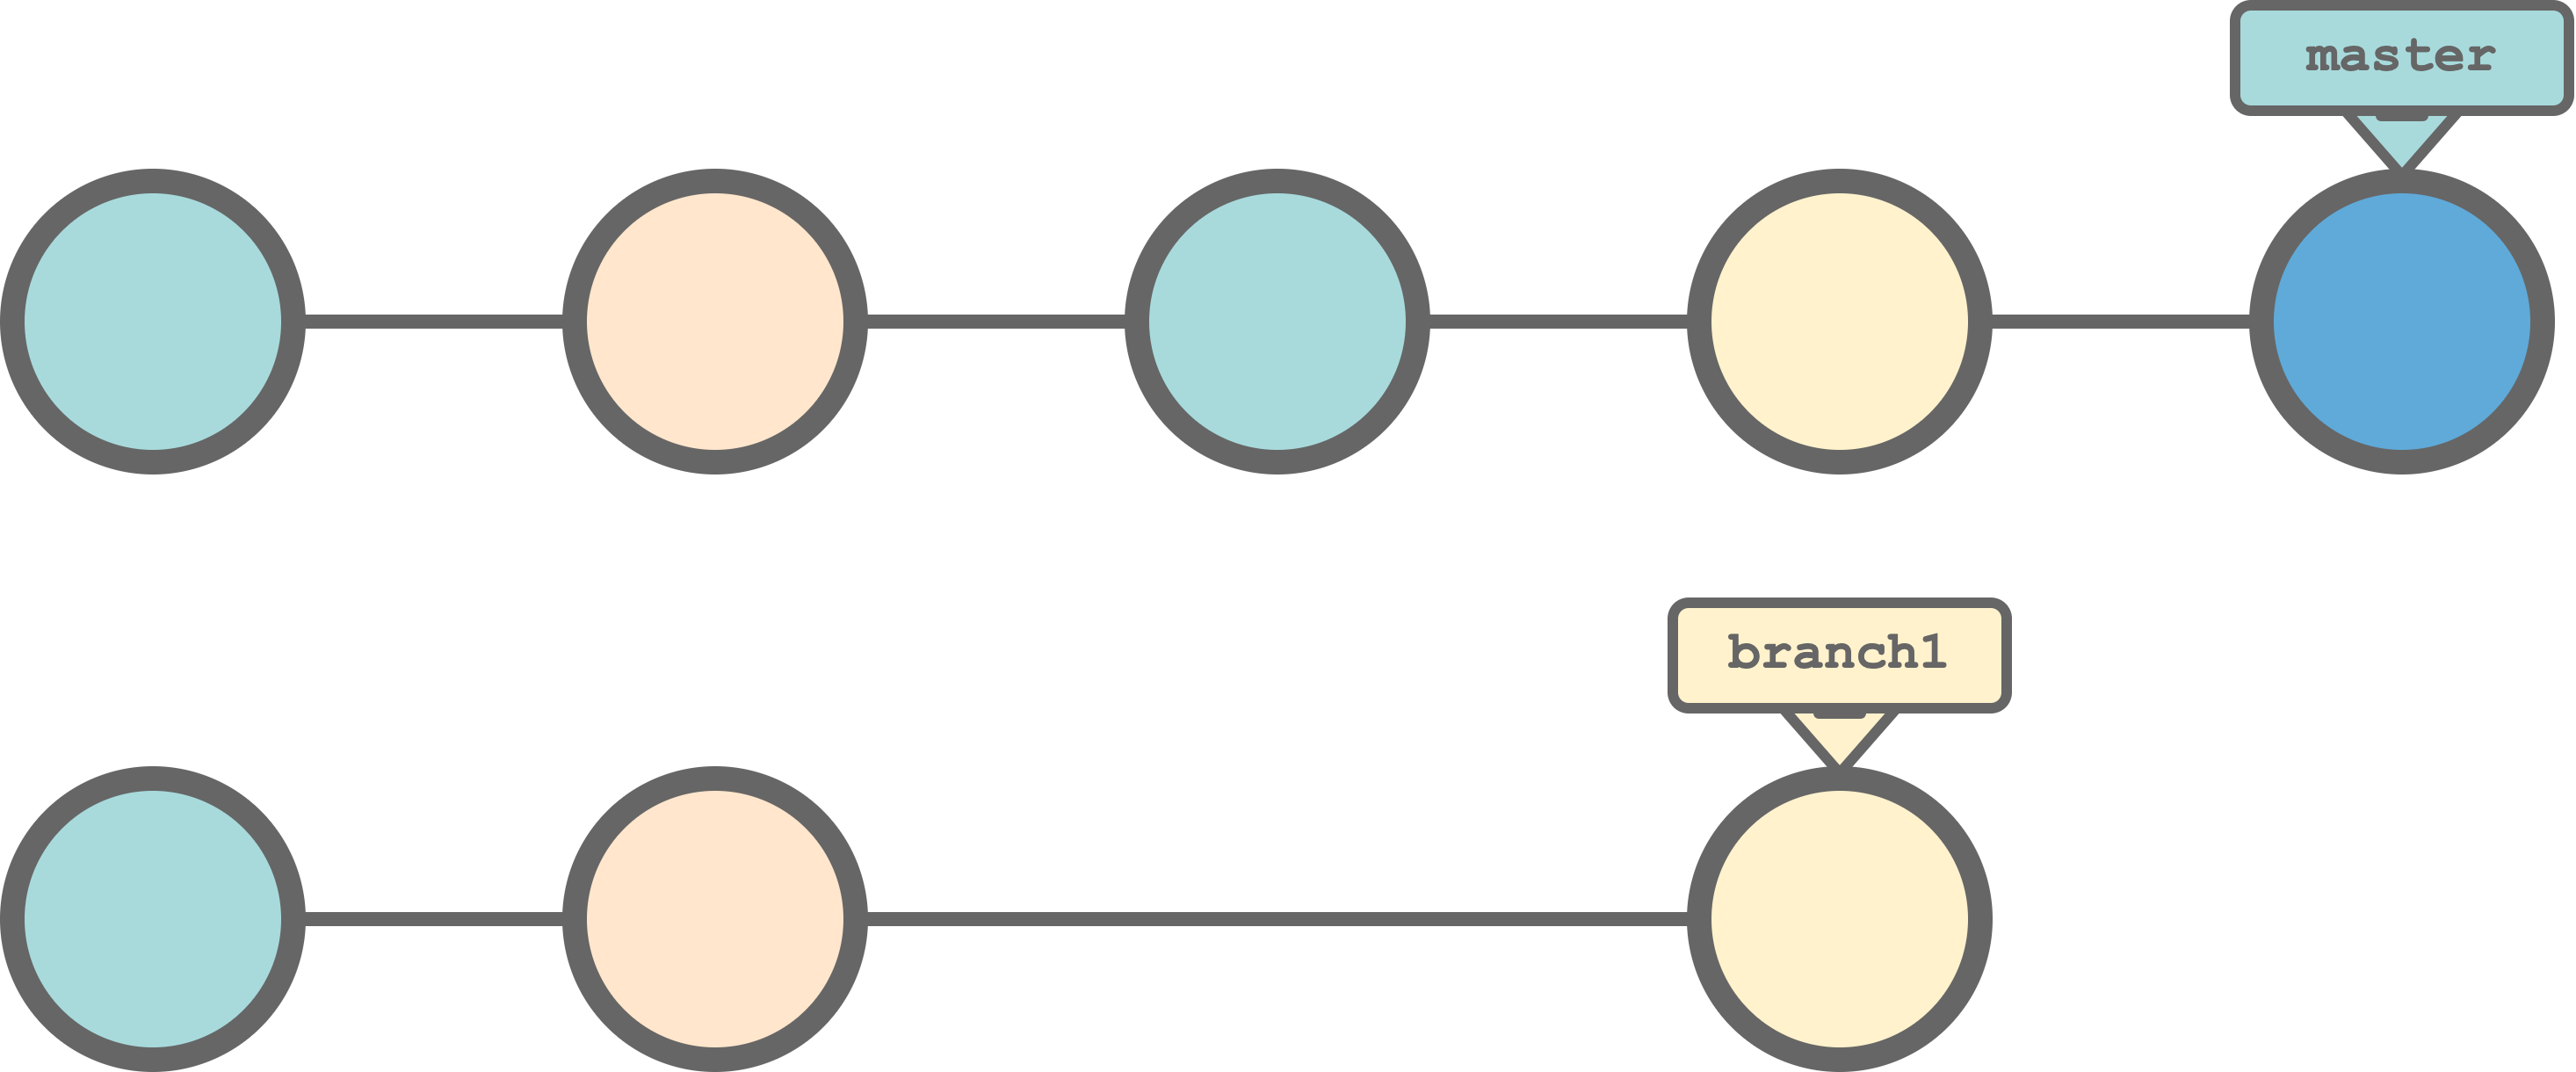
Finally, even after merging, the two branches still exist and they are independent. This means that we can keep working on
branch1and new commits will not affectmaster. Only the merging operation allows to integrate commits from one branch to another.
Branching and merging may require some practice and experience before to properly use them. However, they are extremely useful tools to organize and manage projects development workflow both when collaboration with other colleagues or when working on our own. In Section 7.5, we describe suggested practices and more advanced workflows to efficiently organize and use multiple branches during the project development.
7.3 Install Git
We can check whether Git is installed on our machine by running the following command in the terminal.
$ git --versionThe Git version is returned. If Git is not available, we can install it following the Operating System specific instructions. See also https://git-scm.com/downloads.
7.3.1 On Windows
We have two main scenarios:
Git Bash. Git for Windows (https://gitforwindows.org/) is a project that provides us the required tools to work with Git on Windows. In particular, it includes Git Bash (a Bash terminal to run Git from the command line), Git GUI (a graphical user interface for Git), and other integration tools. Install Git for Windows following the instructions at https://git-scm.com/download/win.
WLS. We can use the Windows Subsystem for Linux (see Section 6.2.1) opening the dedicated terminal. Git is already installed in most Linux distributions. if this is not the case (or if we want to update the Git version), we can run the command (for Ubuntu/Debian)
$ sudo apt-get update
$ sudo apt-get install git
Depending on our preferred solution, we need to use the correct terminal (Git Bash or WLS) to run Git command lines.
7.3.2 On macOS
We have two main scenarios:
- XCode Command Line Tools. Git is automatically installed with the XCode Command Line Tools (
xcode-select —install). If not already available, when runninggit --versioncommand, the system will automatically ask us if we want to install it. However, this is not the latest version of Git. - Brew. If we are using Brew to manage packages (highly recommended), we can install the latest Git version running the command
bash $ brew install git
7.4 Get Started
Yep! Finally, we are ready to put our hands on Git and enjoy all of it power (and madness). In this introduction to Git, we describe the basic features and commands. For more details and advanced features, we suggest the the following resources:
- Bitbucket Git Tutorial: https://www.atlassian.com/git/tutorials
- Pro Git Book: https://git-scm.com/book/en/v2
- Git Official Manual: https://git-scm.com/doc
Now we can open our terminal and start to play.
7.4.1 Configure Settings
First of all, we need to configure Git providing our username and email. These will be used by Git to identify the author of each commit. To configure the username and email, run the following commands,
$ git config --global user.name "<My Name>"
$ git config --global user.email "<user@email.com>"
Using the flag --global, we configure username and email for all projects for the current user. Configuration settings are stored in ~/.gitconfig.
#----    .gitconfig    ----#
[user]
    name = My Name
    email = user@email.com
To check the current settings, run he following command,
$ git config --listPerfect! Now Git knows who we are.
We can configure Git settings at three levels:
System. These settings are available for all users and are stored in
/etc/gitconfig. To set system settings, use the flag--system, for example$ git config --system user.name "My Name"Global. These settings are available for all projects of the current user and are stored in
~/.gitconfig. To set global settings, use the flag--global, for example$ git config --global user.name "My Name"Project. These settings are available only for the current project and are stored in
.git/config(within the project directory). We do not need flags to set project settings.$ git config user.name "My Name"
Of course, project settings over-rides global settings and global settings over-rides system settings (see https://stackoverflow.com/questions/8801729/is-it-possible-to-have-different-git-configuration-for-different-projects/54125961).
7.4.2 Initialize a Git Repository
When starting a project with Git, there are two main scenarios:
init. We have an already existing project on our local machine and we want to start using Git for that project. To do that, we run the commandgit initfrom the project directory.$ cd <path-to/project-directory> $ git initThis command will create an hidden folder
.git/within the project directory where Git stores all the information and files required for version control. Moreover, Git also initialize the principal branch using the namemaster(ormain).clone. The project is already under version control and is available in a remote repository. To obtain a local copy of the repository, we run the commandgit cloneindicating the repository URL.$ git clone <repository-URL>This command creates a copy of the remote repository at the current working directory. Note that we can easily clone any public repositories. However, we need specific authorization or authentication protocol (e.g., login credentials or SSH keys) to clone private repositories. We discuss authentication procedures in Chapter 8.1.2.
7.4.3 Tracking Files
Now our project is under version control. Suppose we have the following project structure,
my-project/
    |-- README
    |-- data/
    |     |-- raw-data.csv
    |-- documents/
    |-- code/
    |     |-- my-functions-1
    |     |-- my-functions-2
We can run the command git status the check the project state.
$ git status
On branch master

No commits yet

Untracked files:
  (use "git add <file>..." to include in what will be committed)
    code/
    data/
    README

nothing added to commit but untracked files present (use "git add" to track)
We are on the principal branch master and at the moment all files are untracked. Note that documents/ is not listed as Git does not track empty directories.
As just pointed out, Git do not track empty directories. However, if we need to track an empty directory, we can add an hidden file. For example, we can create and hidden empty file named .git-track using the command
$ touch <path-to-empty-dir>/.git-trackNote that the name has no special meaning per se. We can use any name.
7.4.3.1 Adding Files to Staging Area
As suggested by Git, we can add untracked files using the command git add listing the desire files.
$ git add README <other-files>We can also use the flag --all to add automatically all untracked files.
$ git add --all
$ git status
On branch master

No commits yet

Changes to be committed:
  (use "git rm --cached <file>..." to unstage)
    new file:   code/my-functions-1
    new file:   code/my-functions-2
    new file:   data/raw-data.csv
    new file:   README
Note that using git add --all is not recommended as we may end up adding a lot of not useful files (e.g., system files or build artefacts). If we added some unwanted files, we can use the command git rm --cached <file> to remove a specific file from the staging area (or git reset to remove all files). We should always aim to keep our repository as clean as possible tracking only relevant files. To help us with this, we can specify which files to ignore listing them in the .gitignore file.
The .gitignore file is used to list all files we want to ignore. These files will be not tracked by Git. The .gitignore file is usually saved in the project root.
We can specify the exact file name or we can use matching patterns (i.e., globbing patterns, see https://linux.die.net/man/7/glob) to exclude specific subset of files. For example:
note.txt: ignore all files named"note.txt"in any directory (e.g.,"my-folder/note.txt")folder-A/note.txt: ignore files named"note.txt"in"folder-A". In this case the file"folder-B/note.txt"is not ignored.folder-A/: ignore files in any directory named"folder-A". For example also files in"folder-B/folder-A/"are ignored.*.log: ignore files that ends with".log"in any directory.folder-A/*.log: ignore files that ends with".log"in"folder-A".!important.log: the exclamation mark is used to create exceptions to previously define patterns. In this case the file"important.log"will not be ignored.
When creating or editing the .gitignore file, it is important to remember that:
- Each file or pattern has to be defined on a new line
- The character
#is used to create comments - Defined patterns are evaluated according to the
.gitignorefile position.
Moreover, the .gitignore file is usually saved in the project root but we can also define multiple .gitignore files and save them in different locations. Remember patterns are evaluated according to the .gitignore file position.
Finally, note that if we want to ignore a file that has been already tracked, first we need to remove it form the list of tracked files by Git. To do that, we can use the command git rm --cached <file>. Note that it is important to specify the --cached flag otherwise the file will be removed also from the working directory. Next, we can include it into the .gitignore file and commit the changes. Now the file will be ignored by Git.
To learn more about the .gitignore file and all the other exclusion rules, see https://www.atlassian.com/git/tutorials/saving-changes/gitignore
7.4.3.2 Committing Changes
Now all files are in the staging area and we are ready for our first commit. To create a commit, run the command
$ git commitThis will open our preferred text editor asking us for a commit message. Each commit requires a message describing the content of the commit. In this case, we can add the following message
Init Repo

- add data and scripts
- add README
After we save the file and close the editor, the commit is created. Now we can continue creating new files or modifying existing ones. Once we are ready, we can stage (i.e., add) the desired files and create a new commit.
For example, let’s modify the README file adding some information and save the changes. Git will detect the file has been modified.
$ git status
On branch master
Changes not staged for commit:
  (use "git add <file>..." to update what will be committed)
  (use "git restore <file>..." to discard changes in working directory)
    modified:   README

no changes added to commit (use "git add" and/or "git commit -a")
We can stage and commit the new changes
$ git commit -am "Update README" Note we staged the changes and passed the commit message directly in the command, using two common commit options:
git commit -m "<commit message>". Specify the commit message in the inline command. xgit commit -a. Commit all changes to already tracked files (no new files) without adding first.
These options are useful in the case of small commits, but we recommend limited use as it is always preferable to selectively stage files and add descriptive commit messages.
There are no strict rules when creating a commit message. A good practice, however, is to summarize the content of the commit on the first line with a brief title (less than 50 characters). Next, after a blank line, we can list a detailed description of all changes.
A good message should not only list what we changed but also why we did it. Descriptive messages are very useful for collaborators when reviewing the code and remember, this is likely to be the future us.
7.4.3.3 Checking Commit History
To get the history of all commits, we can use the command git log. Commits are listed from latest to oldest and for each commit we get the following information: commit ID, author, date, and commit message. For a more compact version we can specify the flag --oneline.
$ git log
commit ec15cb085c2e5aa463778bbef3239b06b9ac4010 (HEAD -> master)
Author: username <user@email.com>
Date:   Tue Feb 15 10:06:27 2022 +0100

    Update README

commit 93398d18e686d4698af3e52a0677585afe467a19
Author: username <user@email.com>
Date:   Tue Feb 15 09:26:13 2022 +0100

    Init Repo

    - add data and scripts
    - add README
We can check changes between commits using the function git diff. Depending on the specified arguments we can compare different commits. In particular,
git diff. It displays changes since the last commit.git diff <commit-ID>. It displays changes since a specified commit.git diff <commit-ID-A> <commit-ID-B>. It displays changes from commit-A to commit-B.
Note that it is not necessary to provide the whole commit ID, but we can provide only the initial characters as long as they uniquely identify the commit. Usually 6 to 10 digits are enough. For example in our case we can compare the two commit running,
$ git diff 93398d1 ec15cb0
diff --git a/README b/README
index 64772c2..e994379 100644
--- a/README
+++ b/README
@@ -1 +1,2 @@
 This is my first project using Git!
+New information
Checking commit history and changes between commits directly form command line may be complicated. Popular IDEs (e.g., RStudio or Visual Studio Code) provide useful graphical interfaces to facilitate these tasks (see Section 7.6).
7.4.4 Undoing Commits
Git allow us to keep track of the whole history of our project. In this way we are sure we will never lose anything and, if something goes wrong during the development, we can always easily move back to previous commits.
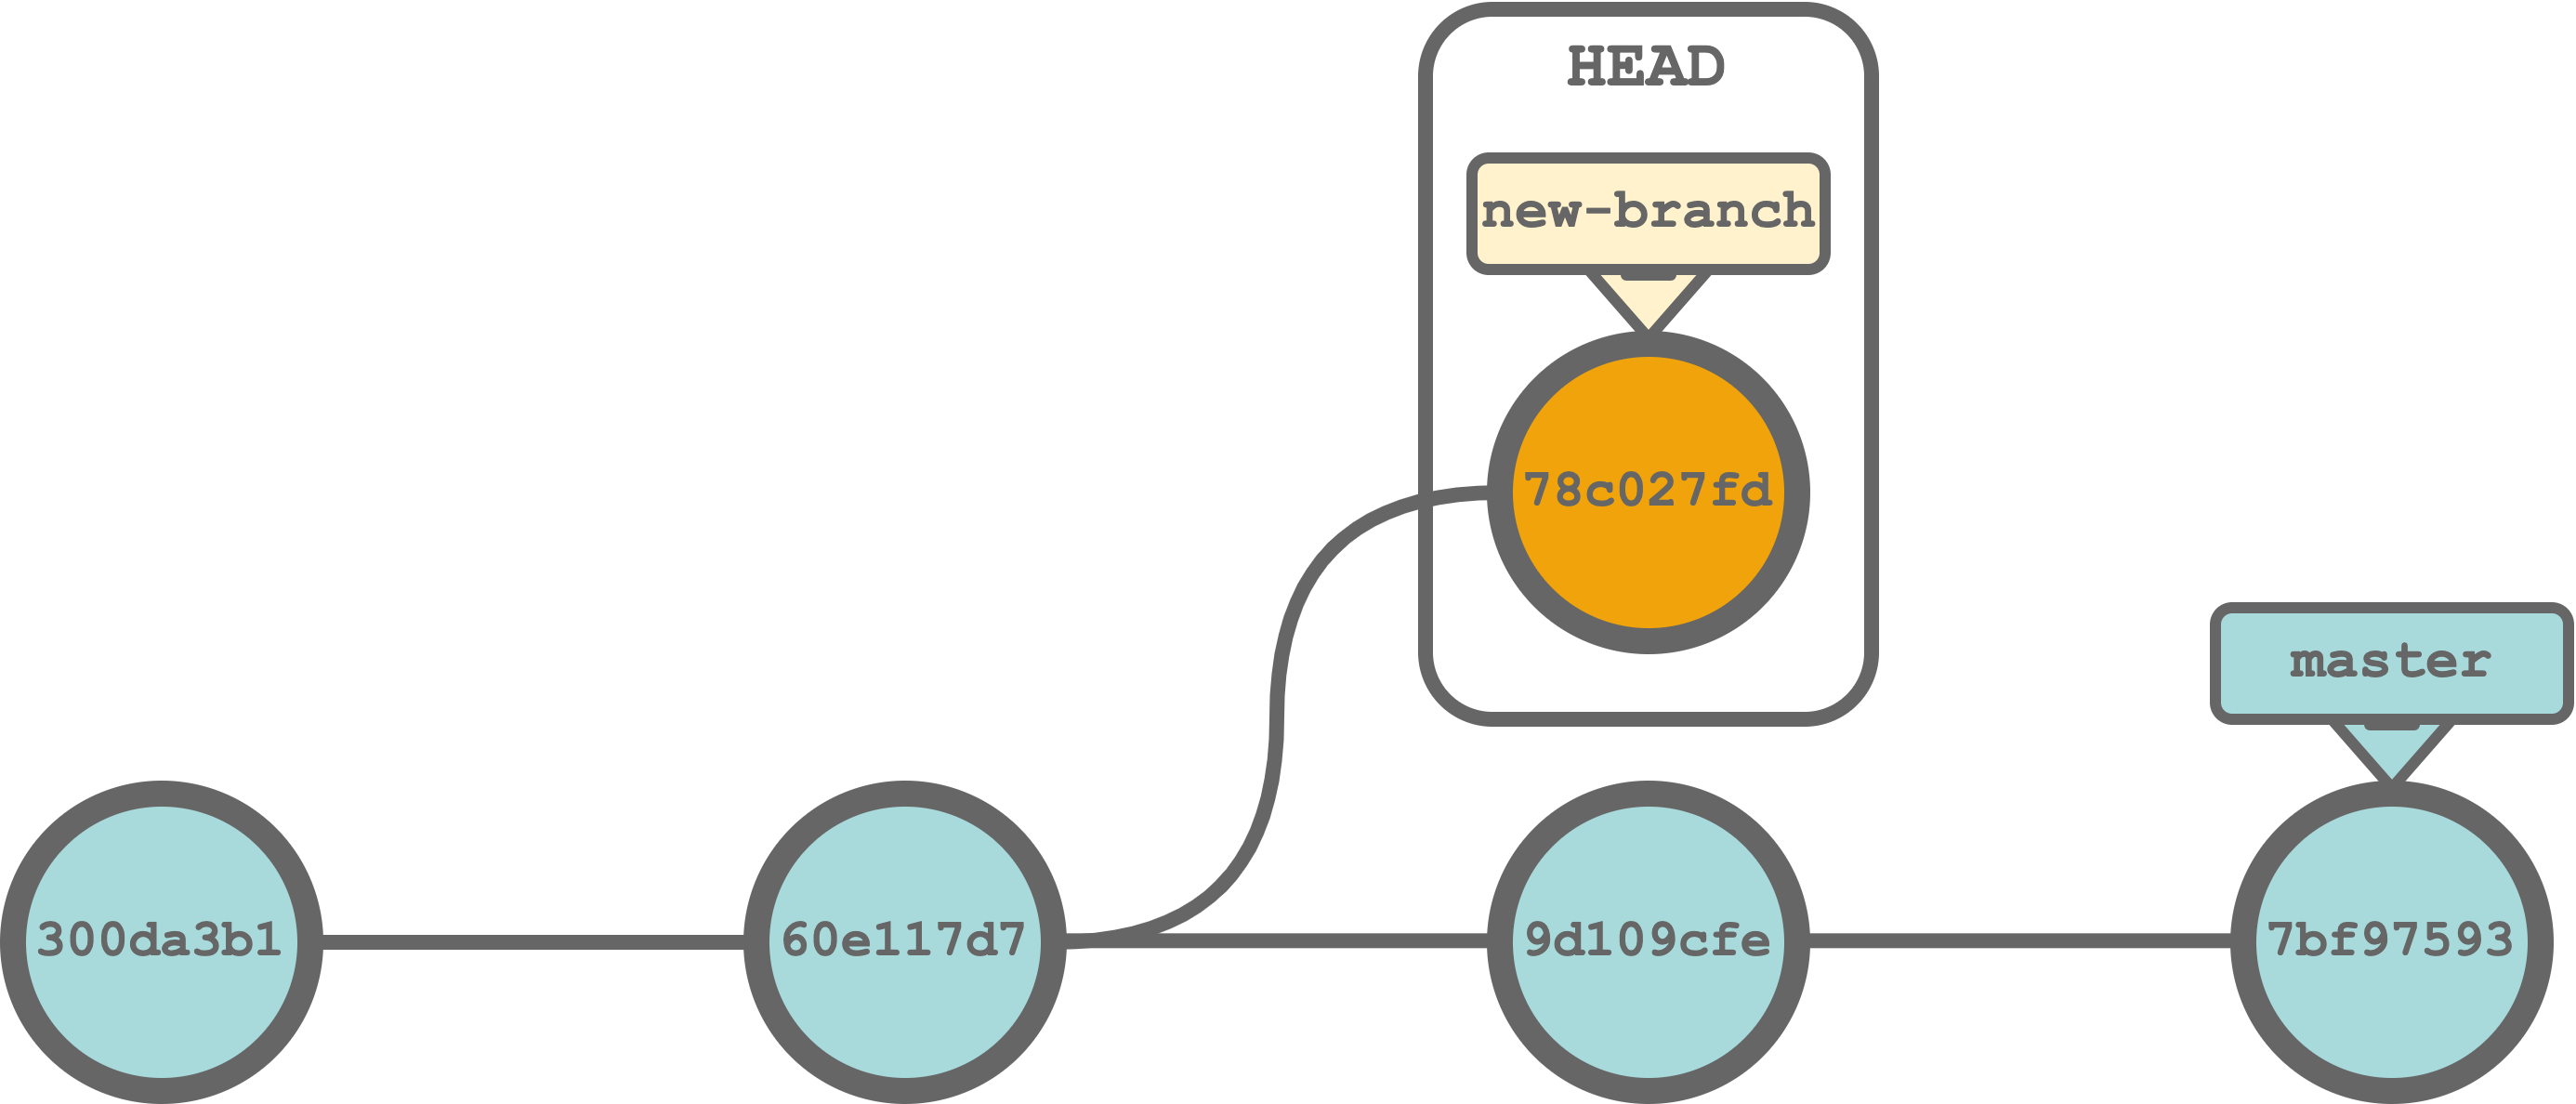
For example, consider a project with the following Git history.
Imagine we ended up in some big troubles and we need to go back two commits (commit 60e117d7) and restart the development over again. Using Git, there are three different ways of undoing commits:
git checkout <commit-ID>.git revert <commit-ID>.git reset <commit-ID>.
Let’s describe the difference between these three commands.
7.4.4.1 Checkout
As already introduced in Section 7.2.1, the git checkout command allows us to point our HEAD (i.e., the current commit we are viewing) to a target commit. In this way, all files in our project will be restored to their state at that exact commit.
$ git checkout <commit-ID>`In our example, we can restore the desired commit (60e117d7) running the command,
$ git checkout 60e117d7
In this state, we can make any experimental changes and commit them. These new commits, however, will not affect our principal line of development (master) or other branches. In Git terms we are in detached HEAD state. This means that once we move back to our last commit (using the command git checkout master) all new commits will be lost.
If we want to retain the new commits, we need to create a new branch, using the command git checkout -b <branch-name> (see Section 7.4.6). In this way, however, our development would diverge from the master branch and this may not be desired.
7.4.4.2 Revert
The git revert command allow us to undo commits. However, rather than removing the target commit from the Git history, git revert creates a new commit in which the changes of the target commit are reverted. Following this approach, the whole Git history is maintained without losing any commit. This allow us to safely collaborate with other colleagues on shared repositories.
$ git revert <commit-ID>`In our example, we can restore the desired commit (60e117d7) reverting the two subsequent commits (7bf97593 and 9d109cfe). To do that, we run the commands,
$ git revert 7bf97593
$ git revert 9d109cfe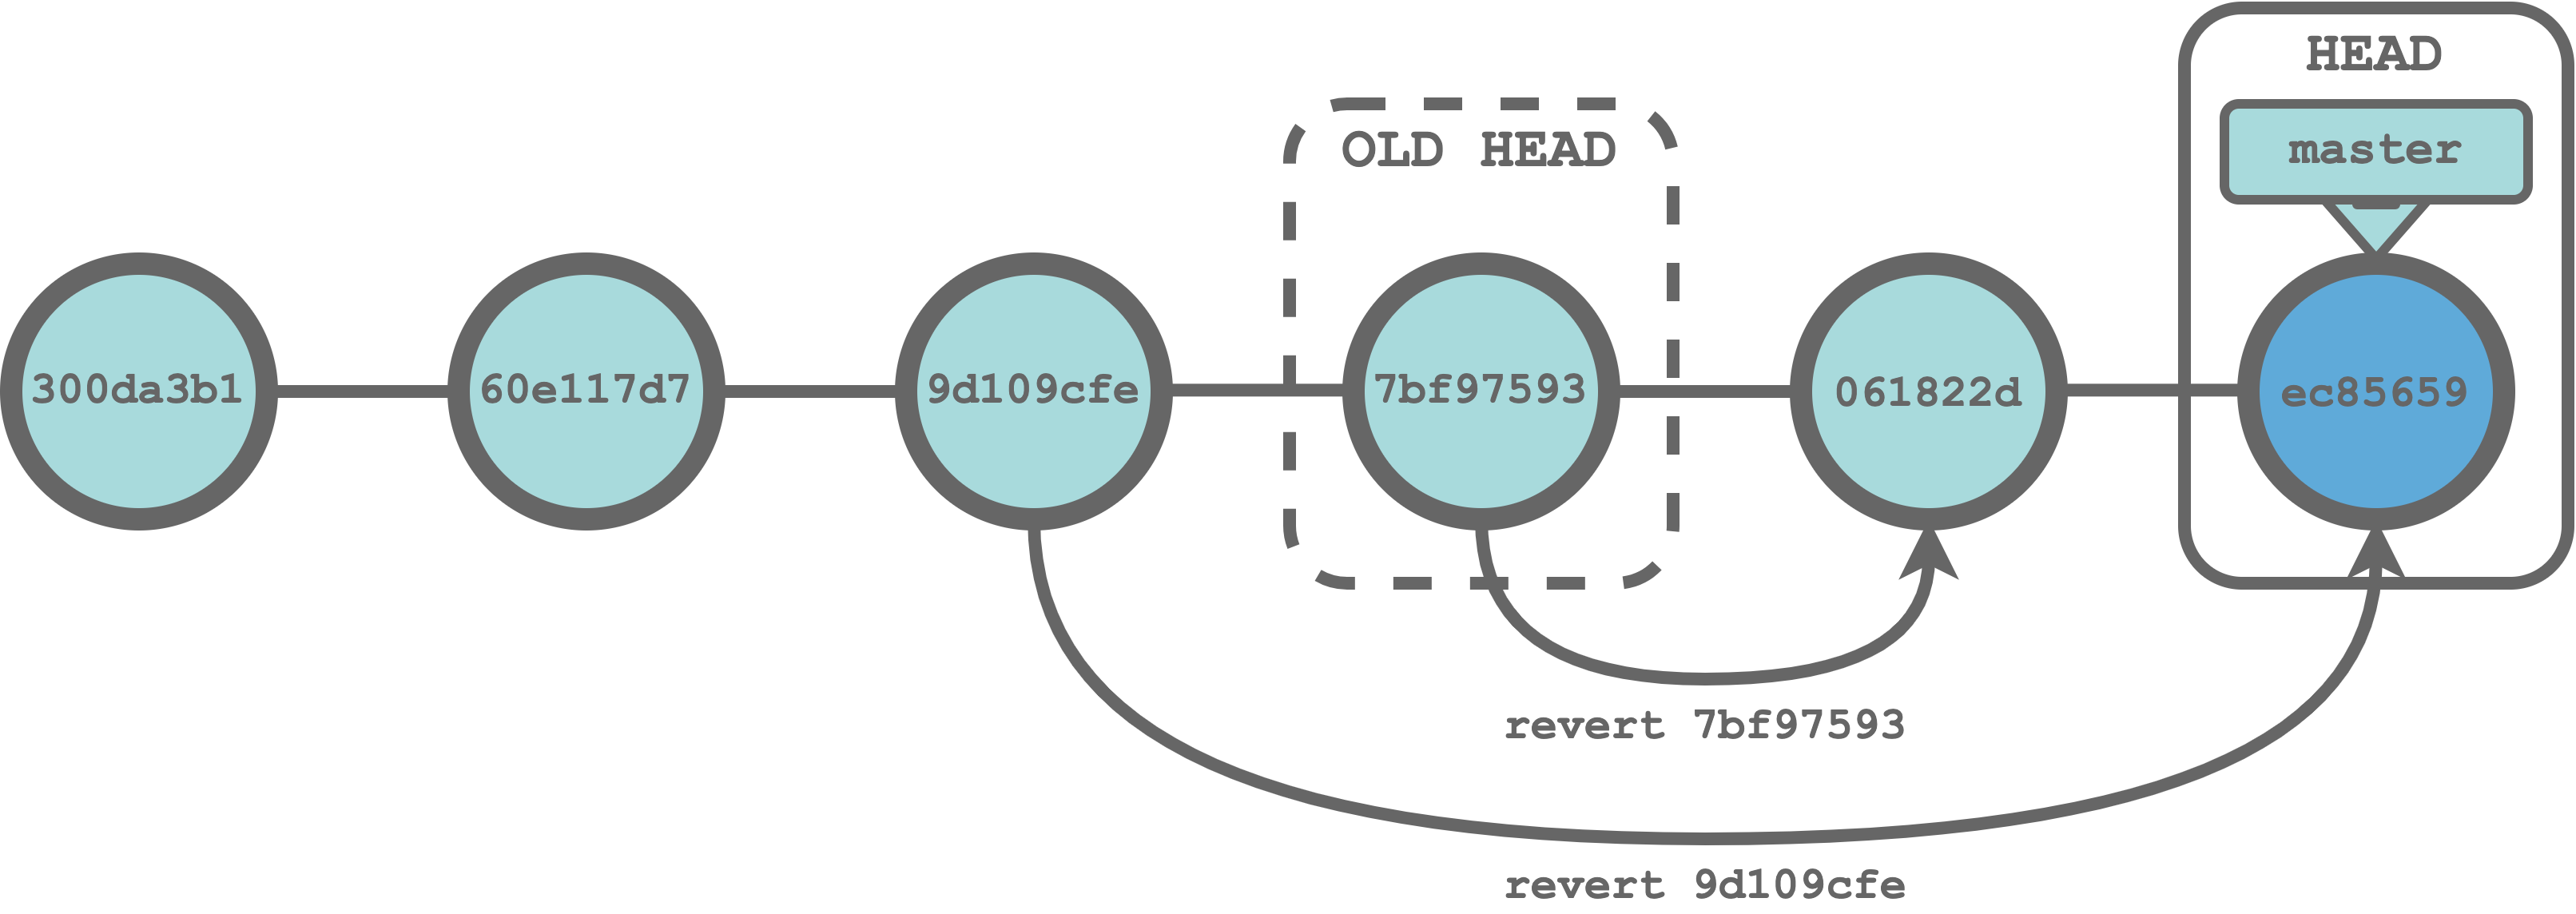
Note that by default each git revert command creates a new commit. Moreover, by using git revert we can undo any commit at any arbitrary point in the Git history.
7.4.4.3 Reset
The git reset command allow us to restore a target commit. All the subsequent commits are removed from the Git history irremediably modifying the Git history. These changes may lead to severe issues if we are collaborating on a shared repository. Therefore, git reset should never be used for undoing commits on public repositories but only for undoing local changes.
$ git reset <commit-ID>In our example, we can reset our Git history to the desired commit (60e117d7) running the command,
$ git reset 60e117d7
Note that by default, the git reset command reset th commit history and file staging state to the target commit. However, all files in our working directory still maintain all the changes from the last commit (previous to the reset command). This is our last occasion to revise all changes before losing everything. We can run the command git restore <file> to definitely discard changes. Alternatively, we can specify the flag --hard in the git reset command, in this case we will not be able to revise changes and all data would be irremediably lost.
Summarizing, when we need to undo some commits:
git checkoutcommand is useful to restore the project to a previous state from where we can our test without worrying abut impacting the current Git history and we can create a new line of development . However, thegit checkoutcommand does not allow us to undo changes in the original line of development.git revertcommand is the recommended safe method for undoing changes as it never deletes old commits but create new commits for undoing changes. Using thegit revertcommand we always maintain the full Git history intact.git resetcommand is the dangerous way of undoing changes as old commits are irremediably deleted from the Git history. Thegit resetcommand should be only used for undoing local changes and should never used for undoing public commits.
7.4.5 Managing Collaboration
When collaborating with other colleagues on a project, we share a remote repository used as main reference. Each colleague can work independently on its own local repository and upload/download commits when required.
Let’s describe the operations required to collaborate.
7.4.5.1 Adding a Remote Repository
If we created our repository using the git clone command, it automatically creates a connection to the remote repository. Otherwise, we need to add the name and the URL of a remote repository. To do that, we use the command,
$ git remote add <name> <url>For example,
$ git remote add origin https://github.com/username/my-project.gitNote that the name origin is the standard convention to indicate the principal remote repository but it has no special meaning per se. Moreover, there are multiple ways of specifying the remote repository URL according to the authentication protocol used (e.g., HTTP or SSH protocol). This will affect our specific permissions (e.g., read and/or write access). Authentication and permissions are discussed in Chapter 8.1.2.
We can add more than one remote repository. This may be useful, for example, to manage large projects were different team collaborate on different project features. In this case, we would add both the principal remote repository (shared by all teams) and our team specific remote repository. To check all the remote repositories currently available, we can us the command,
$ git remote -v
origin  https://github.com/username/my-project.git (fetch)
origin  https://github.com/username/my-project.git (push)
7.4.5.2 Pulling Commits
To download new commits from a remote repository to the current branch, we use the command,
$ git pull <remote-name> <branch-name>specifying the remote repository name and the branch we want to pull from. For example, to update our current branch according to origin/master, we run the command,
$ git pull origin master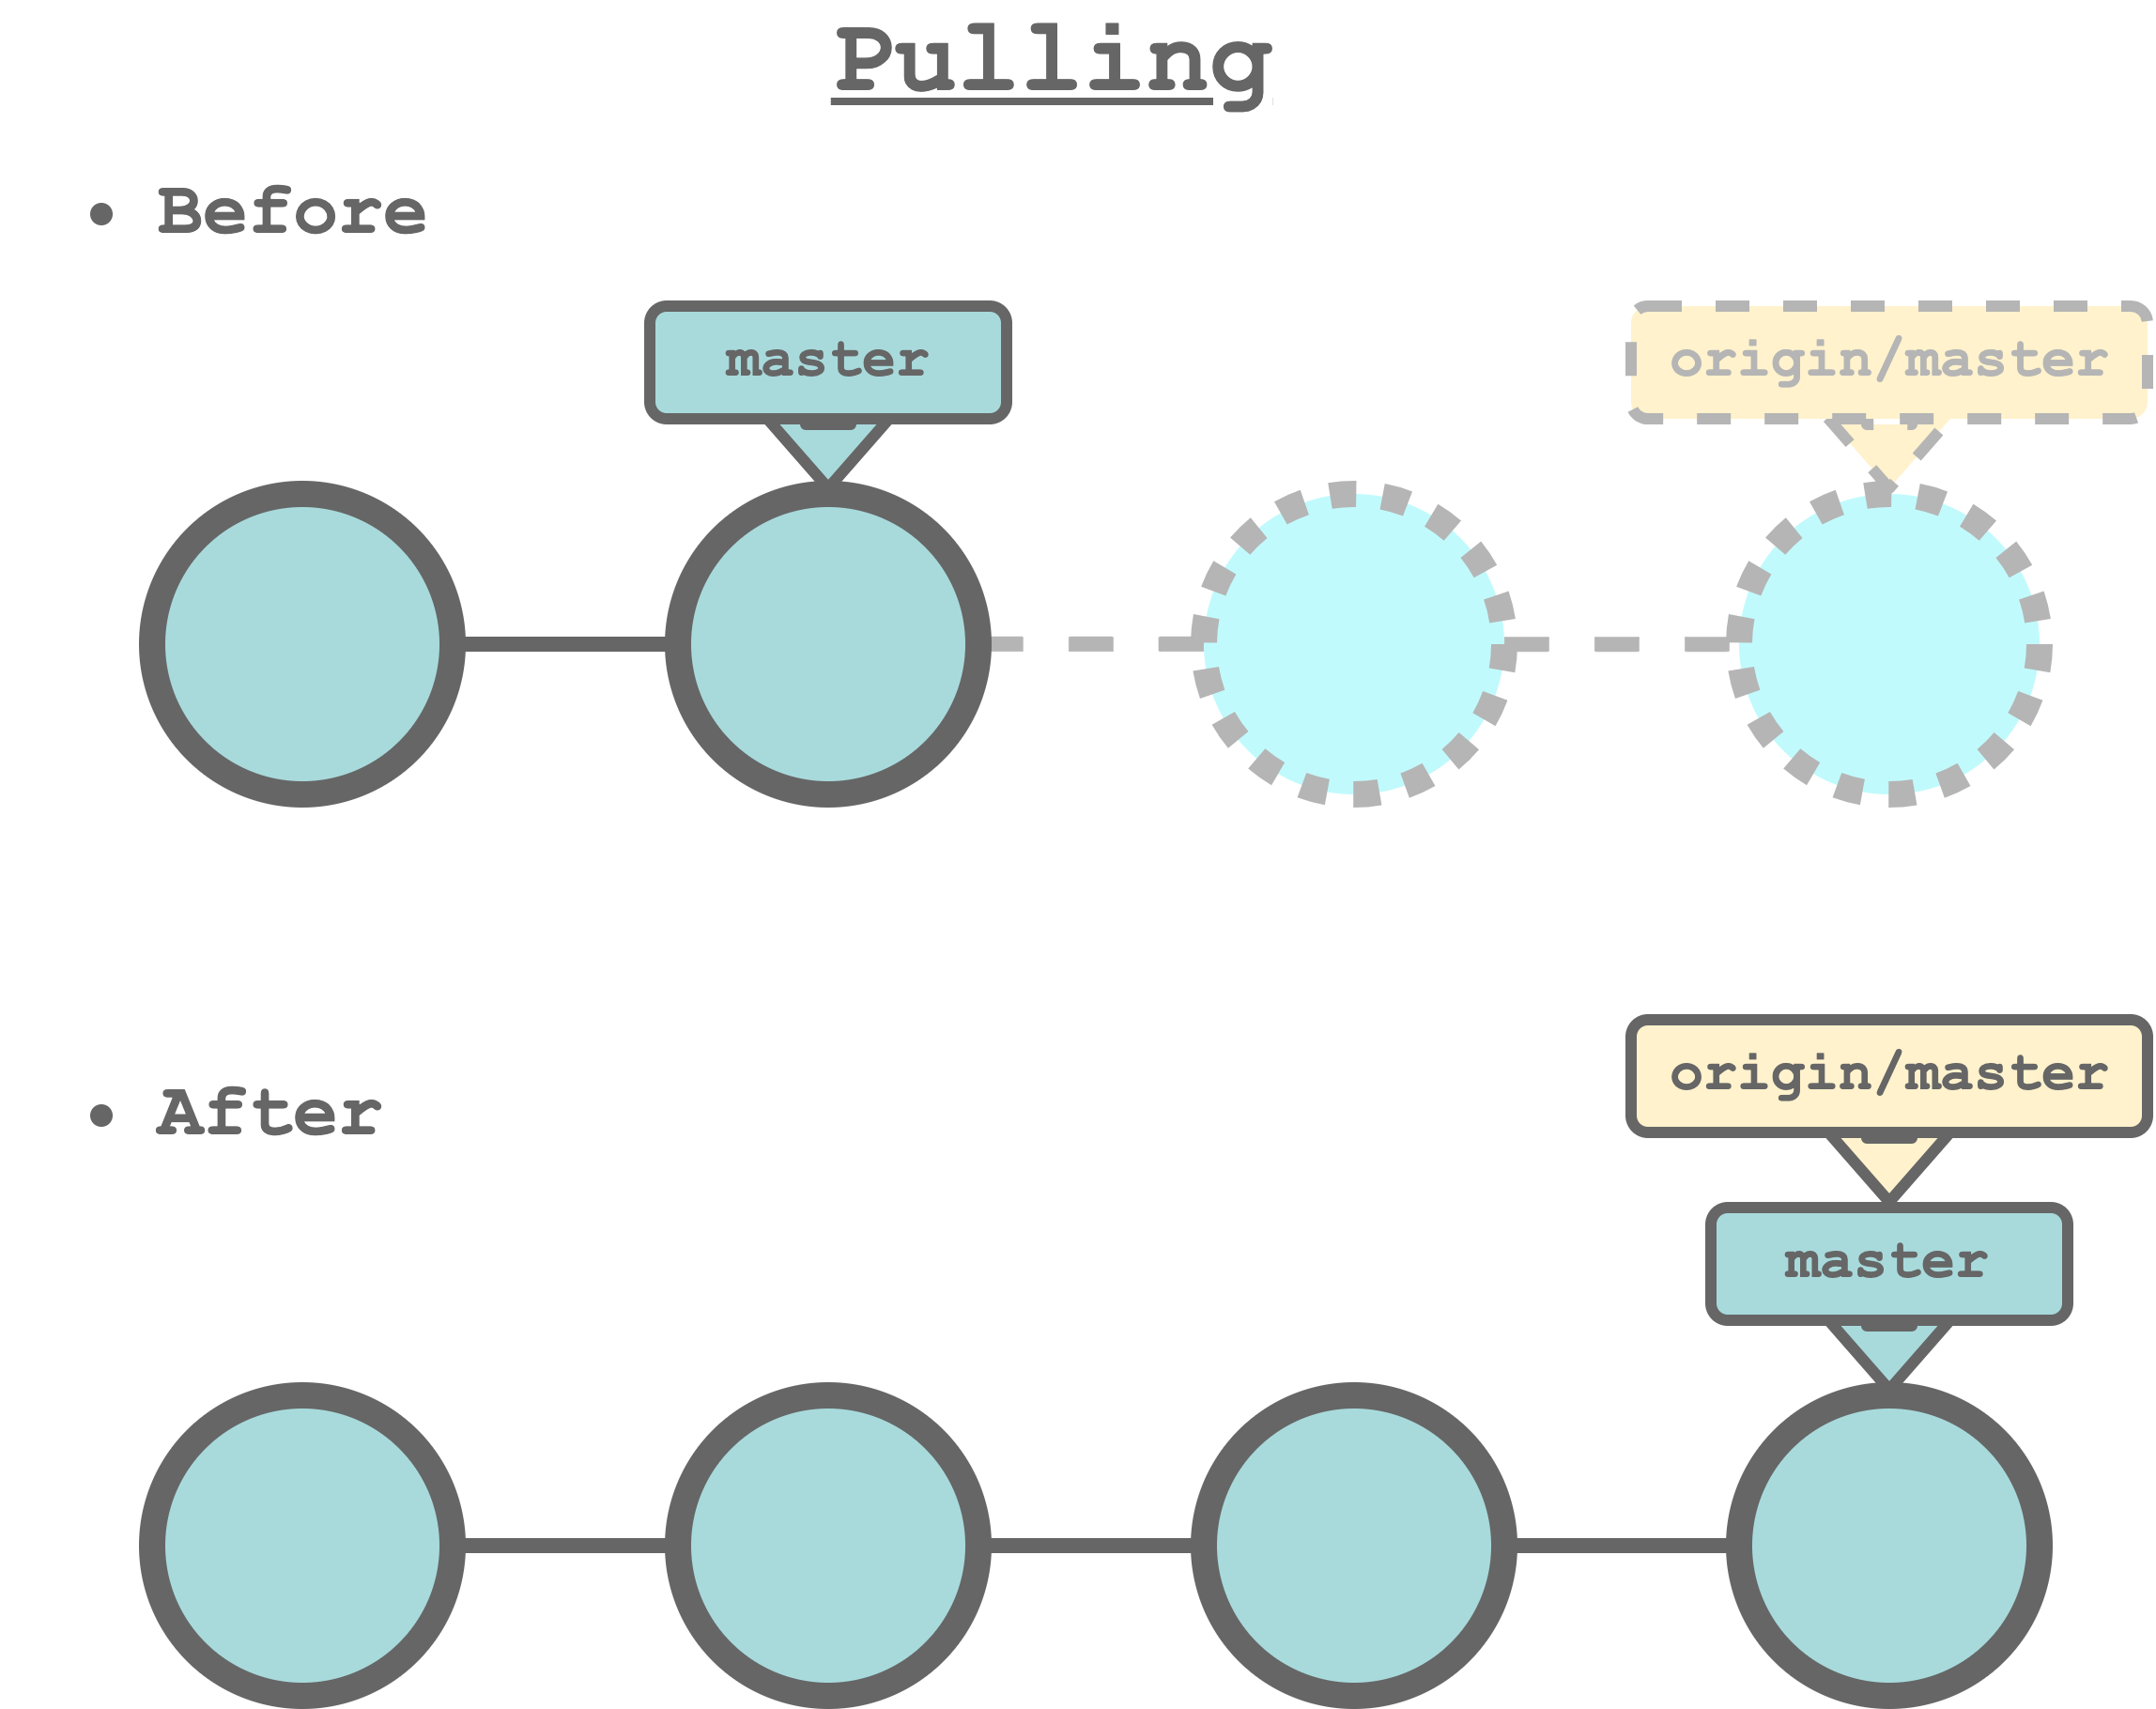
The git pull command downloads the new commits and automatically updates our working directory to match the last changes. Alternatively, we can use the safer command git fetch that downloads the new commits but does not update our working directory allowing us to review commits before integrating them in our local repository (see https://www.atlassian.com/git/tutorials/syncing/git-fetch).
7.4.5.3 Pushing Commits
To upload new commits from a local branch to a remote repository, we use the command,
# Local branch and remote branch same name
$ git push <remote-name> <branch-name>

# Local branch and remote branch different names
$ git push <remote-name> <local-branch>:<remote-branch>
specifying the remote repository name and the branch name. For example, to upload the new commits from the local master branch to origin/master, we run the command,
$ git push origin master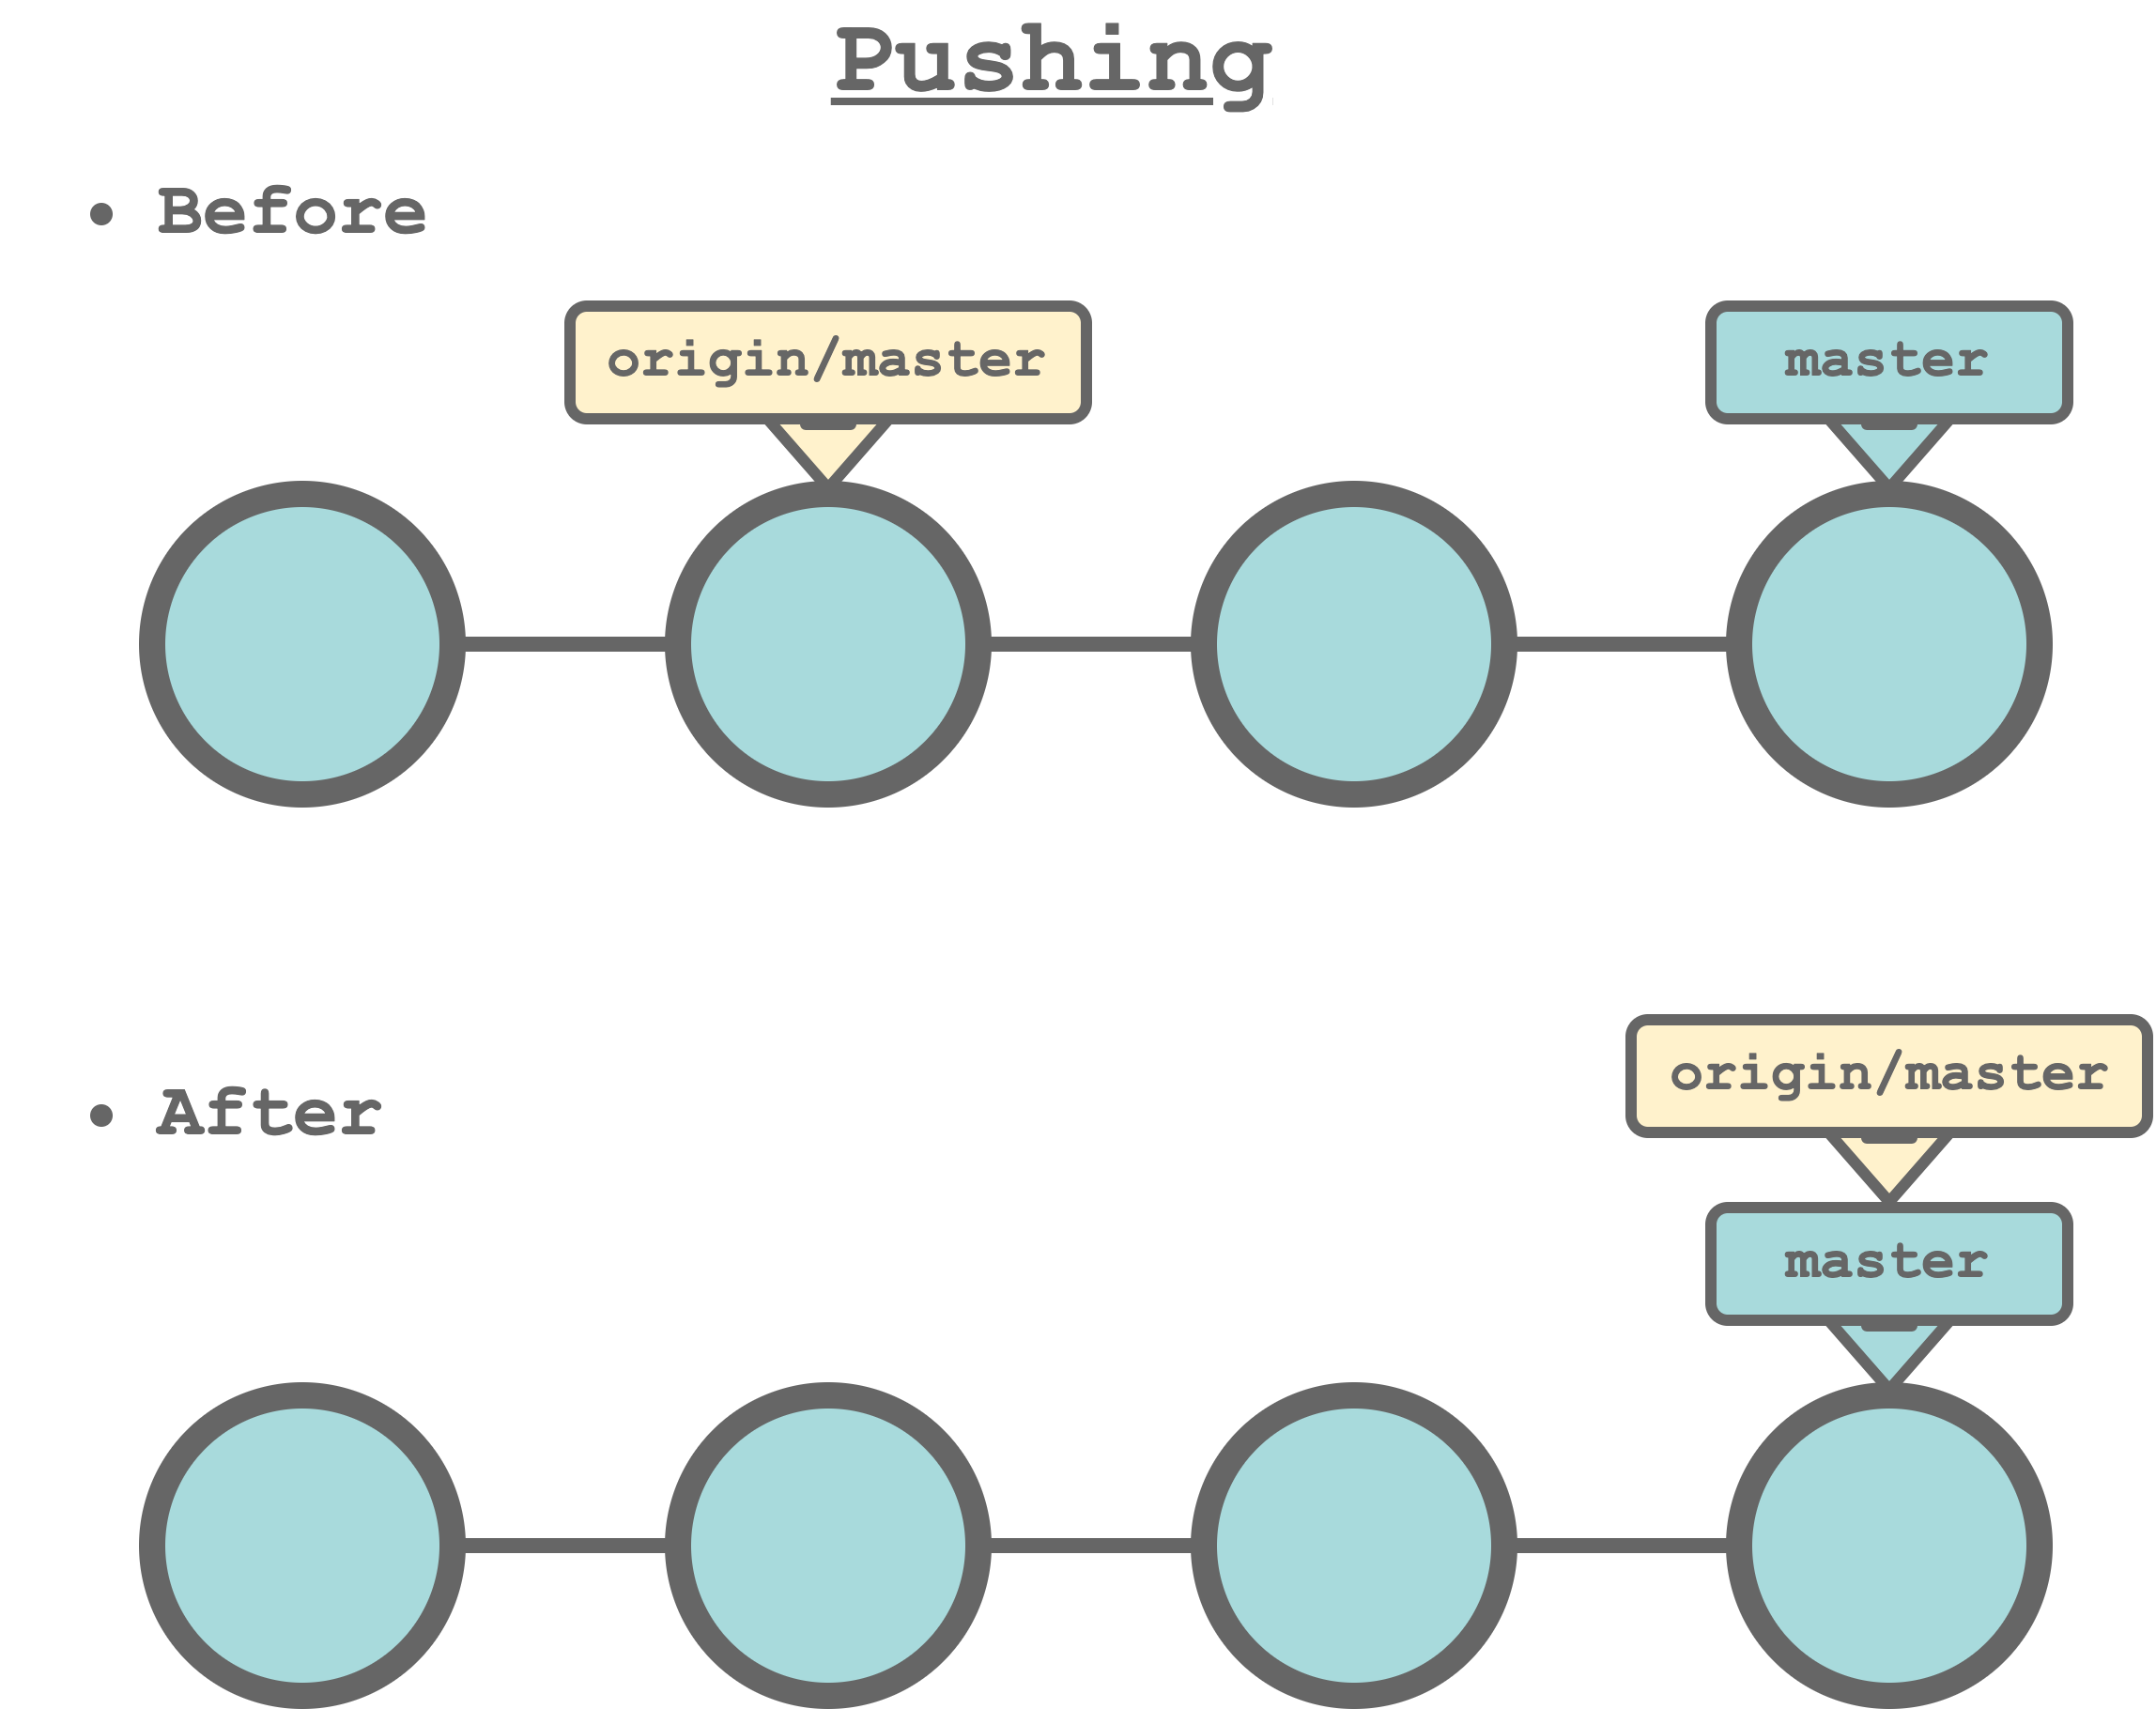
Git does not allows us to push our commits if our local repository is not updated with the last changes in the remote repository. If we try to push, a similar message is displayed,
$ git push
To https://github.com/username/my-project.git
 ! [rejected]        master -> master (fetch first)
error: failed to push some refs to 'https://github.com/username/my-project.git'
hint: Updates were rejected because the remote contains work that you do
hint: not have locally. This is usually caused by another repository pushing
hint: to the same ref. You may want to first integrate the remote changes
hint: (e.g., 'git pull ...') before pushing again.
hint: See the 'Note about fast-forwards' in 'git push --help' for details.
In this case, we need to pull first and then push again. However, it may occur that our new commits have some conflicts with the last changes in the remote repository. Git would ask us to explicitly solve any conflict before pushing to the remote repository. To minimize this issue, we should always work starting from the latest updates by remembering to pull at the beginning of each session. We discuss how to deal with conflicts in Section 7.4.6.
7.4.5.4 Setting Upstream
Instead of specifying the remote repository name and the branch name each time, we can set the default remote branch for each of our local branch. In Git terms this is called the upstream branch. To do that, we can use the command,
$ git branch --set-upstream-to="<remote/branch>"specifying the remote repository name and the branch name we want to use as upstream. For example, to set origin/master as the upstream branch for our local master branch, first we checkout to the desired branch, next we run the command,
$ git checkout master
$ git branch --set-upstream-to="origin/master"
Branch 'master' set up to track remote branch 'master' from 'origin'.
Now we can pull and push commits from and to the upstream branch simply running git pull and git push respectively. Alternatively, we can set the upstream branch when pushing commits specifying the flag -u (or --set-upstream). Considering the example above,
$ git push -u origin master
...
Branch 'master' set up to track remote branch 'master' from 'origin'.
7.4.6 Branching and Merging
As introduced in Section 7.2.3, with Git we can create branches to allow independent lines of development. The principal line of development is itself a branch and, following standard conventions, it is named master (or main; these are just names without any special meaning per se).
Let’s describe the operations required to create and merge branches.
7.4.6.1 Creating Branches
It is important to understand that branches are simply pointers to a specific commit. When we create a branch we are creating a new pointer to the current commit. From here, each branch will follow its own line of development. To create a local branch, we use the command
$ git branch <branch-name>For example, we can create a new branch named my-branch running the command,
$ git branch my-branch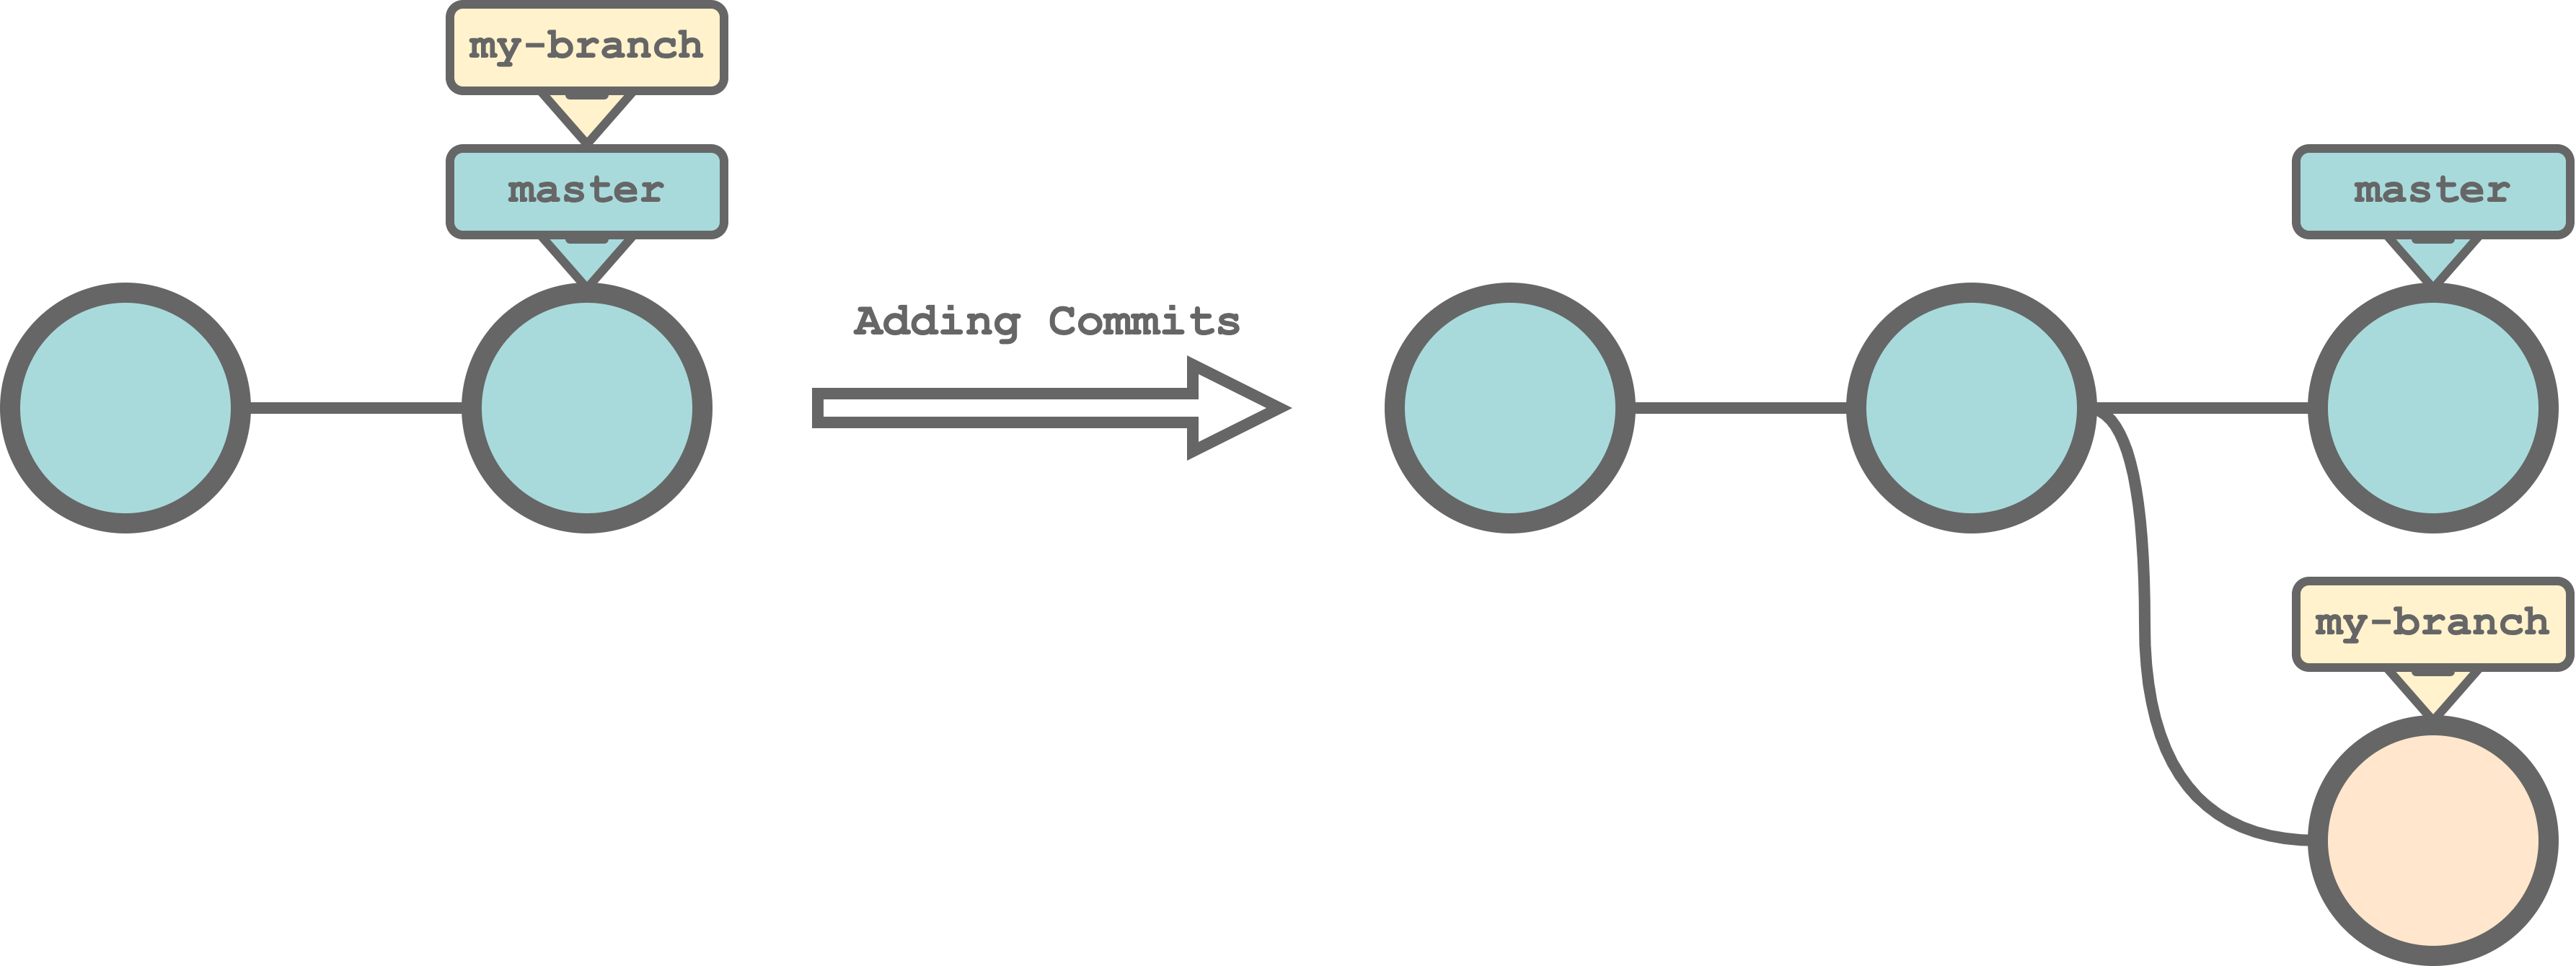 A remote branch with the same name is automatically created when we push the branch to the remote repository. To do that, we run the command,
$ git push -u <remote-name> <branch-name>Remember that we use the option -u to automatically set the upstream branch.
7.4.6.2 Selecting Branches
We can switch from a branch to another using the command,
$ git checkout <branch-name>As already described in Section 7.2.1, the git checkout command allows us to point our HEAD (i.e., the current commit we are viewing) to a target commit. Specifying a branch, we move our HEAD to the commit the branch is pointing at. Again, all files in our project will be restored to their state in that exact branch.
Moreover, we can use the -b flag to create and move to a new branch.
$ git checkout -b <new-branch-name>We can list all currently available branches running the command git branch. In particular, we can use the flag -vv to obtain a verbose output with more information (i.e., branch name, commit ID, upstream branch, commit message) or the -r flag to list all the remote branches.
$ git branch
* master
  my-branch

$ git branch -vv
* master    00ab7a8 [origin/master] Update master
  my-branch 702b800 [origin/my-branch] Create my-branch

$ git branch -vvr
origin/master    00ab7a8 Update master
origin/my-branch 702b800 Create my-branch
Note that the * symbol indicates the branch currently active.
7.4.6.3 Merging Branches
To integrate two line of development together, we merge one branch into another. The directionality is important. Branches are not mixed together creating a single branch, but commits in the timeline of one branch are integrated in the timeline of the other branch.
Before merging we need to ensure that the two branches are up-to-date with the remote repository. Next, we switch to the receiving branch and we merge the other branch using the command,
$ git merge <branch-name>For example, we can merge my-branch into master running the command,
$ git checkout master
$ git merge my-branch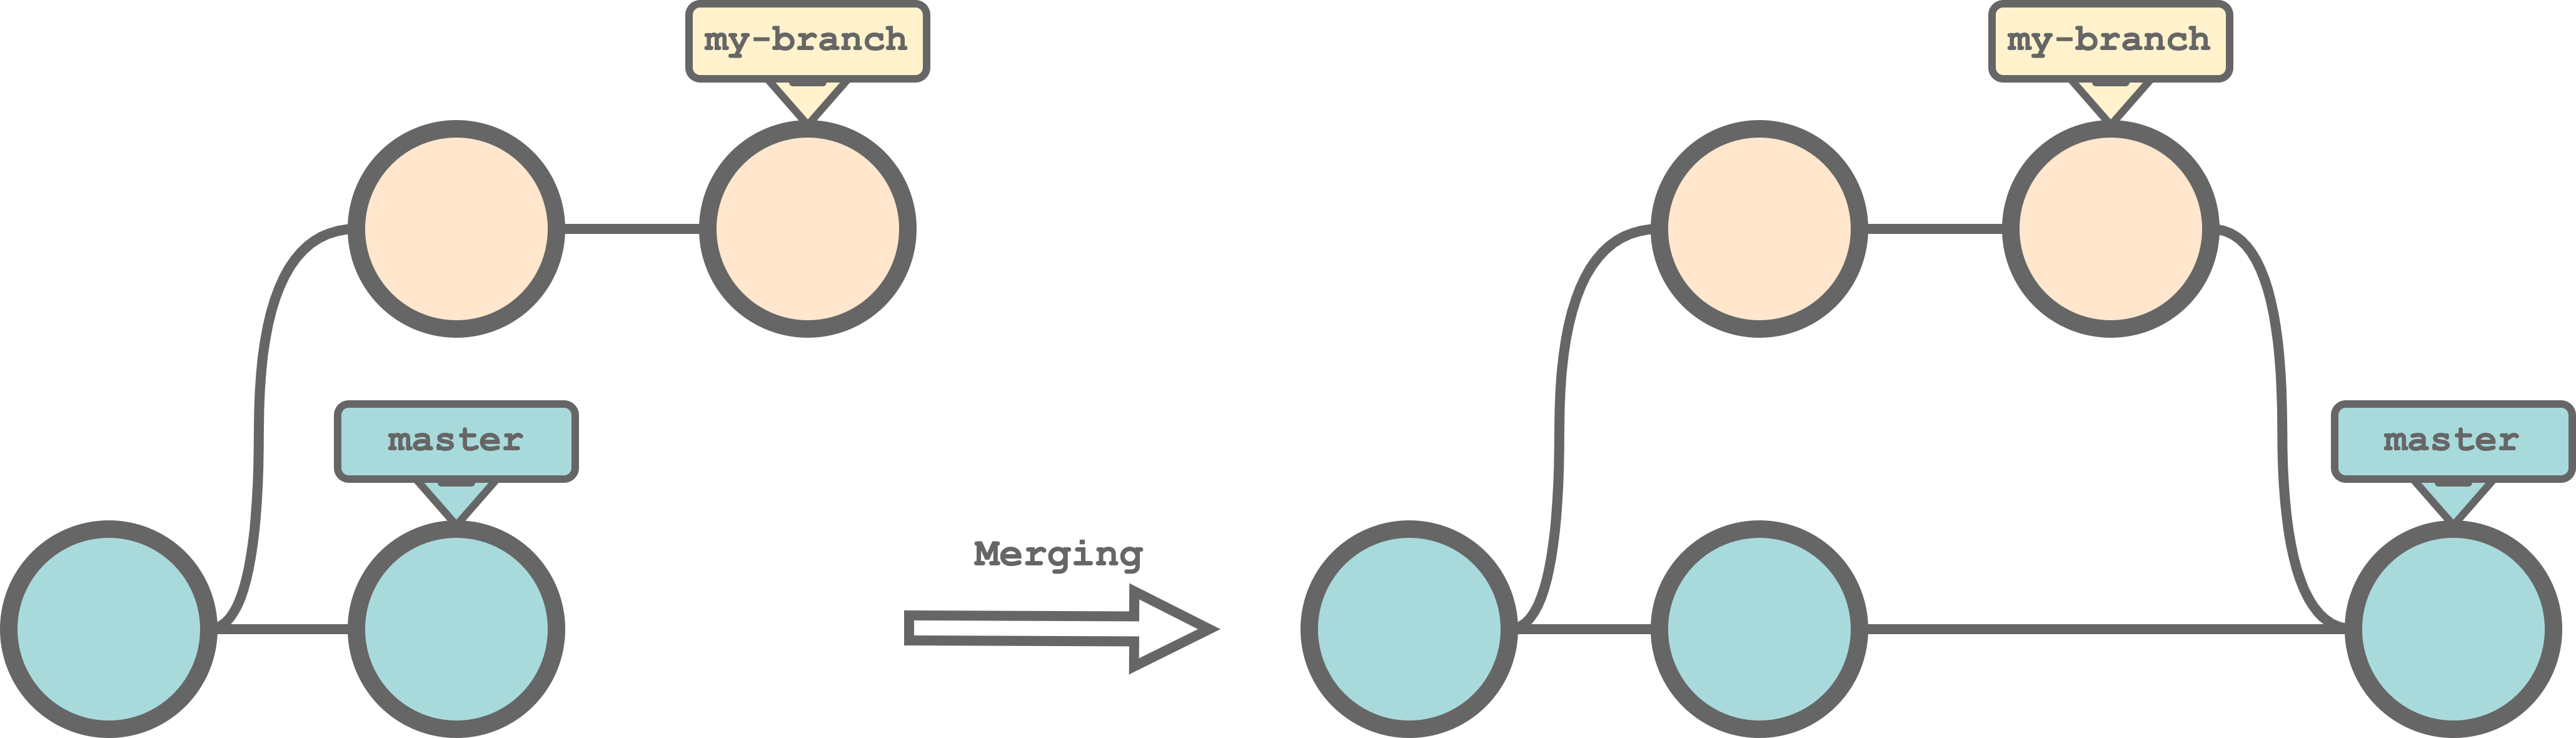
Note that when merging, we always obtain a “merge commit” that joins the two lines of development.
Once merged, we can delete the branch if no longer useful. To delete a branch (local and remote), we use the commands,
# Remove local branch
$ git branch -d <branch-name>

# Remove remote branch
$ git push <remote-name> --delete <branch-name>
7.4.6.4 Solving Conflicts
When merging two branches or pulling changes from a remote repository, conflicts can arise. Conflicts occurs when two different commits modify the same line in a file (or one commit deletes the file and the other edit the same file). In these cases, Git is no longer able to automatically integrate the changes. Therefore, Git requires us to explicitly solve the conflicts by choosing which of the two versions to keep.
Suppose we create a file my-file.txt as follow,
#----    my-file.txt    ----#

First text line
Second text line
Third text line
Next we create two branches (branch-A and branch-B) and we modify the second text line differently in the two branches ("Branch-A text line" and "Branch-B text line" respectively). If we try merging branch-B into branch-A we would get a conflict.
$ git checkout branch-A
$ git merge branch-B
Auto-merging my-file.txt
CONFLICT (content): Merge conflict in my-file.txt
Automatic merge failed; fix conflicts and then commit the result.
Examining my-file.txt, we see that the conflict is marked as follow
#----    my-file.txt    ----#

First text line
<<<<<<< HEAD
Branch-A text line
=======
Branch-B text line
>>>>>>> branch-B
Third text line
The <<<<<<< HEAD and >>>>>>> branch-B lines delimit the conflict and the ======= line separates the two conflicting versions. In particular, we get the changes of the currently active branch HEAD (in our case branch-A) followed by the changes of the merging branch (in our case branch-B).
To solve a conflict, we need to edit the file modifying the text to keep the desired version and removing the other together with the conflict delimiters. Finally, we commit the changes and Git will create a new “merge commit” finalizing the merge.
We can abort a merge that created conflicts using the command,
$ git merge --abortWe can choose between different styles with which Git marks conflicts. We recommend using the diff3 style. To change the default merge conflict style, run
$ git config --global merge.conflictstyle diff3In addition to the changes of the current branch and the changes of the merging branch, the diff3 style also display the original version of the common ancestor commit. This give us more context, helping us understanding the reasons of the different changes and properly choosing which one to keep.
#----    diff3 conflict style    ----#

<<<<<<< HEAD

||||||| common ancestor commit

=======

>>>>>>> merging-branch
7.4.7 Summary
Git is very powerful but requires time (and tears) to learn how to use. We described its basic features and commands. Again, for more details and advanced features, we suggest the the following resources:
- Bitbucket Git Tutorial: https://www.atlassian.com/git/tutorials
- Pro Git Book: https://git-scm.com/book/en/v2
- Git Official Manual: https://git-scm.com/doc
For everything else there’s stackoverflow.
Here a brief summary of all the Git commands introduced so far.
#----    Configure Settings    ----#

git config --list         # Check configuration settings

git config --global user.name "<My Name>"          # Configure username
git config --global user.email "<user@email.com>"  # Configure email
git config --global merge.conflictstyle diff3      # Configure conflict style
#---- Initialize Git Repo ----#
git init <path> # Initialize local repository
git clone <repository-URL> # Clone remote repository#---- Tracking Files ----#
git status # Check repository status
# Staging
git add <files> # Add selected files to staging area
git add --all # Add all files to staging area
git rm --cached <file> # Remove selected files from staging area
git reset # Remove all files from staging area
# Commit
git commit # Create commit
# Options
-a # Commit all changes of tracked files
-m "<message>" # Inline commit message
git log # Get commit history
git log --oneline # Get commit history (compact)
git diff # Changes since the last commit
git diff <commit-ID> # Changes since a specified commit
git diff <commit-ID-A> <commit-ID-B> # Changes from commit-A to commit-B.
git checkout <commit-ID> # Point HEAD to specific commit/branch
git revert <commit-ID> # Undo commit (forward-way)
git reset <commit-ID> # Undo commit (disruptive-way)#---- Collaboration ----#
git remote -v # List remote (verbose)
git remote add <name> <url> # Add remote
git pull <remote-name> <branch-name> # Pull commits from remote
git push <remote-name> <branch-name> # Push commit to remote
-u # Set upstream remote branch
git branch --set-upstream-to="<remote/branch>" # Set upstream remote branch #---- Branching ----#
git branch # List branches
git branch -vv # List branches (verbose)
git branch -vvr # List remote branches (verbose)
git branch <branch-name> # Create new branch
git checkout -b <new-branch-name> # Create and move to new branch
git merge <branch-name> # Merge target branch
git merge --abort # Abort merge
git branch -d <branch-name> # Delete local Branch
git push <remote-name> --delete <branch-name> # Delete remote Branch7.5 Git Workflow
As discussed in the previous sections, Git is extremely useful (if not fundamental) to manage project development and collaboration. Here we discuss how we can organize the project development using branches following efficient and organized workflows.
These workflows are most effective for projects creating applications or services used by other people and that requires continuous maintenance and development. However, they me be very useful even for complex research projects.
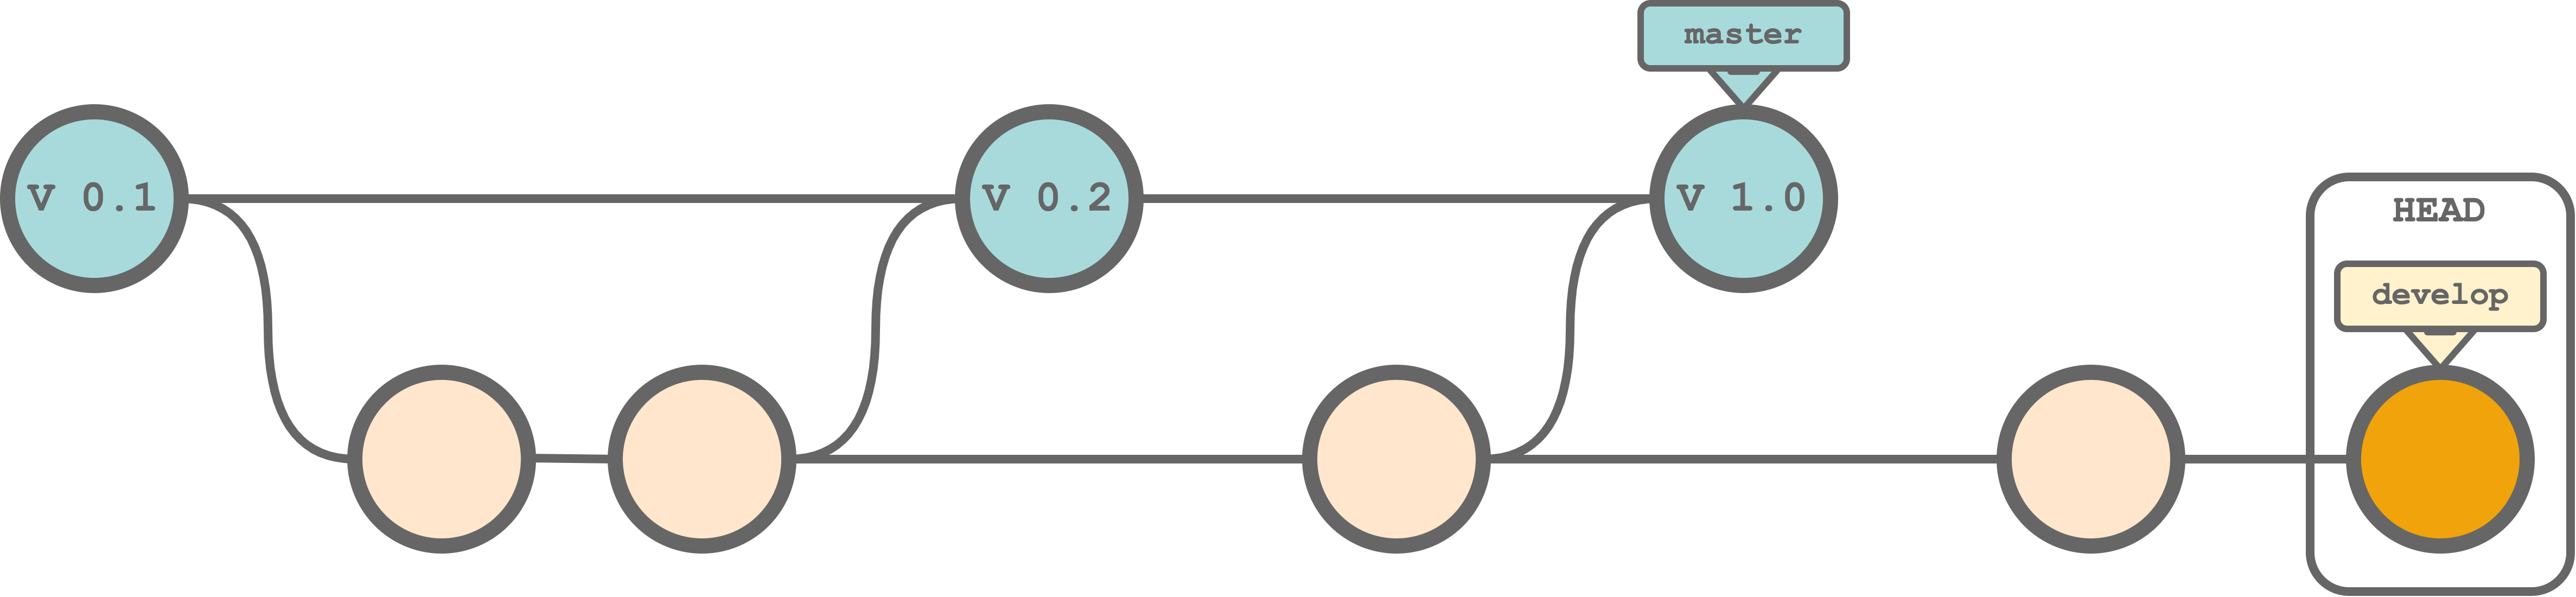
7.5.1 Two Branches Approach
A first workflow is based on two branches approach:
master. This branch is used for official releases of our project. This branch contains only working stable versions of our project that other people can install and use.develop. This branch is used for the development of new features or any other operation required for project development (e.g., debugging or documentation). This branch contains the latest updates but the version could not be stable or not even working.
Following this approach, a stable version of our project will be always available in the master branch and we can proceed in the development without warring about breaking our project in the develop branch. Once we reach a new stable point, we can release a new version of our project by merging the develop branch in the master branch. Note that we do not delete the develop branch after the merge, but we keep using it for the project development.
7.5.2 Multiple Branches Approach
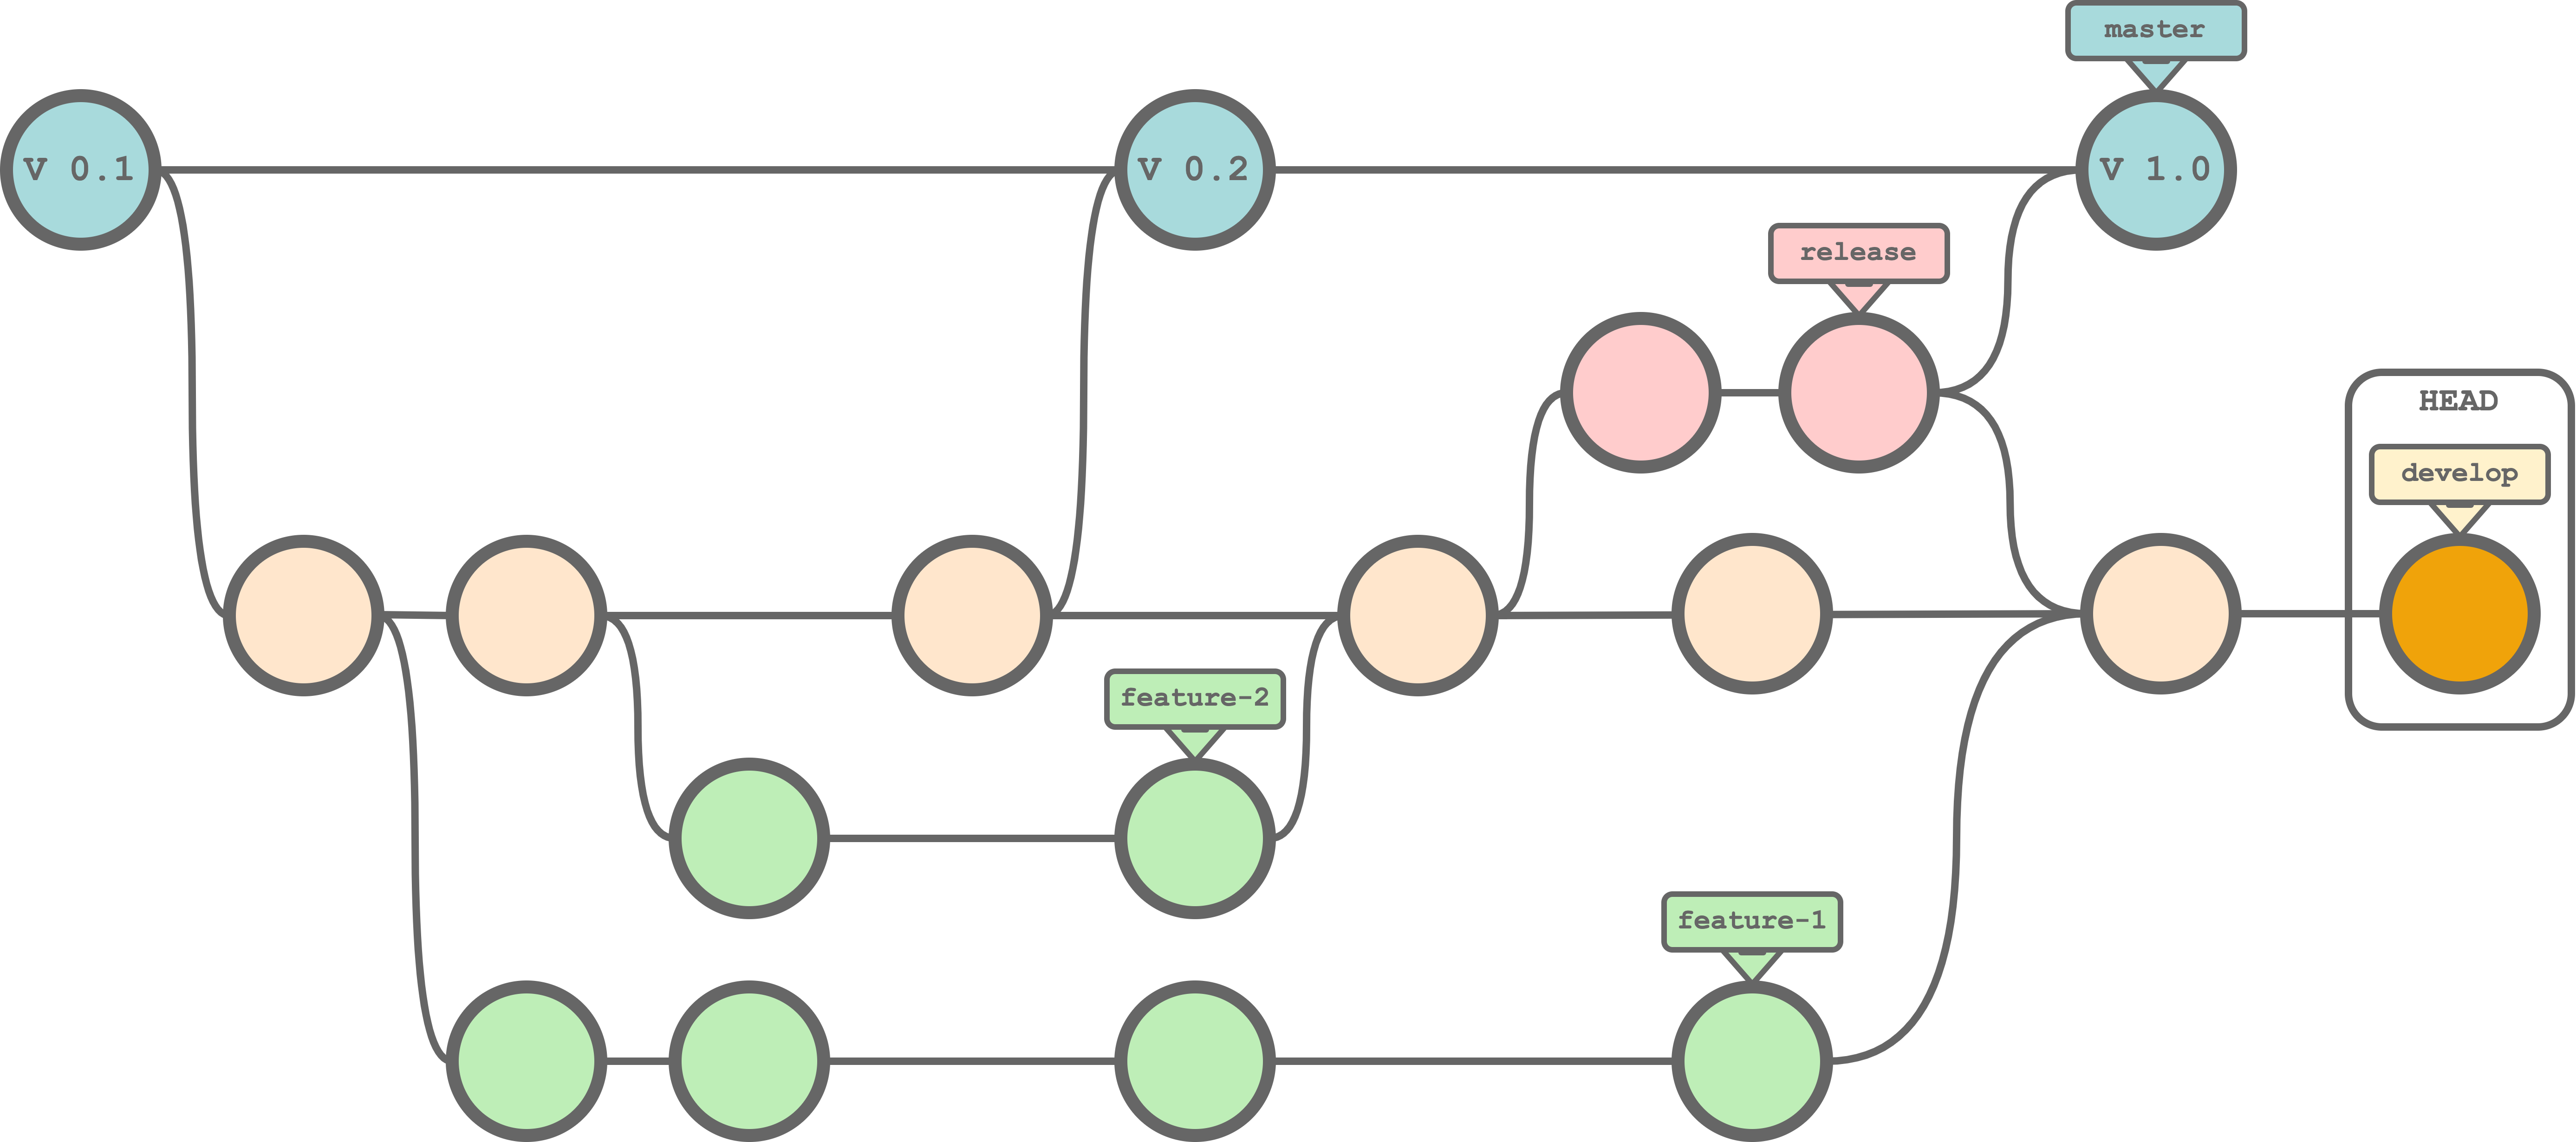
If the project is more complex and composed of multiple parts, we can follow another workflow based on multiple branches approach:
master. As before, this branch is used for official releases of our project. This branch contains only working stable versions of our project that other people can install and use.develop. Again, this branch is used for the project development. This time, however, any new feature is developed on a separate branch and in this branch we maintain a development version of the project with the latest working stable updates.feature-*. Any new feature is developed independently on a separate branch and merged back into thedevelopbranch only when ready.release. When ready for a new release, this branch is used to ultimate the last changes before merging into themasterbranch. This branch is used to fixing bugs, creating documentation or other minor changes required for the release.
Following this approach, we can manage independently the development of different features. Only when a new feature is ready, we merge it into the develop branch and then we delete the (now useless) feature branch. In this way, we always keep a working version of the project with the latest updates in the develop branch from where we can start working on new features or fix other problems.
When we are ready for a new release we can use the release branch for the last changes required before releasing while the development can freely continue on the develop branch. Note that after the release, before deleting the release branch, it is important to merge the release branch also into the develop branch to keep all updates during the development.
For more information and about the Git Workflow, see https://www.atlassian.com/git/tutorials/comparing-workflows/gitflow-workflow.
7.6 RStudio Git GUI
RStudio provides a useful GUI to manage the Git workflow. In this section, we describe how to configure Git in RStudio and use the RStudio GUI to manage the principal Git operation using the RStudio GUI. More details are provided in:
Remember, GUIs are attractive, but it is important to familiarise also with the Git command line interface. No GUI provides all the commands and options available in Git. At some point there will be no button to click to solve our problems but a single line of code could save us.
7.6.1 Configure Git in RStudio
To use Git in RStudio, we need to activate the version control interface. To do that:
Open the “Tools -> Global Options”
Select the “Git/SVN” tab
Select “Enable version control interface for RStudio projects”
Specify the path to the Git executable (in Windows, we can choose to use Git Bash as shell). To check where Git is installed, we can run from the terminal,
# Windows
where git

# Linux (macOS)
which git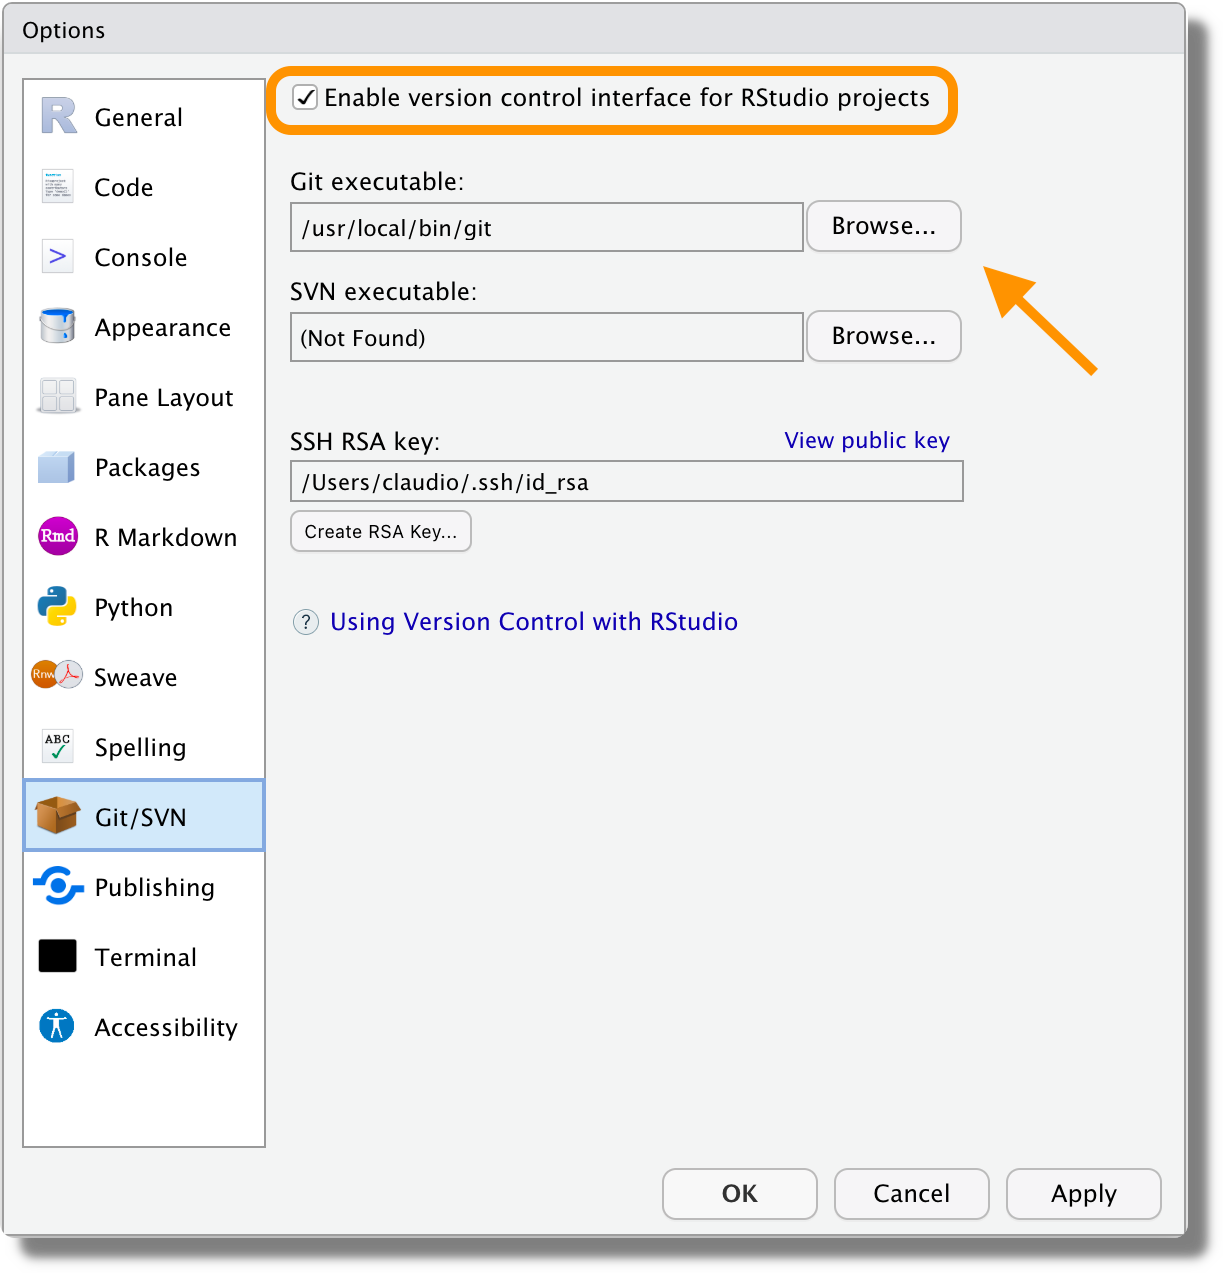
Restart RStudio, the Git icon should appear in the toolbar

7.6.2 Using Git in Rstudio
We now describe how to execute the main Git operation using the RStudio GUI.
7.6.2.1 Create a Git Repository
We can create a Git repository in different ways:
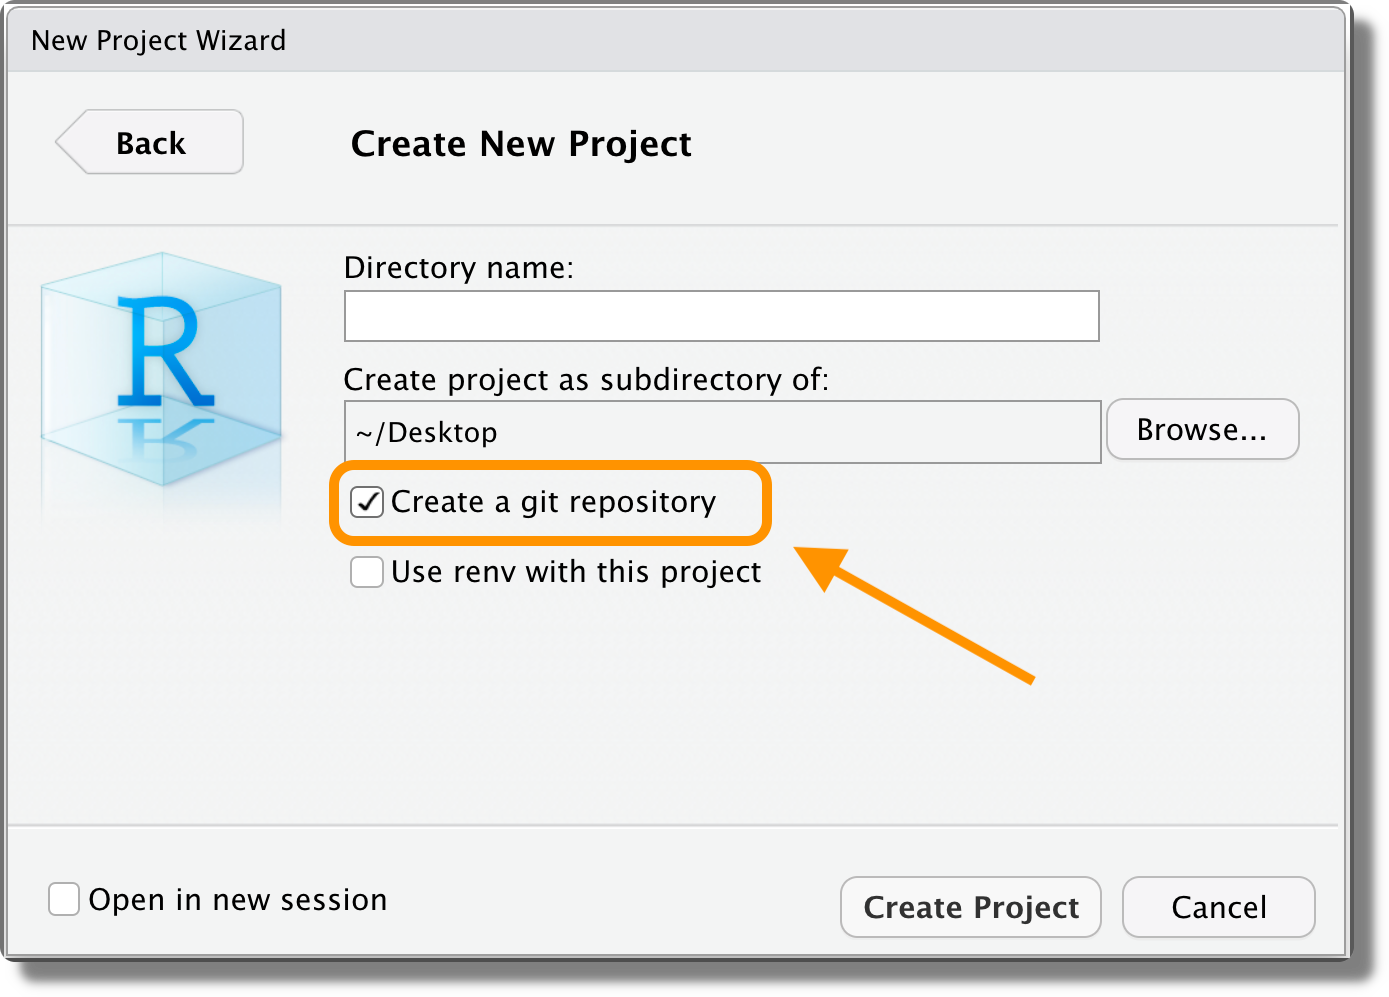
Create a New Project. When creating a new project in a new directory (“File > New Project… > New Directory”), select the “Create a git repository” option.
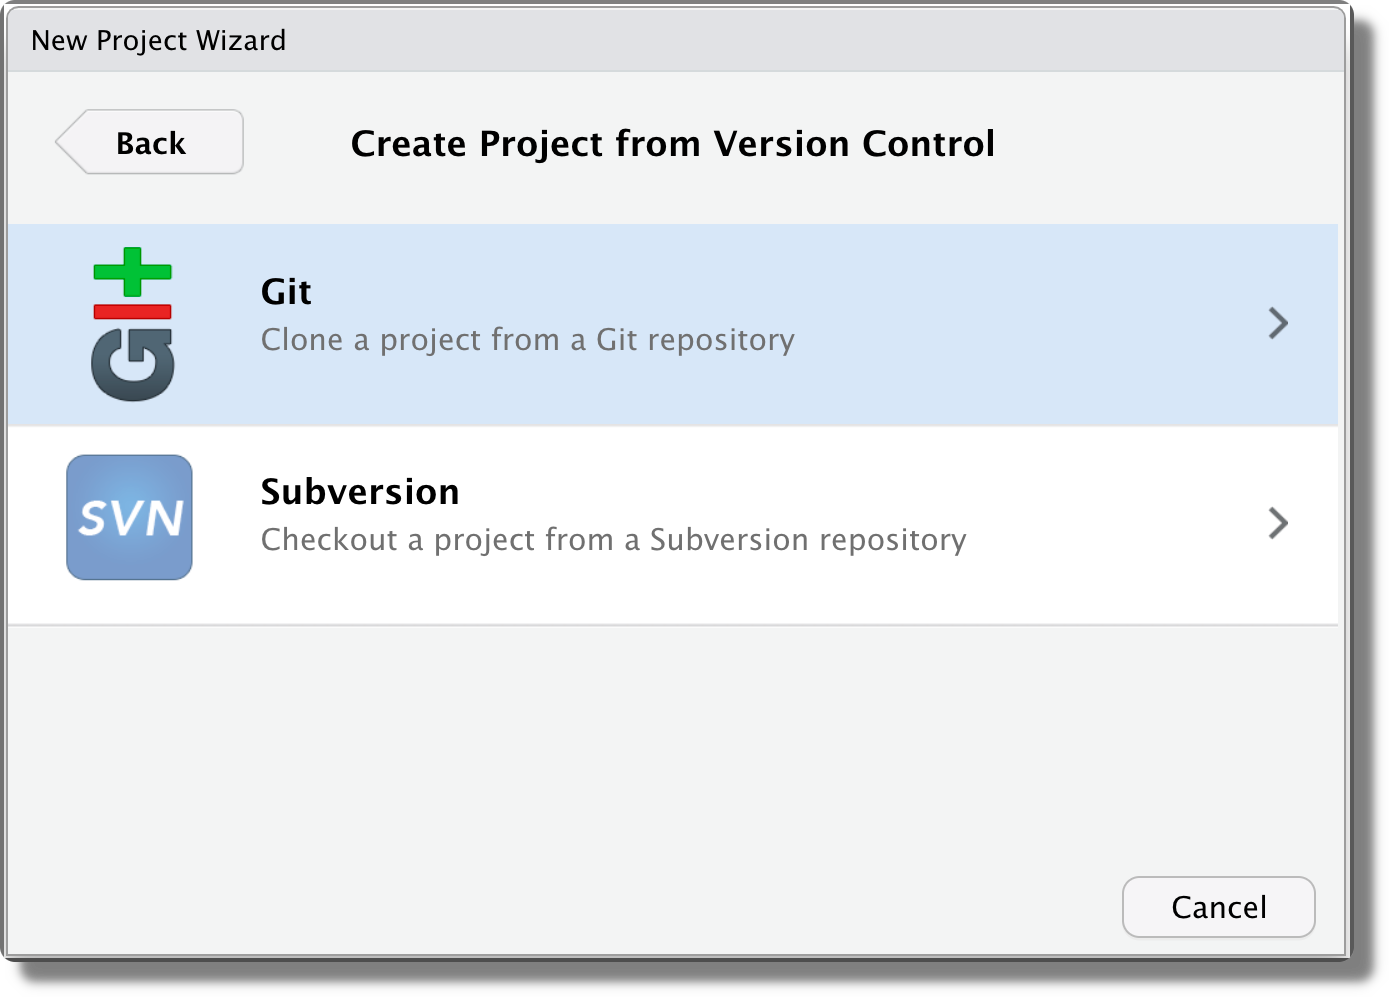
Clone a Remote Repository. We can create a new project cloning a remote repository. From “File > New Project…”, select “Version Control”.
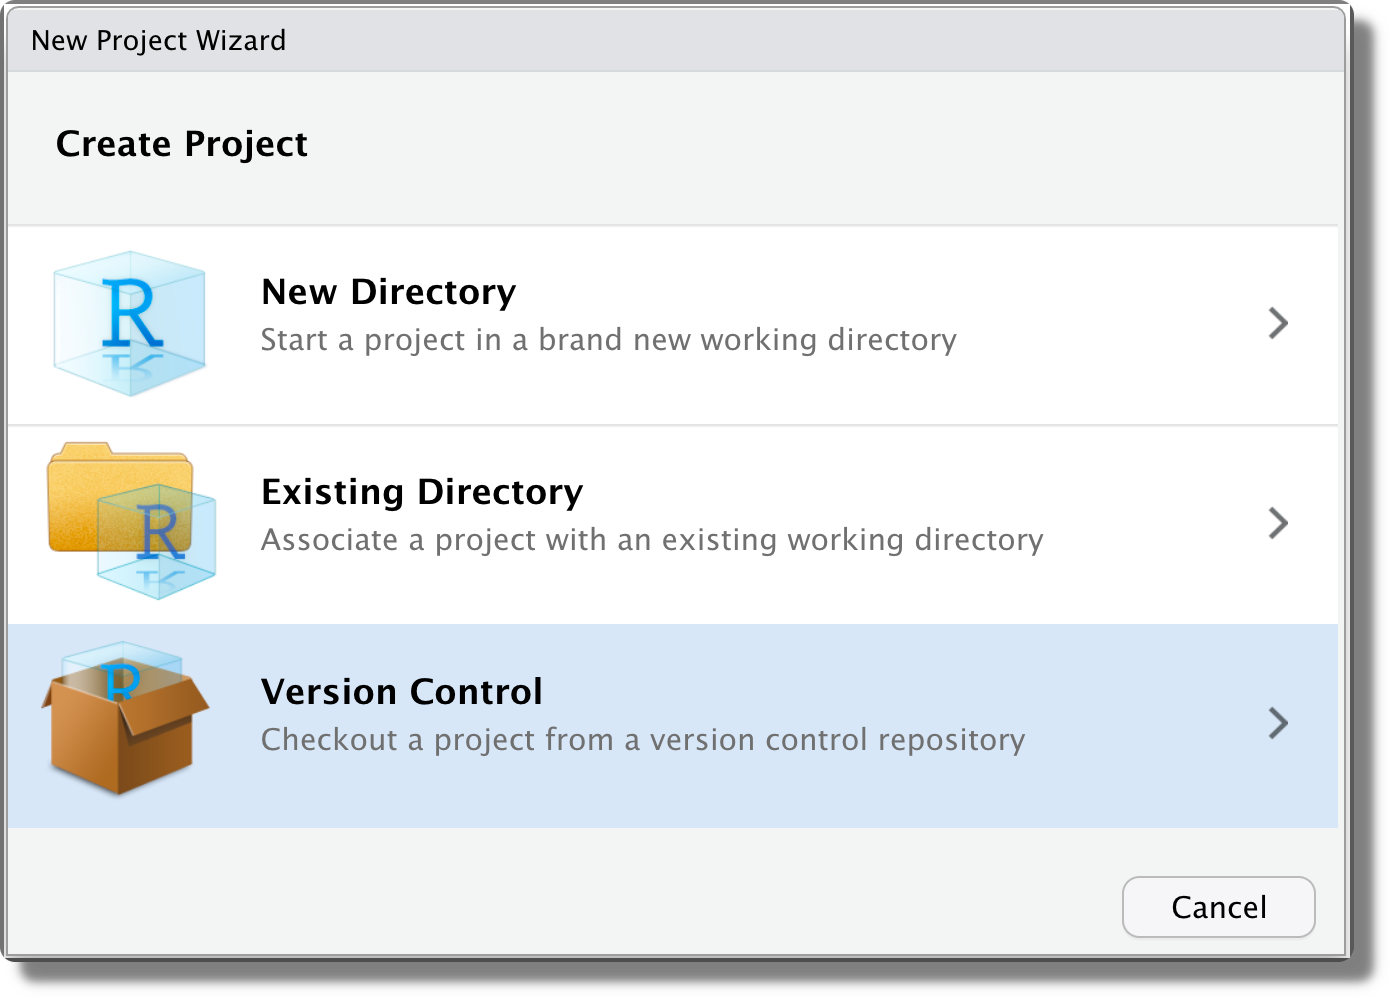
Next, select “Git”.
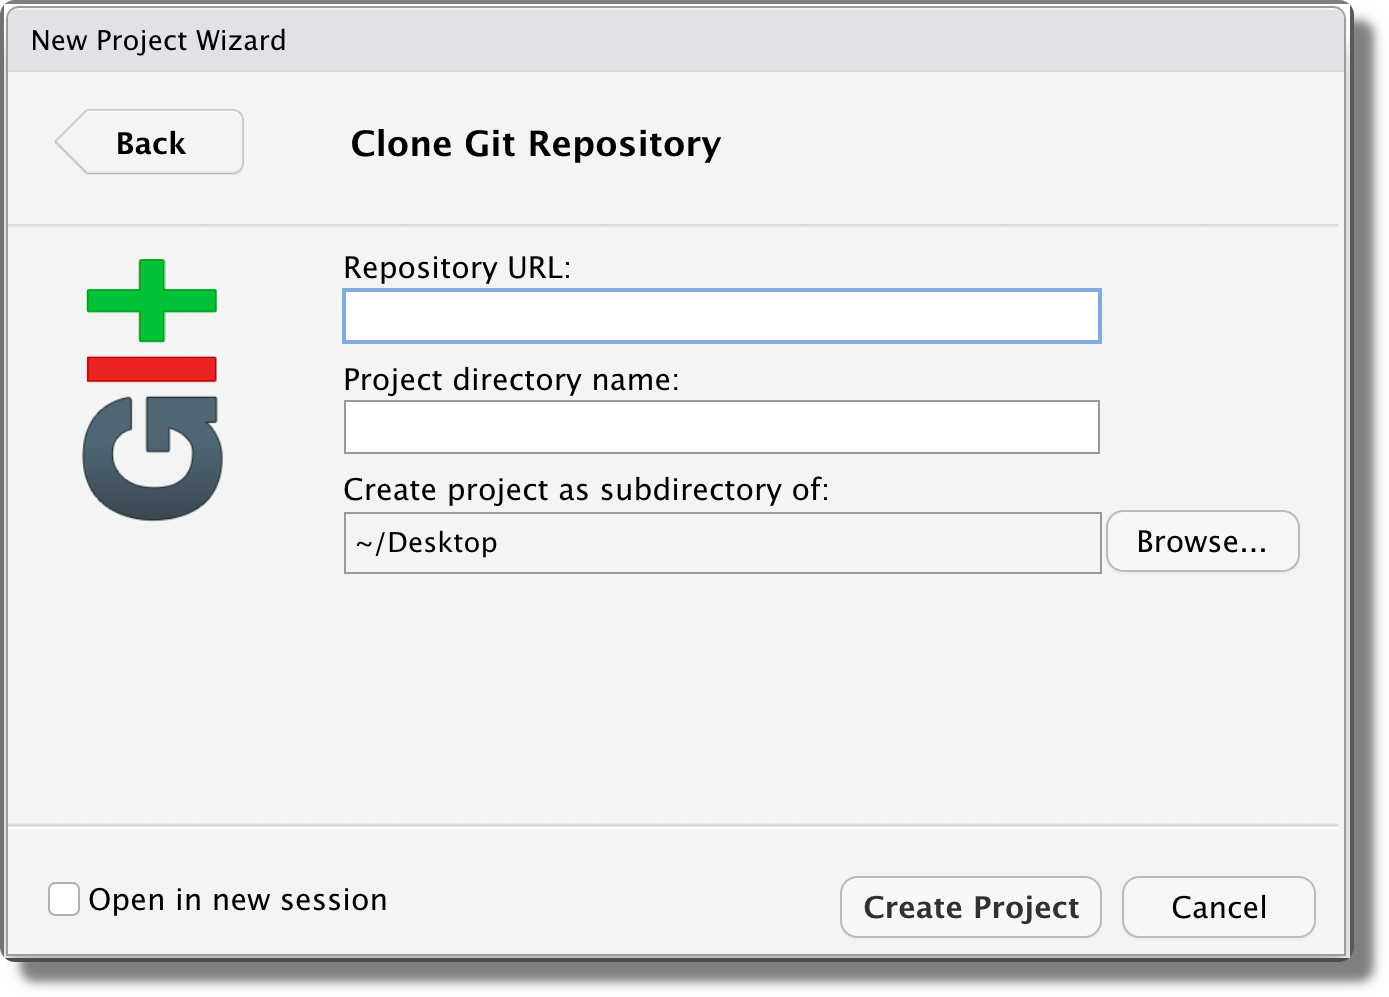
Specify the remote URL and click “Create Projet”.
Init Existing Project. To enable Git in an already existing project, we can use the command
git initfrom the terminal. Next, we need to restart RStudio (close and open it again).
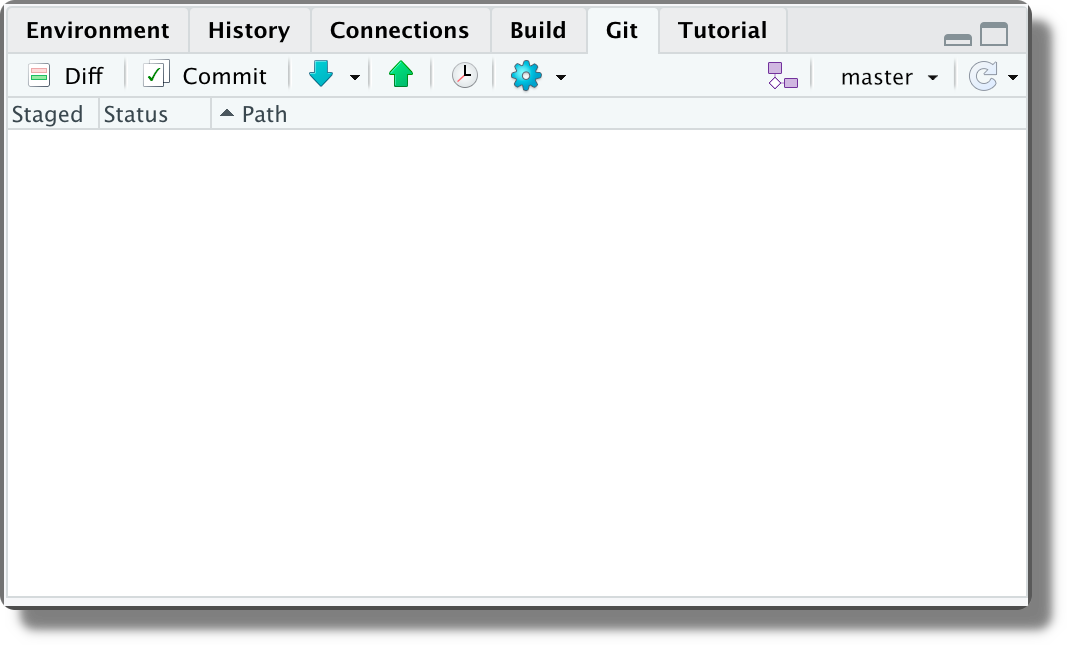
7.6.2.2 Git Panel
When working on a Git repository in RStudio, a new panel named “Git” is displayed (by default in the top-right corner).
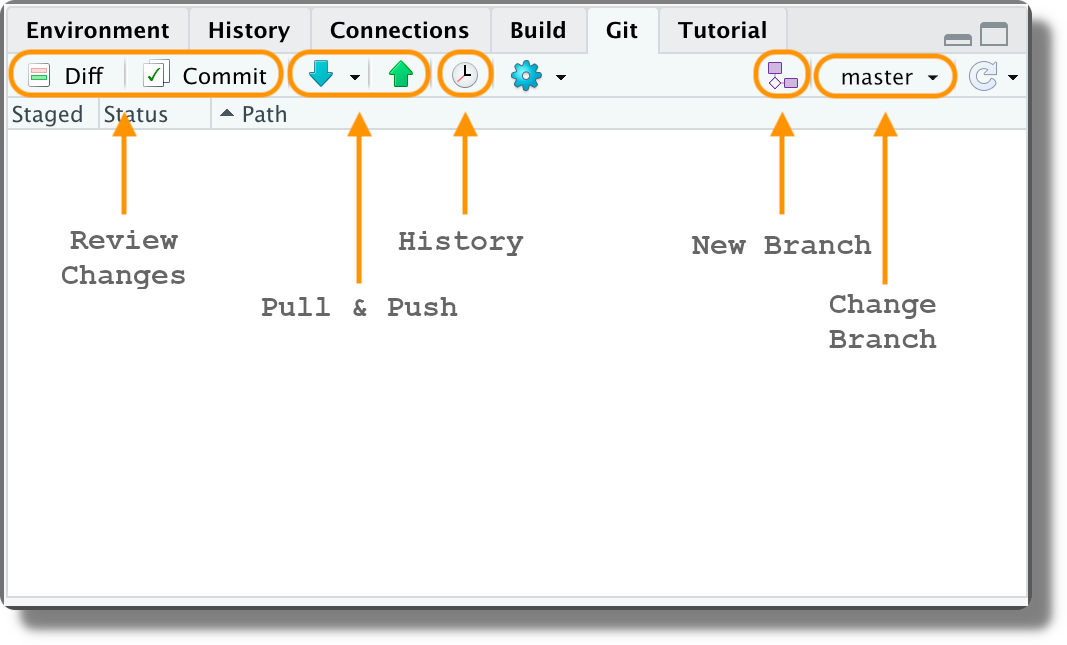
This panel allows us to execute the most common Git operations. In particular,
- Review Changes. Open the “Review Changes” window to evaluate the specific differences within each file and create new commits.
- Pull & Push. Pull or push commits between the current branch and its remote upstream.
- History. Navigate the commit repository history.
- New Branch. Create a new branch (local and remote).
- Change Branch. Change the active branch.
7.6.2.3 Tracking Changes
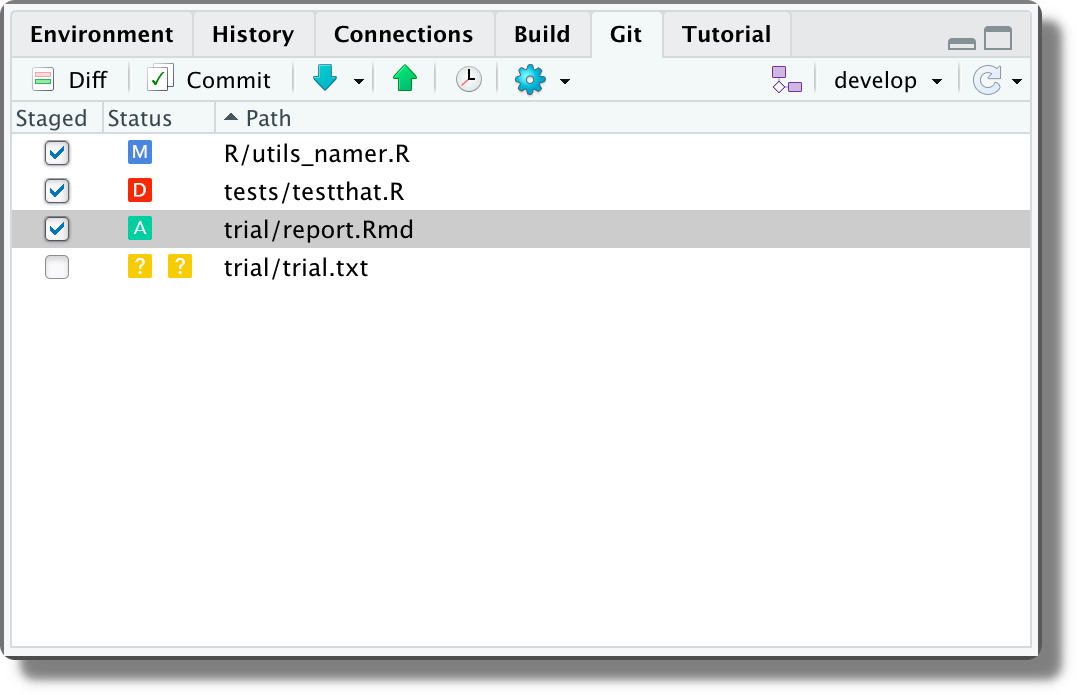
When we create, modify or delete files, these will be listed in the Git panel.

Each file is preceded by an icon indicating the file status:
 Untracked. A new untracked file.
 Added. An untracked file is added to the staging area.
 Modified. The content of the file has been modified.
 Deleted. The file has been deleted.
 Renamed. The file has been renamed.
 Conflict. The file contains a merge conflict.
Staging and Commiting. We can stage files directly form the Git panel by selecting the desired files.
Alternatively, we can open the “Review Changes” window by clicking the “Diff” or the “Commit” button. This window allows us to review changes in each file before staging them.
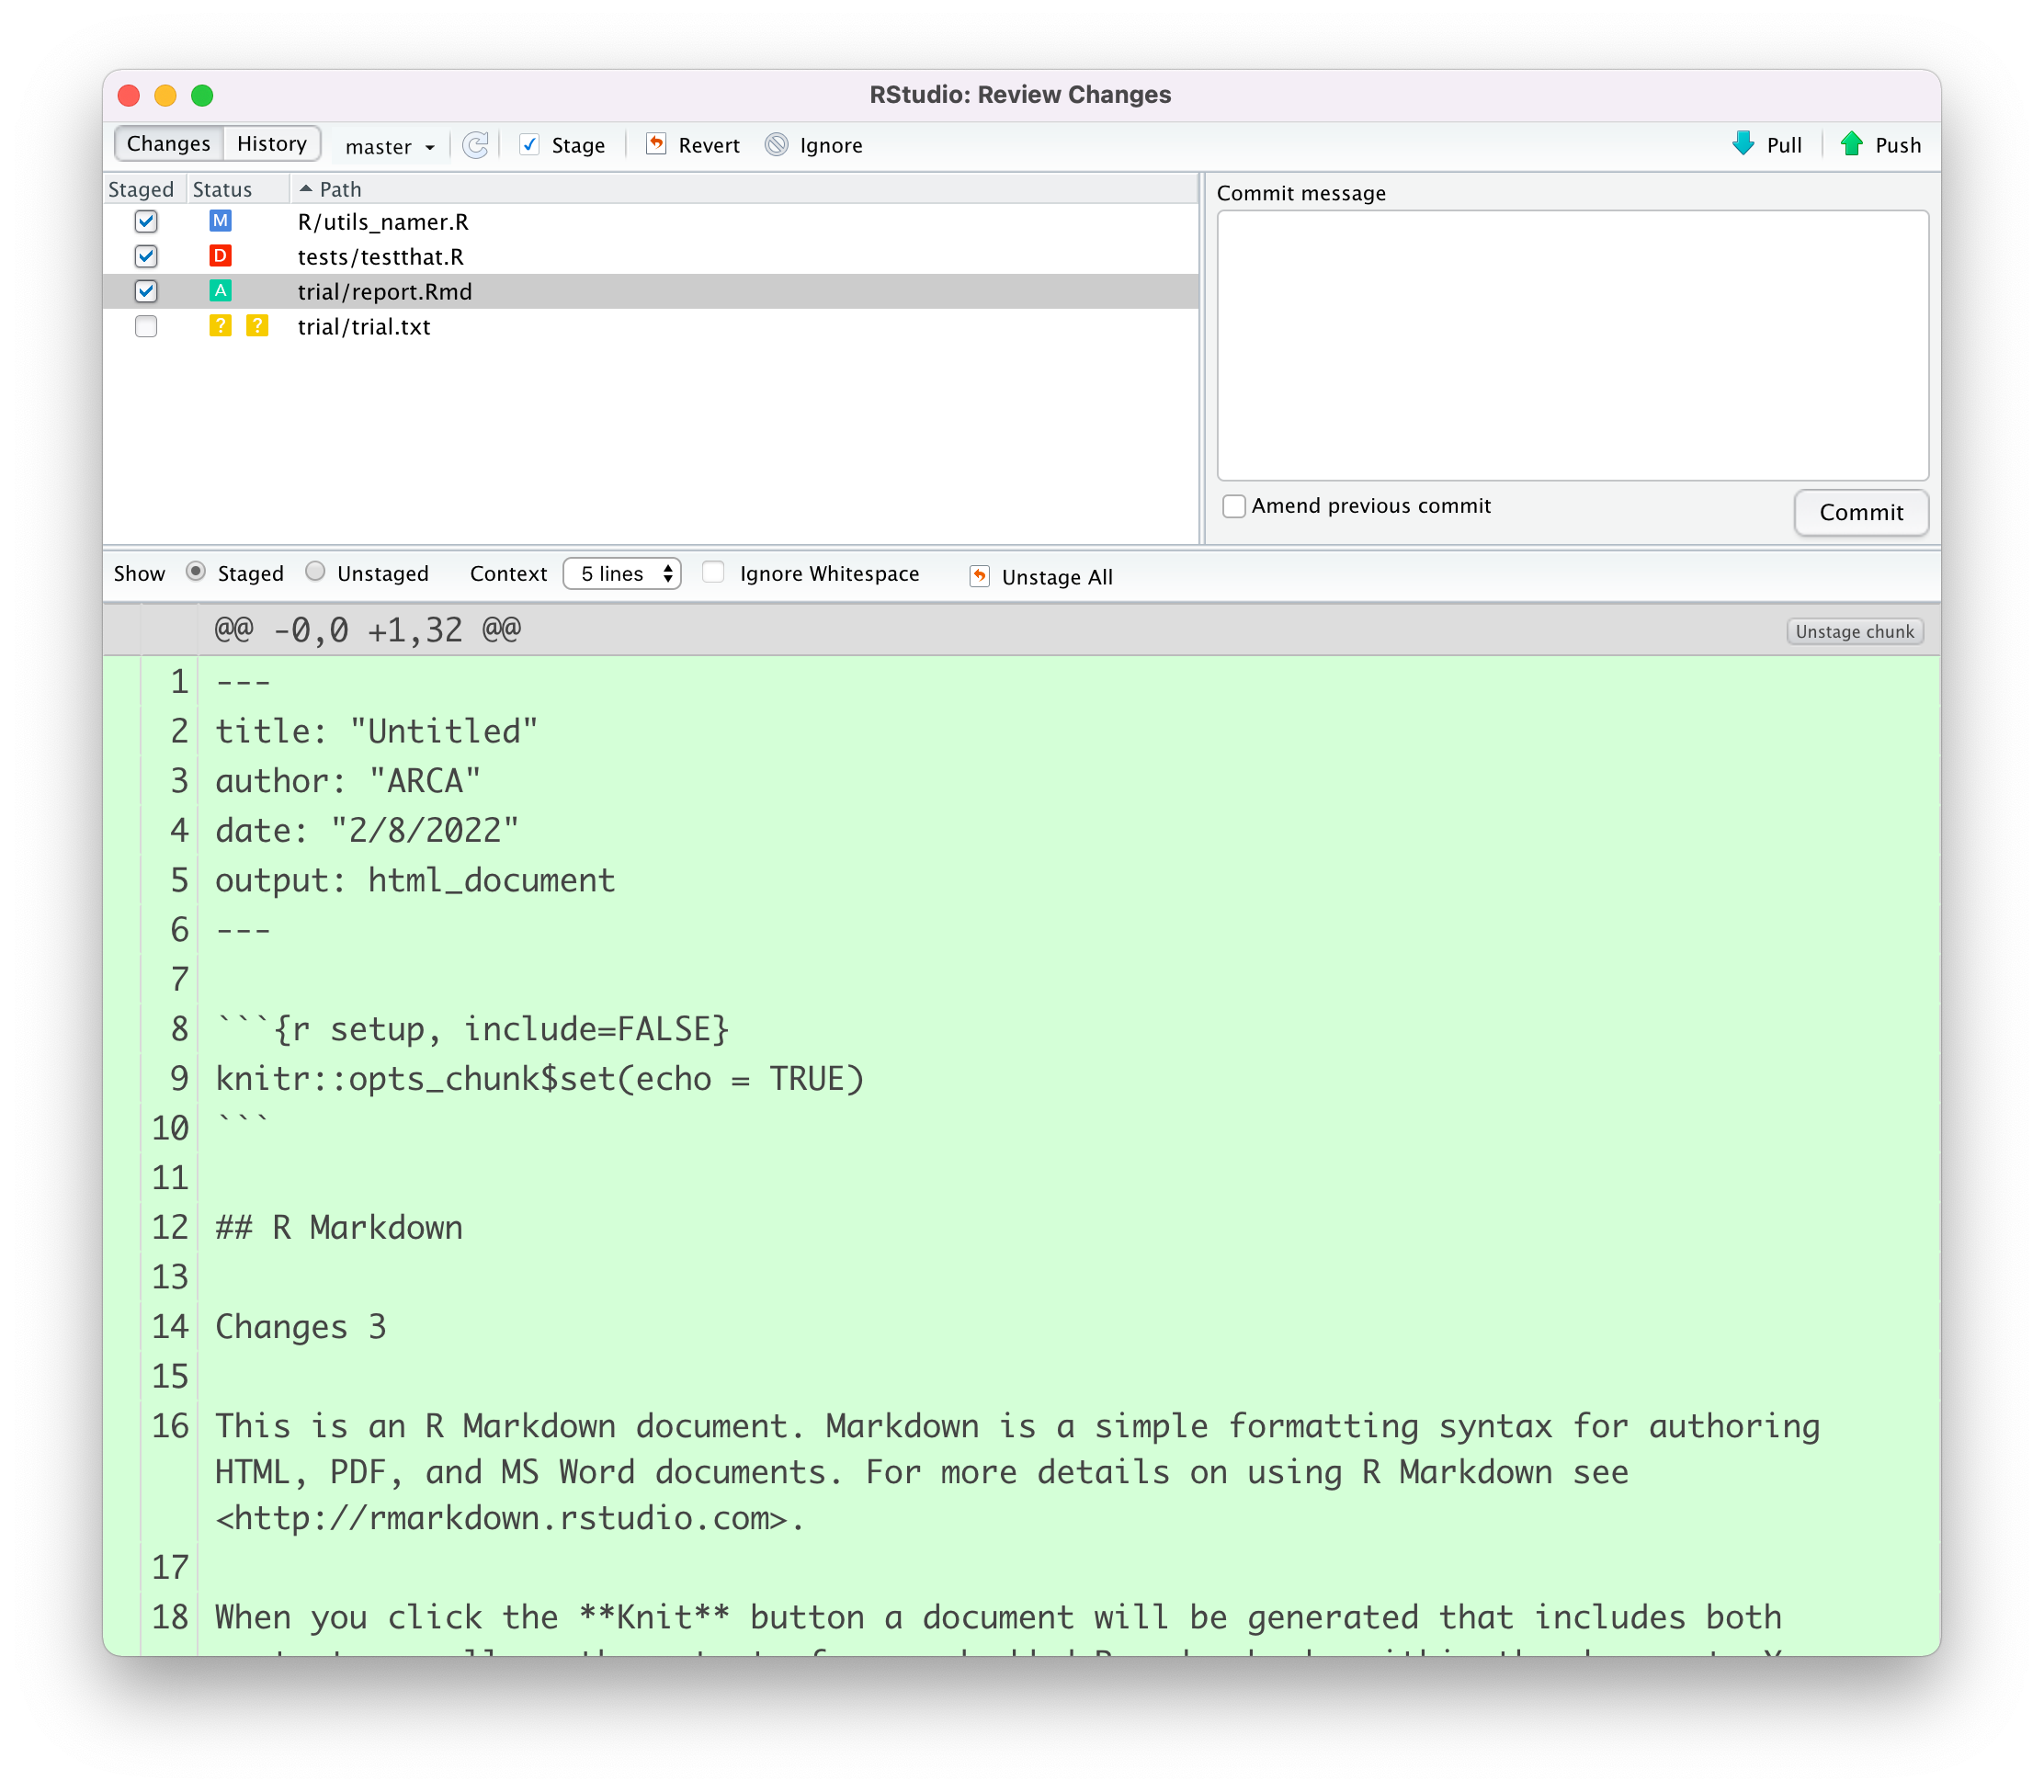
File specific changes are displayed highlighting in red the deleted lines and in green the new lines. Reviewing changes is very useful to check that we did not accidentally changed some part of the code.

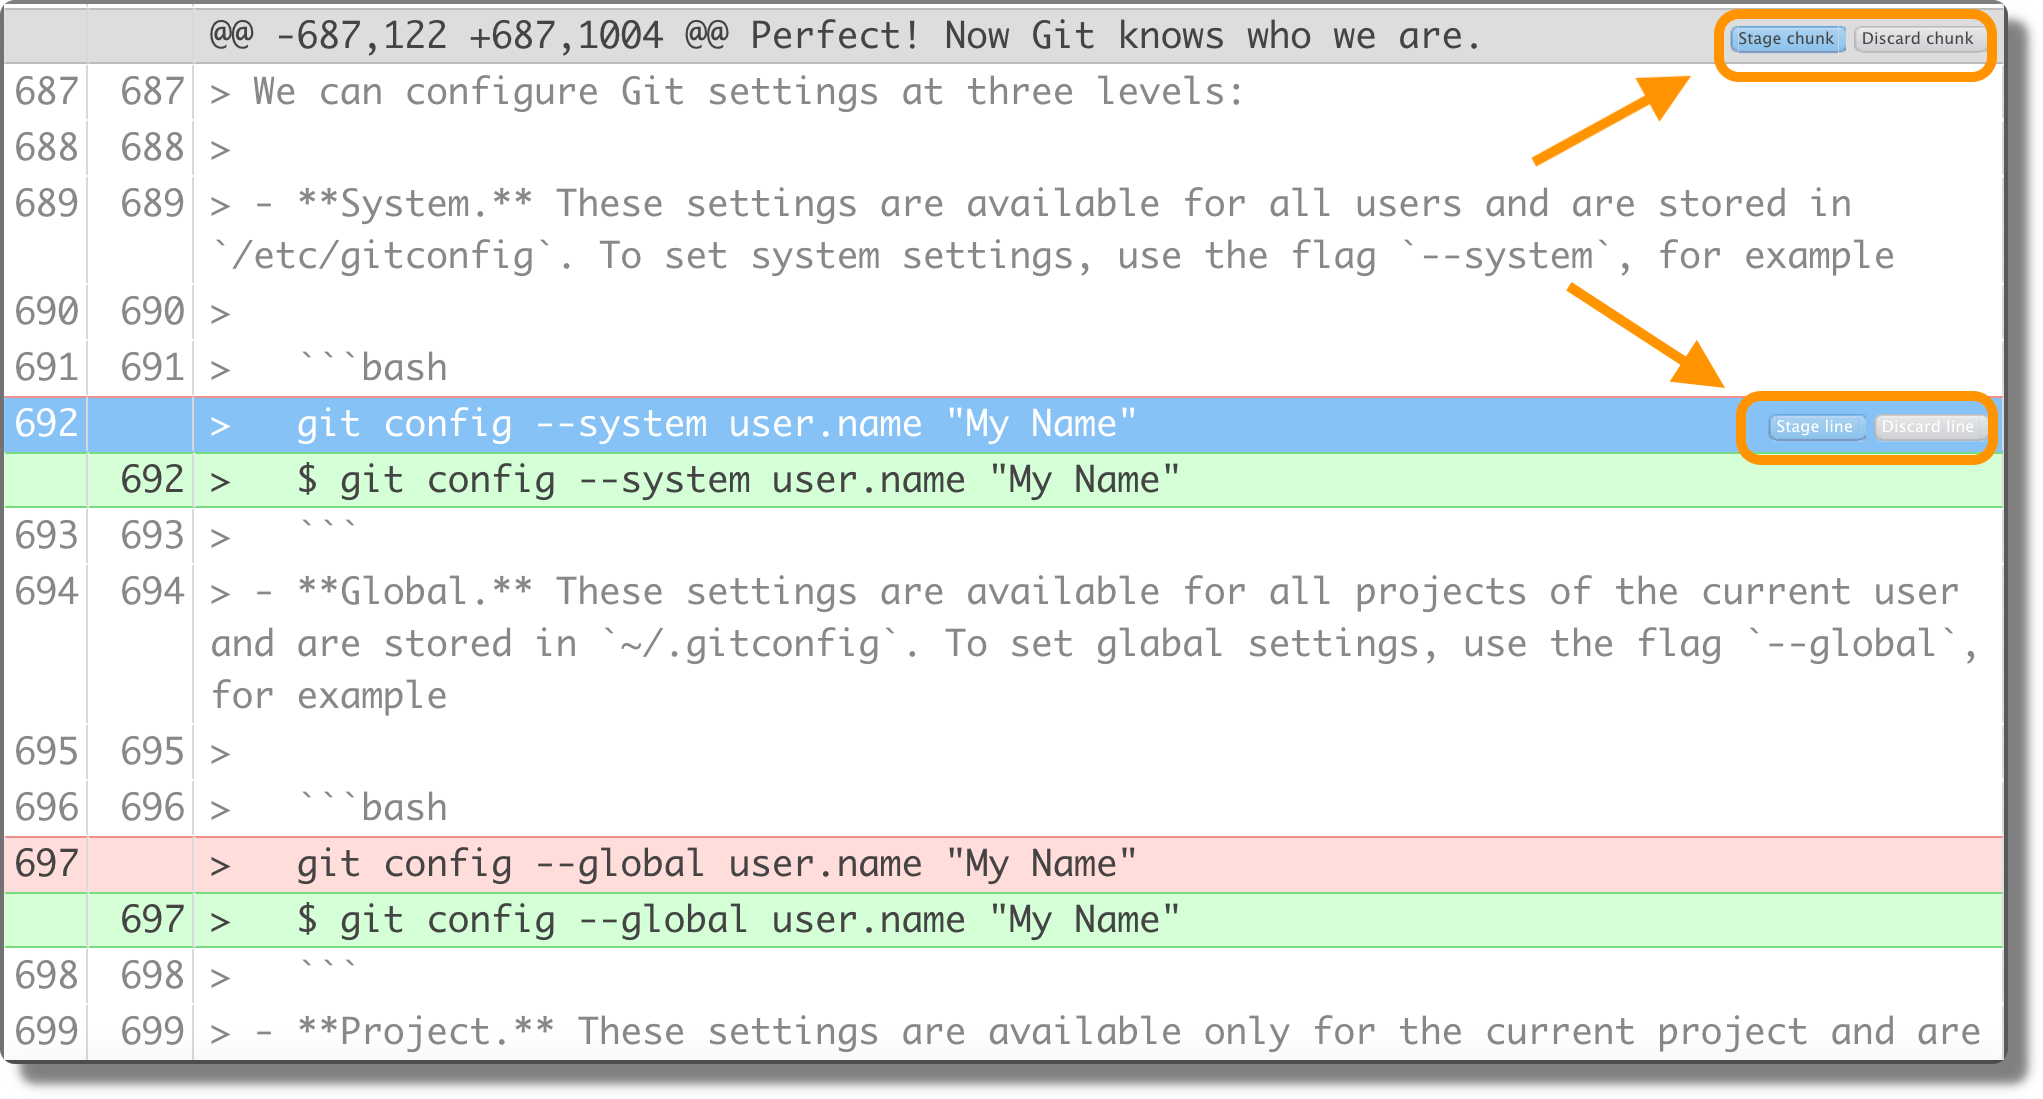
We can also stage or discard single chunks or a single line of text.
Once we have staged all the desired files, we write the commit message and click the “Commit” button.

Commit History. We can open the commit history window by clicking the history icon (or selecting “History” from the “Review Changes” window).
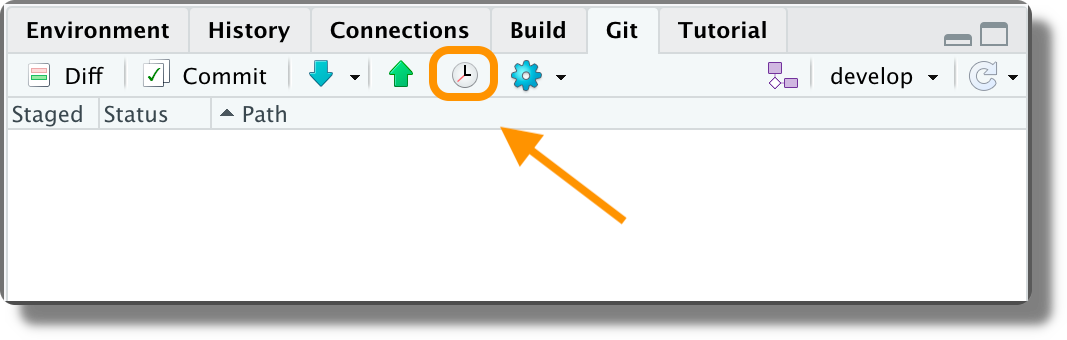
From here, wee can check all previous commits and see all the changes to the files.
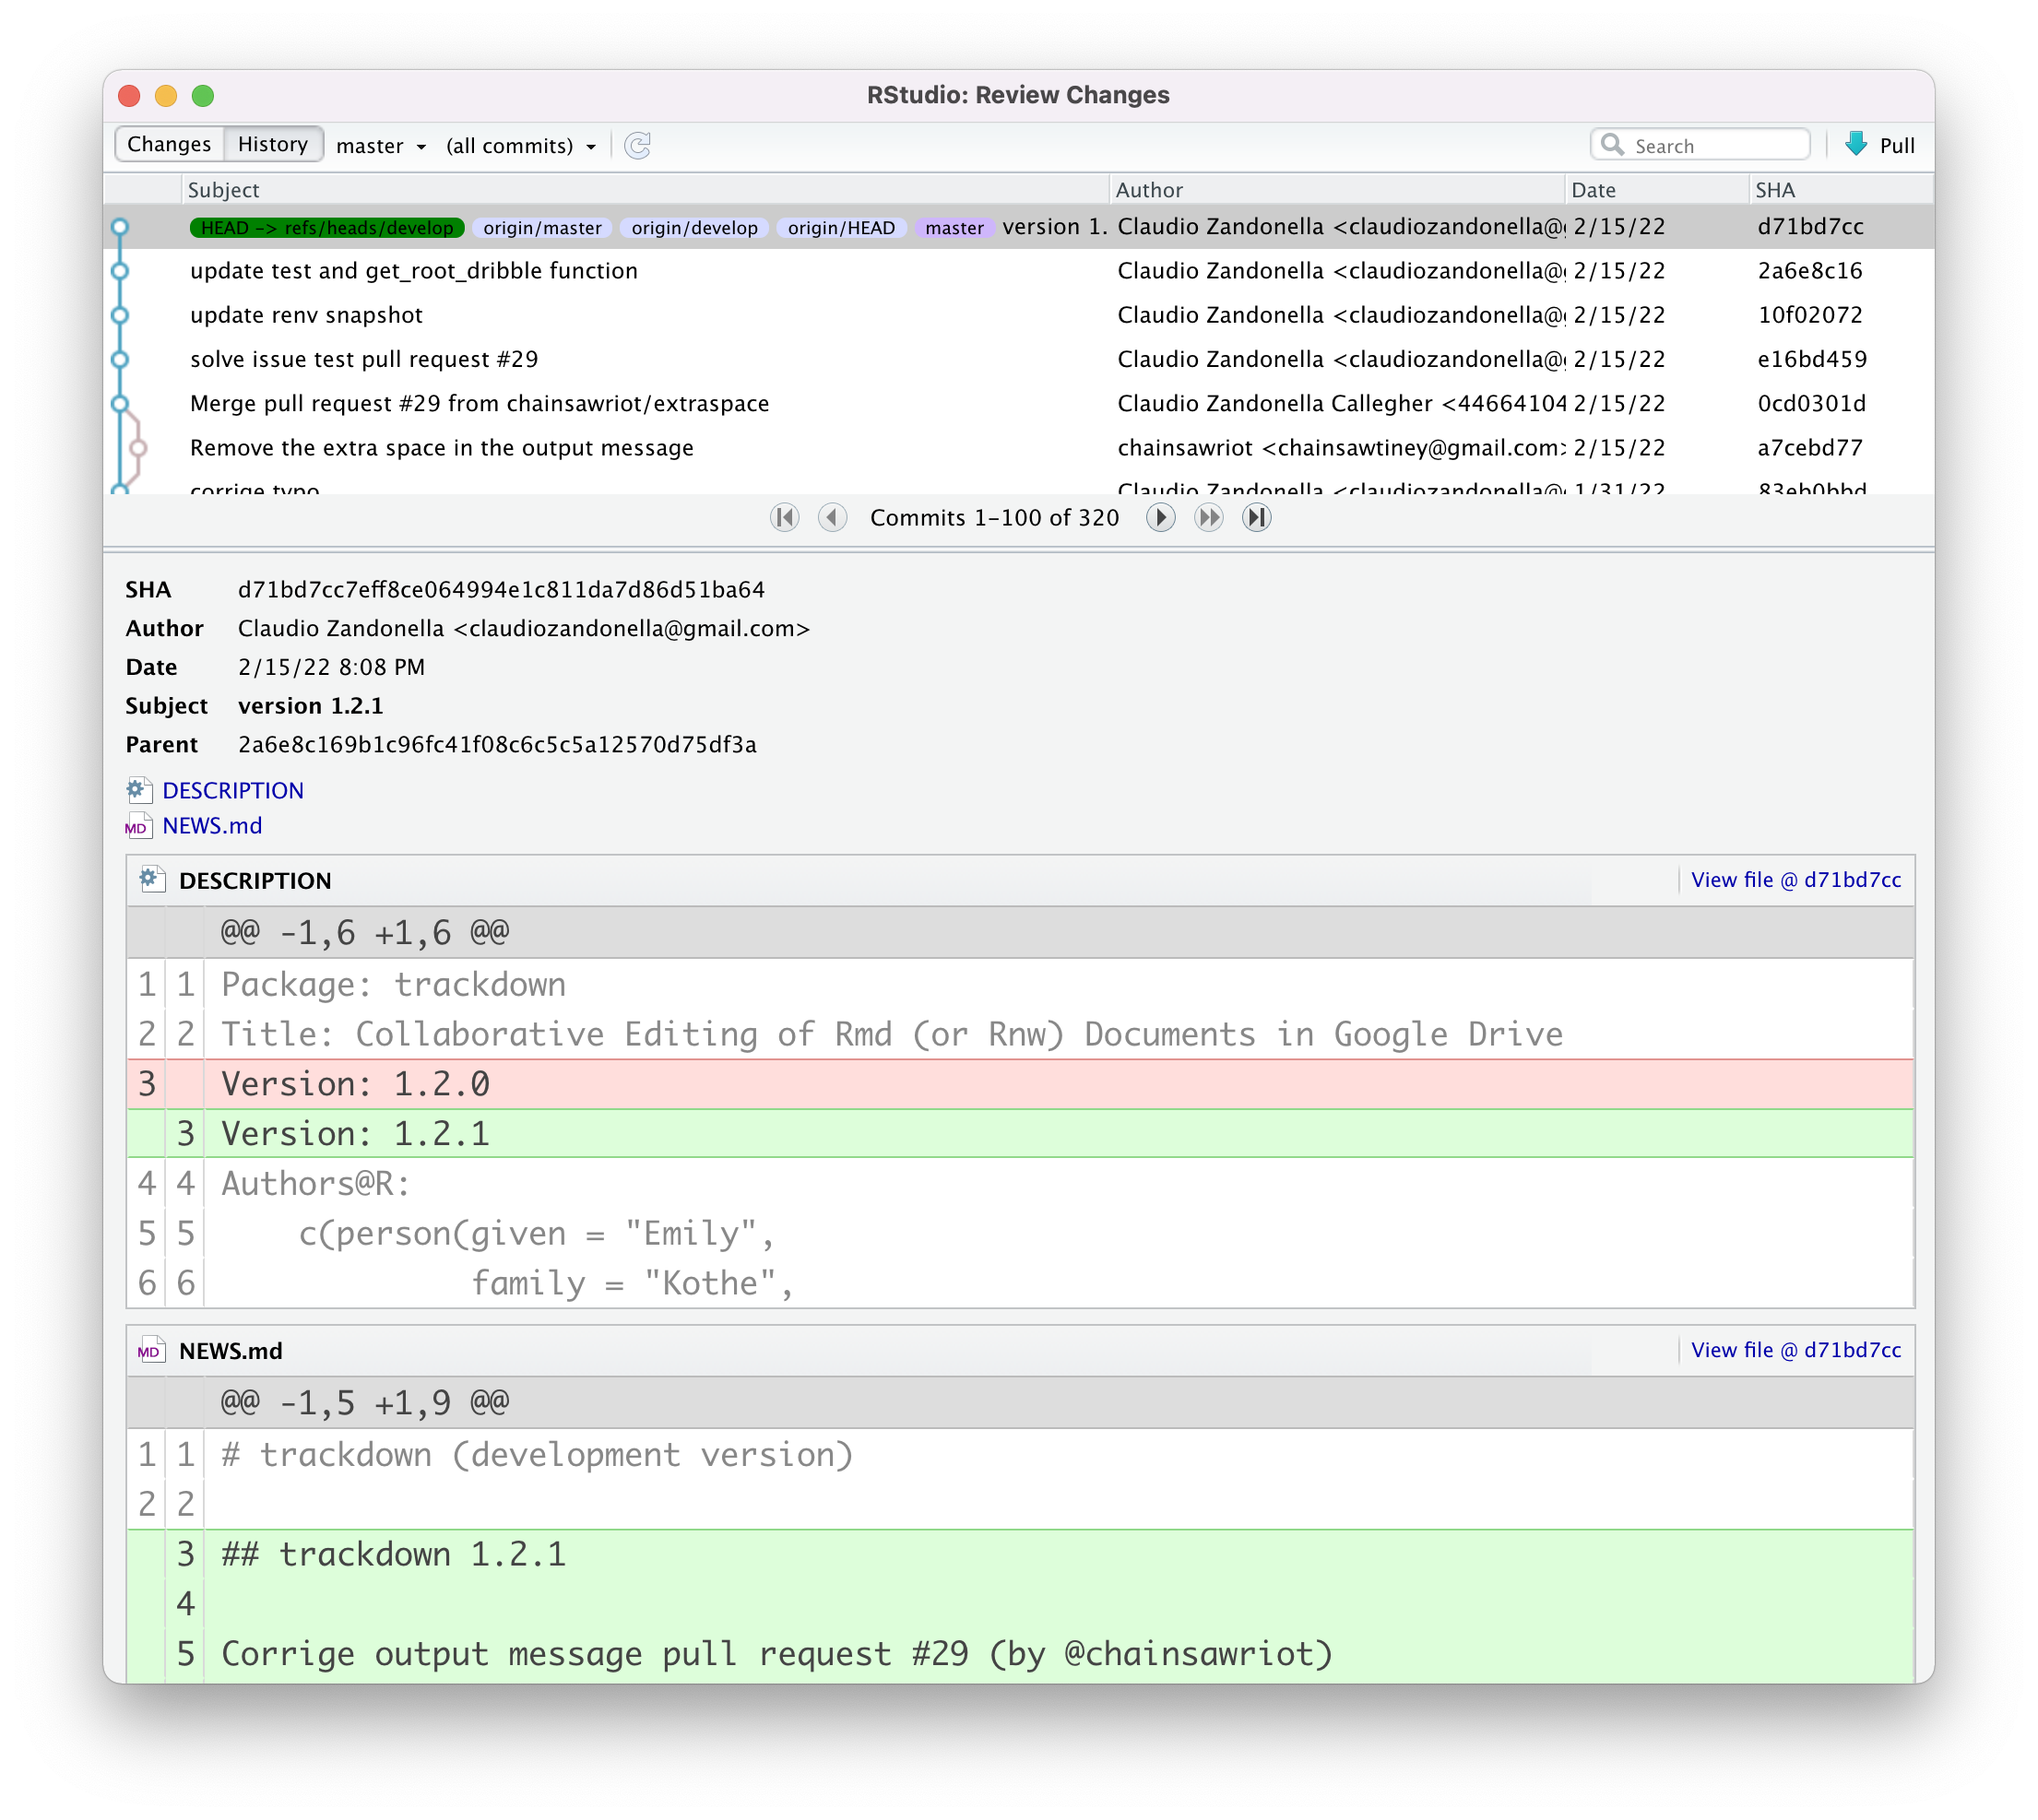
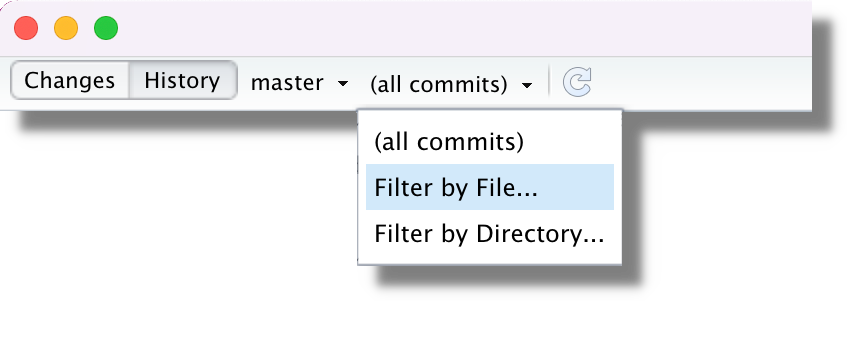
Note, that we can filter commit history according to a specific branch or even a specific file.
Undoing Changes. From the “Review Changes” window, we can undo current changes by selecting the desired file and clicking “Revert” from the top menu.

We can not undo commits or modify commits history from the RStudio GUI. All these actions can be done using the Git command line interface.
7.6.2.4 Managing Collaboration
To add the remote repository URL, we need to use the terminal. The command is,
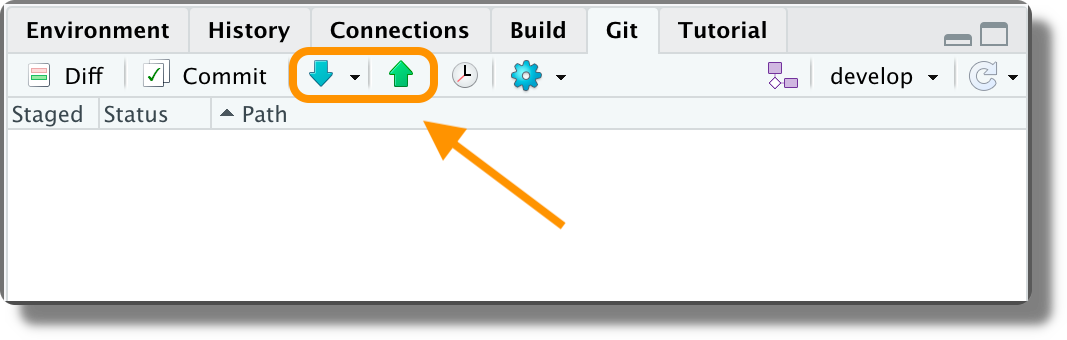
$ git remote add <remote-name> <remote-URL>Once we set the remote, repository we can proceed by Pushing and Pulling commits using the arrows in the Git panel (or in the “Review Changes” window).
To collaborate using remote repositories, we need specific authorization or authentication protocol (e.g., login credentials or SSH keys).
We discuss authentication procedures and SSH protocols in Chapter 8.1.2.
7.6.2.5 Branching and Merging
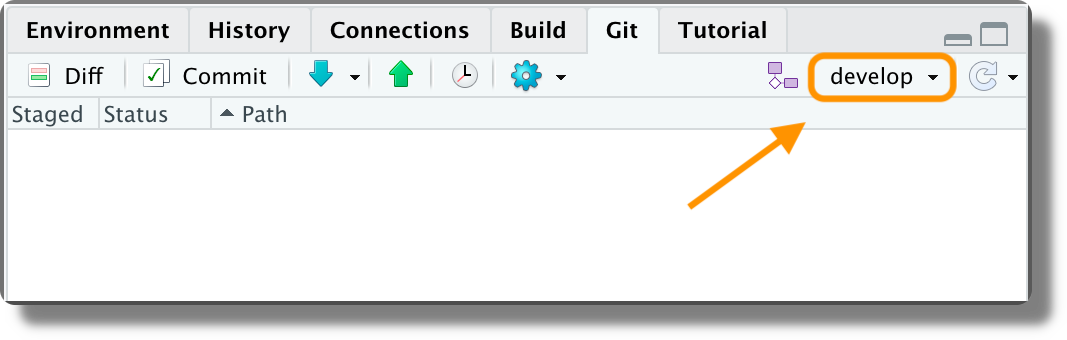
We can change the currently active branch from the top-down menu in the Git panel.
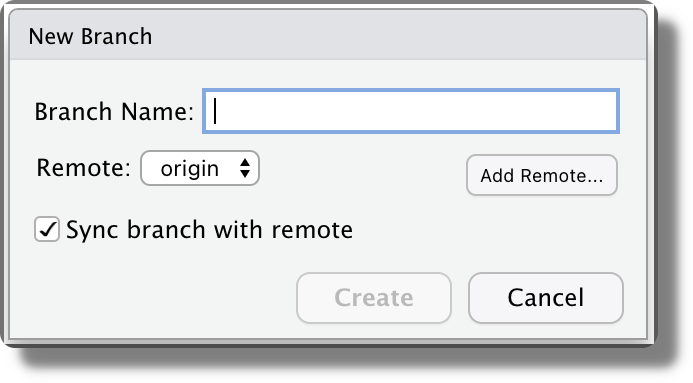
We can create a new branch clicking the branch icon in the Git panel.
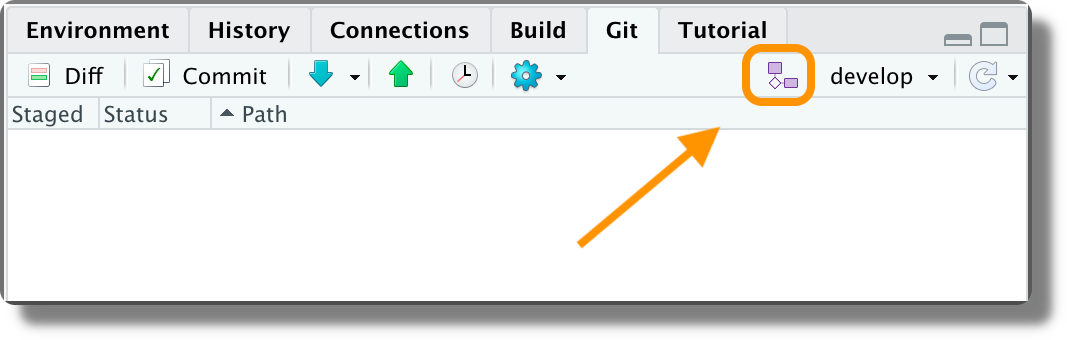
A pop-up window will open in which wee can specify the branch name. By default, also an upstream branch in the remote repository is created.
We can not merge branches from the RStudio GUI. Merging operations can be done using the Git command line interface.
Install Git
- Install git
https://git-scm.com/downloads.
Git Tutorials
- Bitbucket Git Tutorial
https://www.atlassian.com/git/tutorials - Pro Git Book
https://git-scm.com/book/en/v2 - Git Official Manual
https://git-scm.com/doc
Git Extra
- Configuration files
https://stackoverflow.com/questions/8801729/is-it-possible-to-have-different-git-configuration-for-different-projects/5412596 - .gitignore file
https://www.atlassian.com/git/tutorials/saving-changes/gitignore - Fetching
https://www.atlassian.com/git/tutorials/syncing/git-fetch - Git workflows
https://www.atlassian.com/git/tutorials/comparing-workflows/gitflow-workflow.
RStudio Git GUI
- Version Control with Git and SVN
https://support.rstudio.com/hc/en-us/articles/200532077 - Git and GitHub
https://r-pkgs.org/git.html